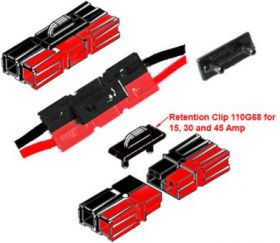
When it comes to connecting high power batteries to drive systems on your ebike there really is only one viable option. Anderson Powerpole connectors come in 4 main power ranges, the 15 amp, 30 amp, 45 amp and much larger 50+ amp connectors. For almost all applications I recommend getting the 45 amp connectors as the price difference is negligible and it’s better to have the higher amperage connectors even when running at lower power levels. The Anderson has a sacrificial tongue which will take the brunt of the spark that will inevitably be created every time you hook up your high power battery.

The powerpole comes in a large variety of sizes and power levels, I recommend the red/black 45 amp connectors
When using Anderson connectors I usually run the wiring on 10 gauge multi-stranded speaker wire (red/black is my favorite). Although 10 gauge is far more than what you need at most power levels, it means you have lower voltage drop and the cable will not heat up. It also means that the insulation will tend to be a little thicker than the lighter gauge wiring, and I like to have stiff wires that don’t flop all over the place.
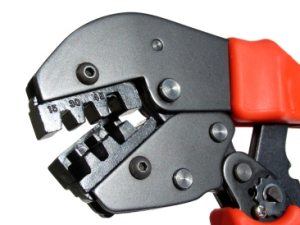
A good set of crimpers will pay for itself many times over. A bad set will give you endless headaches and frustration.
The Anderson Powerpole connectors come in a wide range of colors, but I recommend red and black for power and then yellow, green and blue for the phase wires just so you’re standardized on the same colors as everyone else. To correctly connect the Powerpole connectors you will need a set of good crimpers. It’s well worth investing $30 for a set of decent crimpers from ebay, I usually buy from connectorpros although there are many vendors for this product.
Crimping the 45 amp connectors is a snap. Just strip off about 7-8 mm of insulation then put the metal connector in the jaws of the crimper into the slot that matches the amp rating stamped on the die. Push the connector in till it stops and then carefully feed the wire into the connector till the insulation hits the metal connector. Then ratchet the tool all the way down and release. Although you can probably crimp these connectors with a standard wire crimper/stripper, I strongly recommend getting the dedicated Powerpole crimpers. They pay for themselves quickly in the amount of frustration they will save you. I am not crazy about the 30 amp connectors, so if you are crimping very fine wires use the 45 Amp connectors and crimp them on the 30 or 15 amp slots as appropriate on the crimpers. This will ensure that they won’t pull out even when crimping on super thin wires.
Safety Note: Never cut through both the power and ground connectors at the same time on your battery. Only work with one side at a time, never have both ends stripped and loose as you might accidentally hit both at the same time with the crimpers if you are not careful. Cut and strip the wire, crimp the connector, then put the plastic housing on it before you start on the other wire. This almost guarantees no fireworks when working on battery connectors.
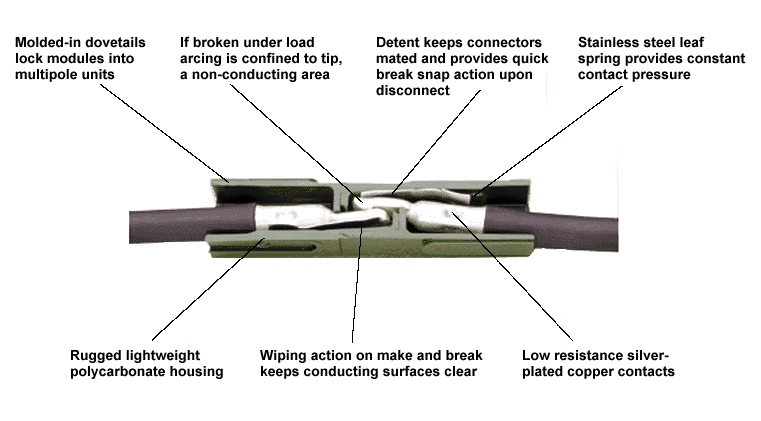
Once the metal connector is crimped on the wire you must push it into the connector with the tongue side down and push it all the way in till it clicks. If it doesn’t click then it’s not all the way in and can pull out. The connectors fit side by side like legos sliding together and becoming a single connector.
The Roll Pin
Retention clips are also available if zipties are a little too ghetto for your build. Be aware that you can’t use the retention clip if roll pins are installed.
There is also a roll pin which gets inserted into the circular hole between the connectors which keeps the connectors from sliding back and forth in relation to each other. This is handy for making a single connector out of multiple connections. If you want the connector to hold tight no matter how hard the wire gets pulled you can use a ziptie or velcro-one ties between the two wires to go around both connectors to keep it from loosening up. If you want to detach it you can cut the ziptie or release the velcro.
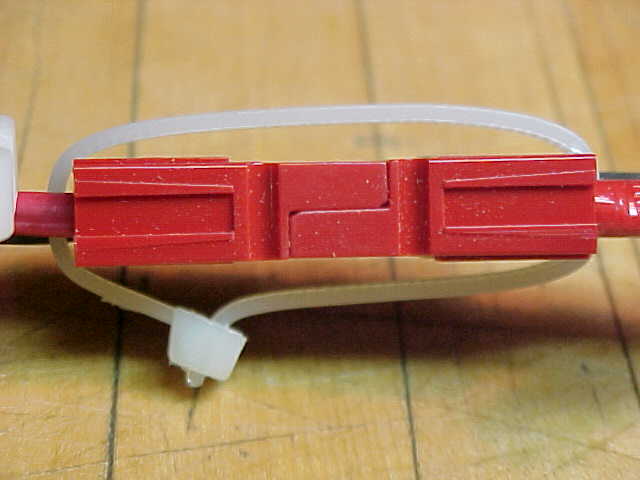
If you don’t want the connectors to loosen up on you and they are going to stay connected this is a good solution.
The larger 50+ amp connectors are more challenging as they need to be soldered rather than crimped. I hold the connector cup side up and fill it with hot solder then stick the wire in before it cools and let the solder solidify around the wire. This technique works quite well, at least as well as crimping a connector would, although some people then crimp the soldered connector to make doubly sure it will not fail. Give the wire a pull after the solder hardens to make sure it is attached good and tight.
Silicone and heat-shrink tube the connectors
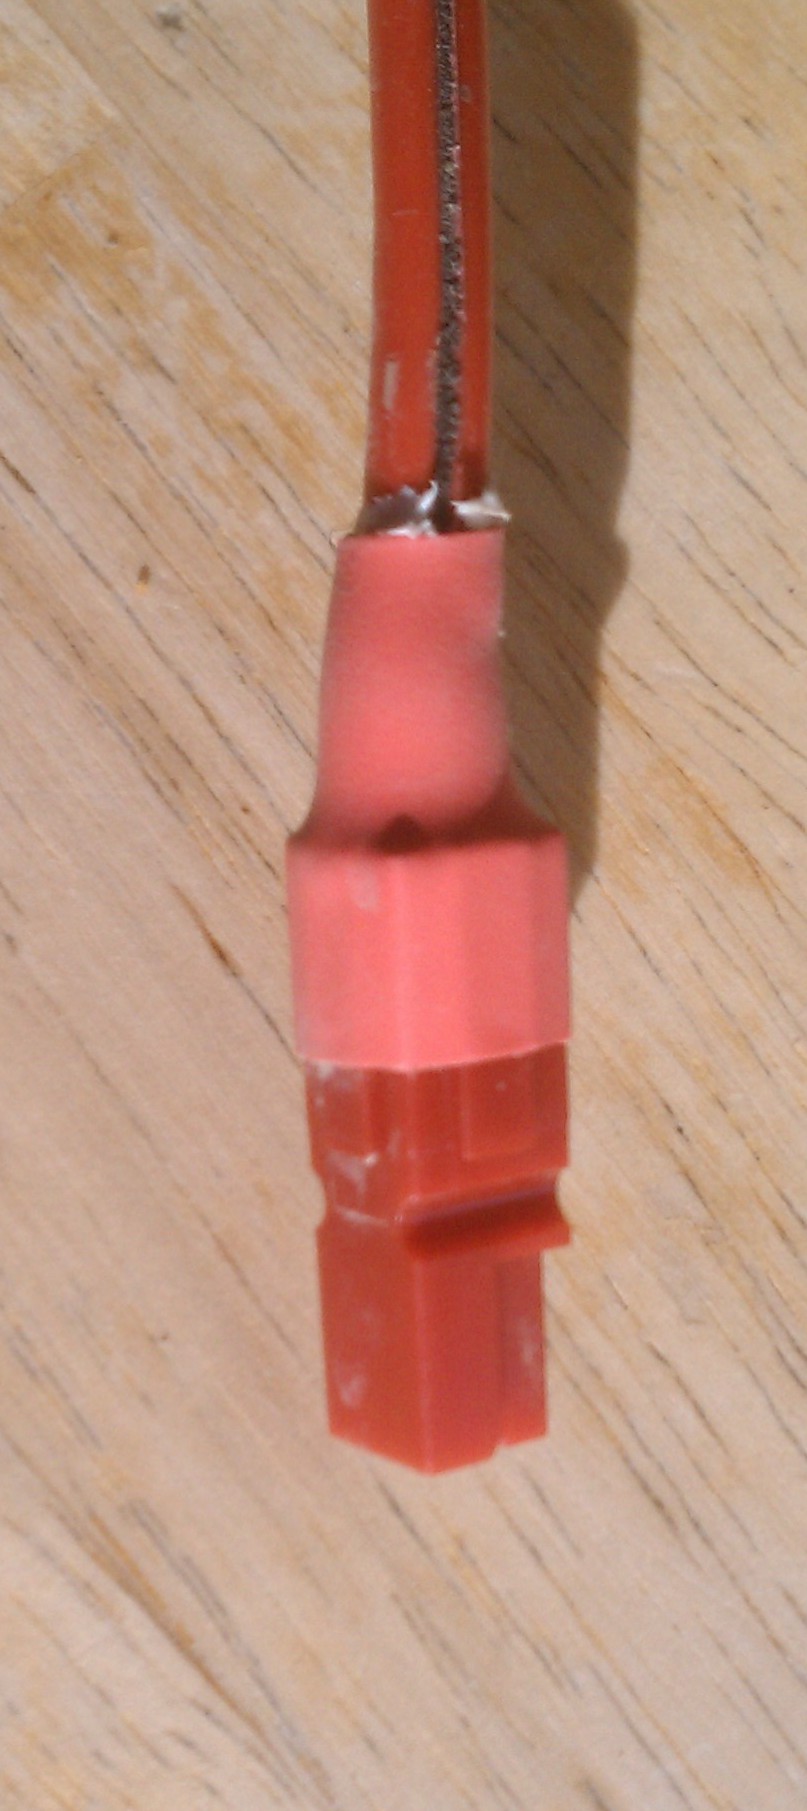 One thing I have done which seems to make the connector a little more waterproof and a lot more sturdy is to put a dab of silicone where the insulation meets the connector then slip some heat shrink tubing over the plastic connector and wire and shrink it down while the silicone is still wet. This makes a much stiffer connector that is less likely to break off or have water and snow seep in.
SPEC-Pak Weather resistant snap together housings
Although I have not tried them, my good friend Larry at Boxy Bikes really likes them, especially in the winter. To bunch 4 Anderson connectors together and protect them from the elements you can buy the 4 Pole SPEC-Pak. Be aware that it requires a separate tool to install these connectors and they are rated for 1000 volts which is far more than you would ever want to use on an ebike. They are also kind of pricey compared to the normal connectors.
Where to buy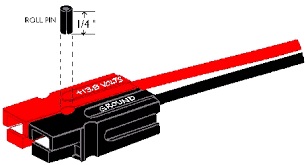
There are reputable online dealers with web stores like powerwerx.com . That being said I usually buy mine on ebay from connectorpros. Like everything on ebay there are always cheap Chinese knockoffs so if you don’t go with a reputable vendor you may get a sub-standard product.
The electrical connectors form the foundation of your ebike build. Without them your bike won’t move. It is quite frustrating trying to deal with loose or bad connectors. I have yet to find any connector that is as inexpensive, works as well and is as easy to install as the Anderson Powerpoles.
Ride On.


This is an excellent article on Anderson Powerpole connectors with great photos. We include training on the Anderson connectors in the Light Electric Vehicle Association (LEVA) E-Bike Technician Training and Certification program.
http://www.levassociation.com
Don Gerhardt
Gerhardt Engineering
LikeLike
Great synopsis!
LikeLike
If you look at the connectors on the em3ev batteries you can see that they may have some sort of spark prevention. The green anderson connector has a special tip that is slightly longer so that it connects before the rest of the Andersons. I’m guessing that it sends current through a resistor so that the caps in the controller fill up slowly and don’t spark.
LikeLike
Sadly, EM3ev does not sell or supply the connector as a pigtail. Very disappointing. It is an excellent connector. I did have some fails with Anderson installs. Great connectors but not as “clean”as the EM3ev connector on BBS0x.All my Anderson fails were operator error. I wasn’t seating the stainless bit deep enough. I think Grin technologies using and supplying systems with Anderson speaks to their quality. Disclaimer: I sell Grin tech products small scale. As accessories to any install I do.
LikeLike
Excellent article. I too use Anderson’s with the 45amp connectors for all my e-bike connections.
I will try the suggestion of using silicone and shrink wrap to further stiffen and waterproof the connectors
LikeLike
I ended up coming back to this one again. I made errors in my connectors. Now that I’m clear my Anderson connections are stellar. One question. I don’t comprehend how the pin works to hold the connectors. I would think they’d push apart. Anyone have a link to a picture of a
installed pin?
ebikes.ca has an excellent how to on using Anderson and JST-SM connectors and crimpers. a 22 page pdf.
LikeLike
The two connectors slide together. They have dovetail lands and grooves. The slide side by slide with each connector having a half round. Once the half rounds line up, the roll pin is inserted. You can’t move the two connectors as the roll pin prevents the motion (you’d have to shear the roll pin).
LikeLiked by 1 person
Pingback: Bike Head Lights – 9W $389 Switchback 3 vs $10.42 Led 20W Head Light From Ebay | Electric-FatBike.com
Pingback: Battery On Your Back Or Battery On The Bike? Which Works Best For You? | Electric-FatBike.com
Pingback: Upgrading And Modding The Sondors Electric Fatbike On A Shoestring Budget | Electric-FatBike.com
Pingback: Care And Feeding For Your New BBS02 | Electric-FatBike.com
Pingback: How Much Power Really Is Enough For Your Build? | Electric-FatBike.com
Pingback: Troubleshooting Problems On Your BBS02 Unit | Electric-FatBike.com
Pingback: Bike Light Smackdown – The Brightest And The Best | Electric-FatBike.com
Pingback: XT60 & XT90 With Spark Arrestors – Why You Should Make The Switch | Electric-FatBike.com
Pingback: BBSHD First Impressions : Meh. | Electric-FatBike.com
Pingback: Phat Phuk : FB 5 2.0 Snowshoe 2XL DIY BBSHD 1000W 10 Speed ebike 51lbs ~$1850 w/ out battery | Electric-FatBike.com
Pingback: Cheapo Chinese Charger Spews Out Smoke As I Dash Across The Room To Unplug It Before My House Burns Down | Electric-FatBike.com
Pingback: Cyclone 3000W Mid Drive : If You’re Gonna Build Something This Illegal Then It Better Be Able To Outrun The Cops | Electric-FatBike.com
Pingback: Pink Bunny Arrested, Charged With Battery : New 18650 Cells vs Alkalines & NCRb Shark Packs | Electric-FatBike.com
Pingback: Where Have You Been All My Life? : 7lb 13.5Ah 52v GA Shark Pack From Lunacycle Reviewed | ElectricBike-Blog.com
Pingback: Spray Varnishing Your BBSHD To Protect It From Rust While Winter Riding | ElectricBike-Blog.com
Pingback: Too Much Is Never Enough : Reprogram Your 50 Amp Luna Ludacris BBSHD Controller To Run At 60 Amps | ElectricBike-Blog.com
Pingback: Electric Bikes Are The Transportation Of Choice For The Coming Apocalypse | ElectricBike-Blog.com
Pingback: Lose Some Weight Fatty : Create An Ebike For All Seasons By Swapping Out Your Fat Wheelset For 29 Plus | ElectricBike-Blog.com
Pingback: I Dream Of Drifting : Lunacycle’s Totally Insane 52v 20Ah Drift Fat Trike | ElectricBike-Blog.com
Pingback: Everything I Own Is Now Obsolete : Christini AWD Fat-E Ultra Max 2XL Snowshoe Ebike | ElectricBike-Blog.com
Pingback: Using ebike batteries to power your RV or travel van | ELECTRICBIKE.COM
Thank you for the very informative post. What about rain? These connectors doesn’t look ideal, thinking about a e-bike where the user unplugs frequently the battery, so no possibility to put a heat shrink tube around the whole connection?
LikeLike
You can do that. I haven’t had problems with them in the rain. If you submerse them in water they will 100% short out. To waterproof connectors I use oversized heat shrink tubing then fill both ends with silicone, turn it around 360 degrees then heat shrink it and clean up the silicone that squeezes out the ends. That will make a 100% waterproof connection that can be submersed in water.
LikeLike
Thanks for the tip and answer!
LikeLike
Pingback: Everything I Own Is Now Obsolete : Christini AWD Fat-E 5 Ultra Max 2XL Snowshoe Ebike - Christini Bicycles