
My milkshake brings all the boys to the yard. May I present my newest build … Burning Chrome. Bitchen, Yo.
After much anticipation, my 3000W Cyclone mid drive (available here) arrived from Lunacycle.com last week. This kit was on sale during Black Friday for a ridiculously low, low price of $369 so I did what any self-respecting e-bike addict would do. I borrowed my wife’s credit card while she was sleeping and bought myself a Christmas present with it. How could I go wrong when I am only paying about 12 cents a peak watt ($369/3000W) as opposed to 53 cents a peak watt for the BBSHD ($799/1500W) and 41 cents a peak watt for the BBS02 ($525/1300W).
After spending a whole day slaving away installing this drive unit, I am not even convinced that 3000W is the peak that this motor can take, so it might even be an even better deal than I at first anticipated. This post will help guide you through a 100mm wide BB install of the 3000W Cyclone mid drive. You should also check out this article on our evil step-sister site electricbike.com that is more oriented toward the 68-83mm BB install written by Eric of lunacycle.com. This is not a beginner kit (no instructions, no support) and you either need to have a decent sized pile of destroyed ebike parts or a note from your mommy in order to purchase one.

The kit comes with everything you’ll need except some washers, an XT90 connector, the donor bike and a single speed chain.
So your kit shows up, the first thing you should do is lay everything out and make sure you have all the parts you need. There are 2 different kits for the Cyclone, one for 68-83mm bottom brackets and one for 83-110mm BB. The wider BB looks totally different and has a skinny axle and costs $20 more. Make sure you ordered and received the right kit.
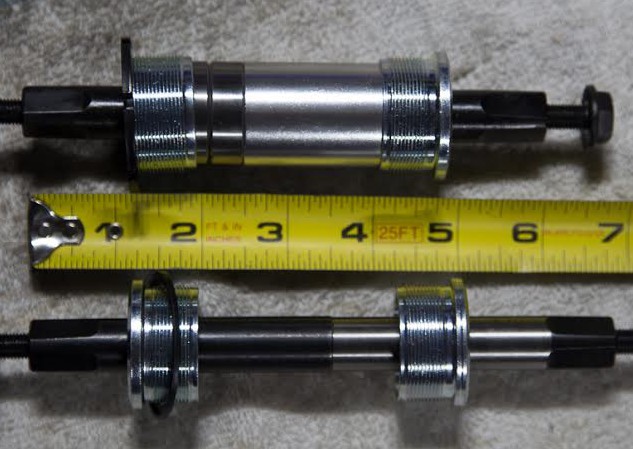
The top axle is for 68-83mm BB the bottom is for 83mm-110mm BB and costs $20 extra
The next thing you should do is plug-in your battery and make sure the controller and motor both work. Eric tested every motor that left Lunacycle but he didn’t test the controllers. Remember to turn the key so that the voltage display on the throttle works, then twist the throttle. The motor should spin pretty fast with full throttle. This kit does not include a PAS sensor but one can be added pretty easily. If you add a PAS system then you absolutely must have an e-brake cutout.
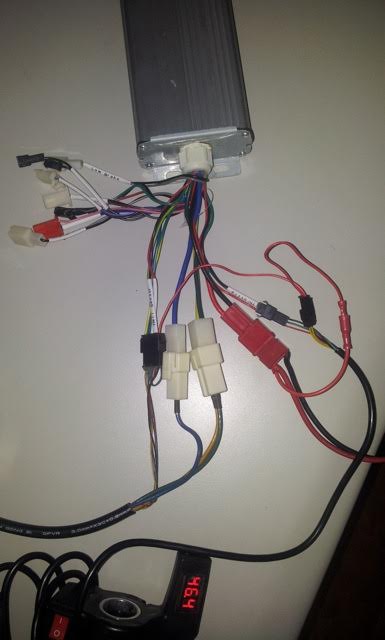
Bench test the controller and motor before you install it to make sure it all works, many connectors are not used although they can be if you want to.
You will need to put a connector on the wires to the controller and I strongly recommend the XT90’s with spark arrestors in them. The Andersons just do not do that well at power levels over 2000W or so and the XT90’s can take a whole lot of power without issues. They run about $1.50 each and you can get them here or you take your chances with eBay or Alibaba (you might be able to save a whole dollar, or you might end up with a cheap clone). Incidentally, I accidentally plugged in the giant crappy red power connector on the controller last and got a huge spark and kind of peed myself a little bit because I’m not used to seeing big sparks. I retested the voltage on the pack and connected it with the XT90 and … no spark. *whew* Remember to put the female end on the battery because WOMEN HAVE ALL THE POWER.

The XT90 with spark arrester is my favorite high power connector, they run about $1.50 each.
For a donor bike I picked a Polished 3 speed IGH Soul Stomper for about $899 shipped located here. Normally I am a total cheap skate and would never spend that much money on a bike, but when I first saw this bike online that little Beastie Boy that hides in my subconscious clicked the BUY IT NOW button before I could stop myself. Although this is a nice bike getting off the bottom bracket was an unbelievable nightmare. It took me 3 hours of cutting, hammering, thread shredding, and dremeling my own tools to get the crappy stock BB off.
If you don’t want to put yourself in the loony bin then just take the bike to your local shop and let them try to do it. It’s a great way to support your Friendly Local Bike Shop and to not have to do the most miserable part of installing any mid drive. I’m convinced that these Chinese laborers put the BB on all their bikes extra tight just as a way to get even for us Westerners who have life way too easy over here.
8 more mm to go. I opted to add nuts to either side of the threaded chrome spacer in the center.
Once you have the old BB off it’s time to measure and adjust the spacing of the brackets. Use a pair of calipers to measure the exact width of your BB from one side to the other. You will need to move the NON-DRIVE side aluminum bracket away from the drive side bracket to make the opening wide enough to seat onto your bike. Unfortudently there is not a lot of room on the bolts that attach to the motor so if you need a lot of room then you will probably have to split the difference. Once I moved the bracket to the other side of the motor mount I still needed about 8mm more of width.
I took 2 nuts that were about 3.5mm each and put one on each nut. This is not such a bad idea, as I didn’t like how they had one of the spacers was threaded at both ends and adding a nut to either side helps to make everything feel a lot more solid. Locktite everything as you go with blue Loctite so that your motor doesn’t fall off the mounting bracket at some point down the road.

I had to grind away part of the plate to get the cable to fit right and not be pinched too bad by the 100mm spacing
Feel free to cut or grind the mounting plates however you need to in order to make them work.Keep the giant hose clamp in the center as it will look much better in the middle when it comes time to mount the drive unit to the bike. I know some people on Endless Sphere are wary of builds that include too many hose clamps and tie wraps, but I can tell you that I’ve been to Black Rock City more times than I can count and the entire city is made out of hose clamps, tie wraps and duct tape. This kit also comes with the biggest tie wrap I’ve ever seen, I’d pay $369 for the tie wrap alone, the rest of the kit is just an extra bonus. The giant tie wrap broke on my first time out so instead I suggest that you use two stainless hose clamps which will work much better.

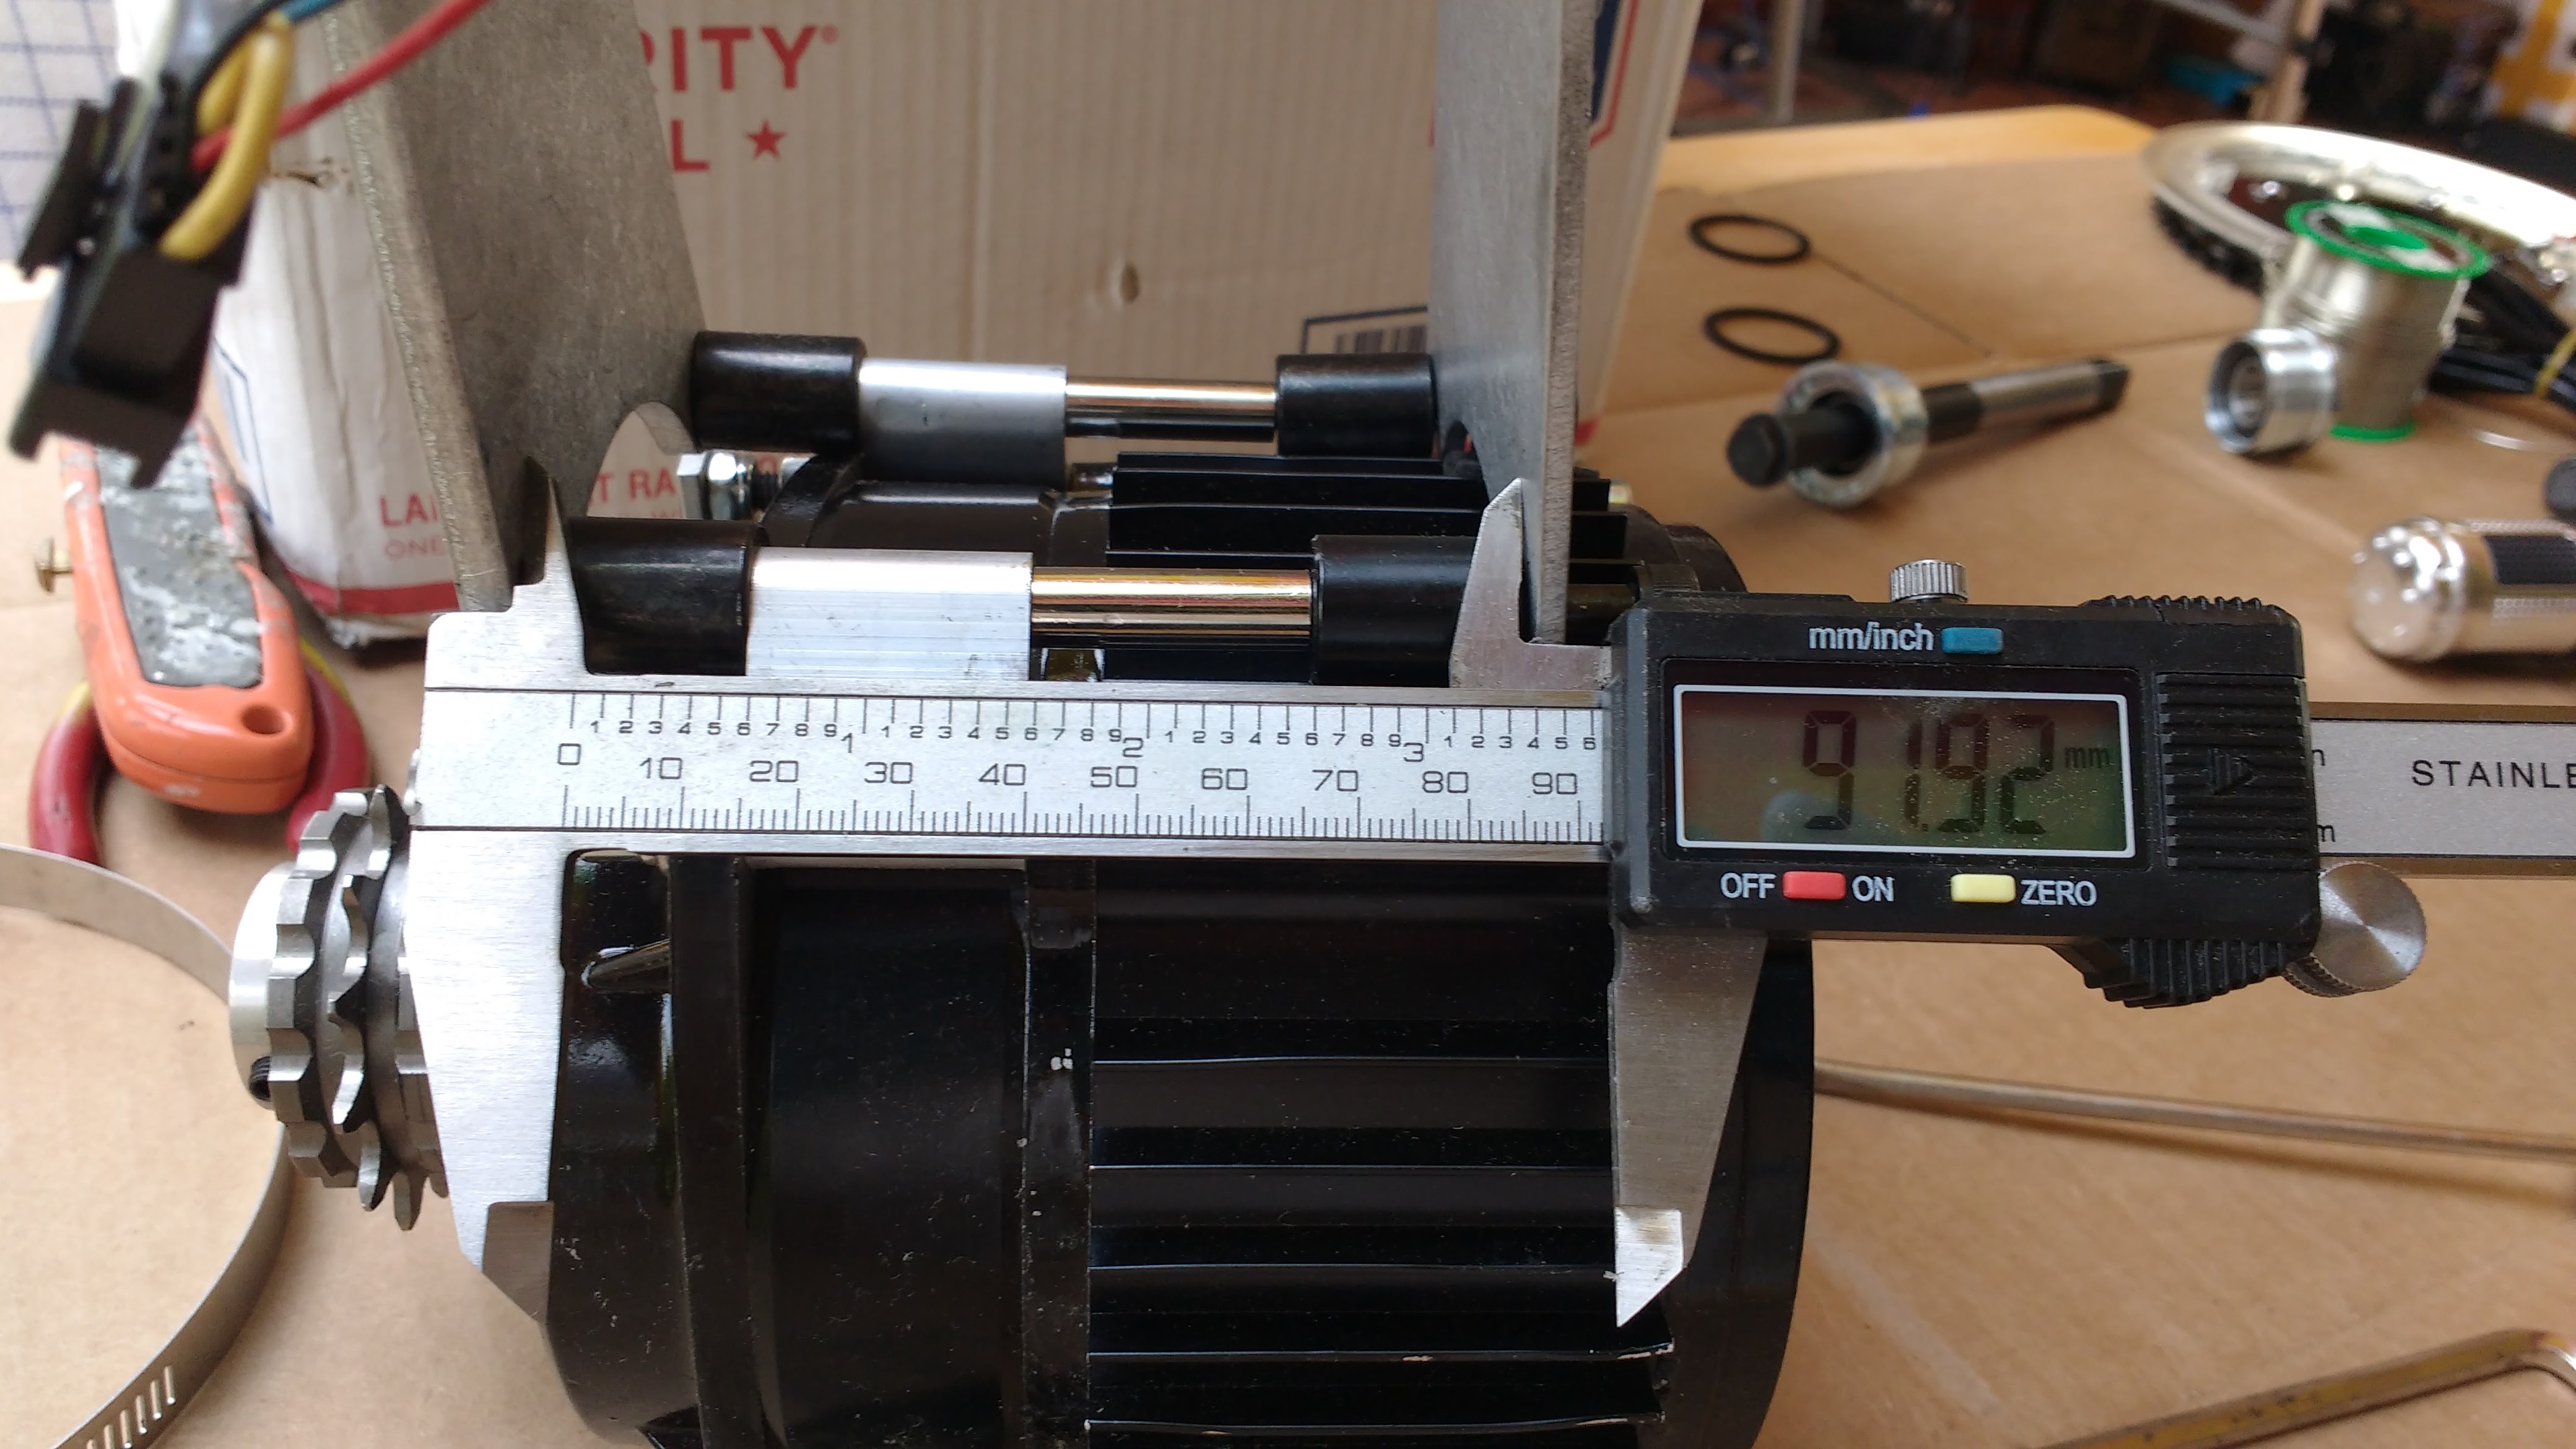
I was impressed by the performance of this 10lb motor, I would say its nominal rating should be over 2000W
The next step once the spacing is correct is to line up the motor on the BB and put both sides of the Cyclone axle in. Make sure that the fixed bearing goes on the DRIVE side and the sliding bearing goes on the NON-DRIVE side. This is important because the drive side is reverse threaded (lefty to tighten) and if you mix them up you’re going to strip the threads and make a really big mess. Stupid is not covered under any warranty.

The weight of the entire kit including the lightsabers and the lightsaber keys, I’m such a weight weenie.
You will then need to tighten the bearings on both sides with a special bearing tightening tool (did I mention that the Drive-side is reverse threaded?). This is easiest to do with the bike upside down. You will need to tighten the hose clamp a little bit then put the GIANT BLACK TIE WRAP around the down tube of your bike and tighten it. Then tighten the hose clamp with the screw near the bottommost part of the bike. Then take off the plastic cover on the Drive side crankarm and thread the giant wheel with the gears on it. I used Loctite but that’s because I Loctite everything (worst sex lube ever). Mount both crank arms then you will need to work on the tensioner alignment next.

This tensioner is not properly aligned, it needs to go about 1 cm away from the motor.
If you didn’t adjust the spacing of the drive side bracket then the main chain wheel and the drive gear should line up pretty well. The tensioning wheel will have to be adjusted so it lines up between the two which is actually pretty easy. Just sight down the gears and loosen the bolt that attached the tensioning gear to the motor. Once it is lined up correctly then tighten down the nut against the motor housing so that bolt won’t turn at a later time.

I am just not crazy about the controller and the first upgrade I am going to do to this kit is a 18FET Lyen controller that can do 65 Amps instead of just 40 Amps. Do you smell something burning? *sniff* *sniff*
Getting the right number of links in the main drive chain is a pain. It should look like it does in all the pictures so use your chain breaker and any single speed BMX KMC chain you have lying around to make a chain that fits. If you don’t have extra chain then just go to a dept store and buy whatever steel KMC single speed BMX chain they have. They are all pretty much indestructible (but heavy) and it should cost <$7. I’d write an article about how to modify chains, but it’s been done countless times by people who are smarter than me so read this article or head over to youtube and do a search for ‘changing bicycle chains for dummies’. You will need a decent chainbreaker and you should not buy a cheap crappy one because it will always break.
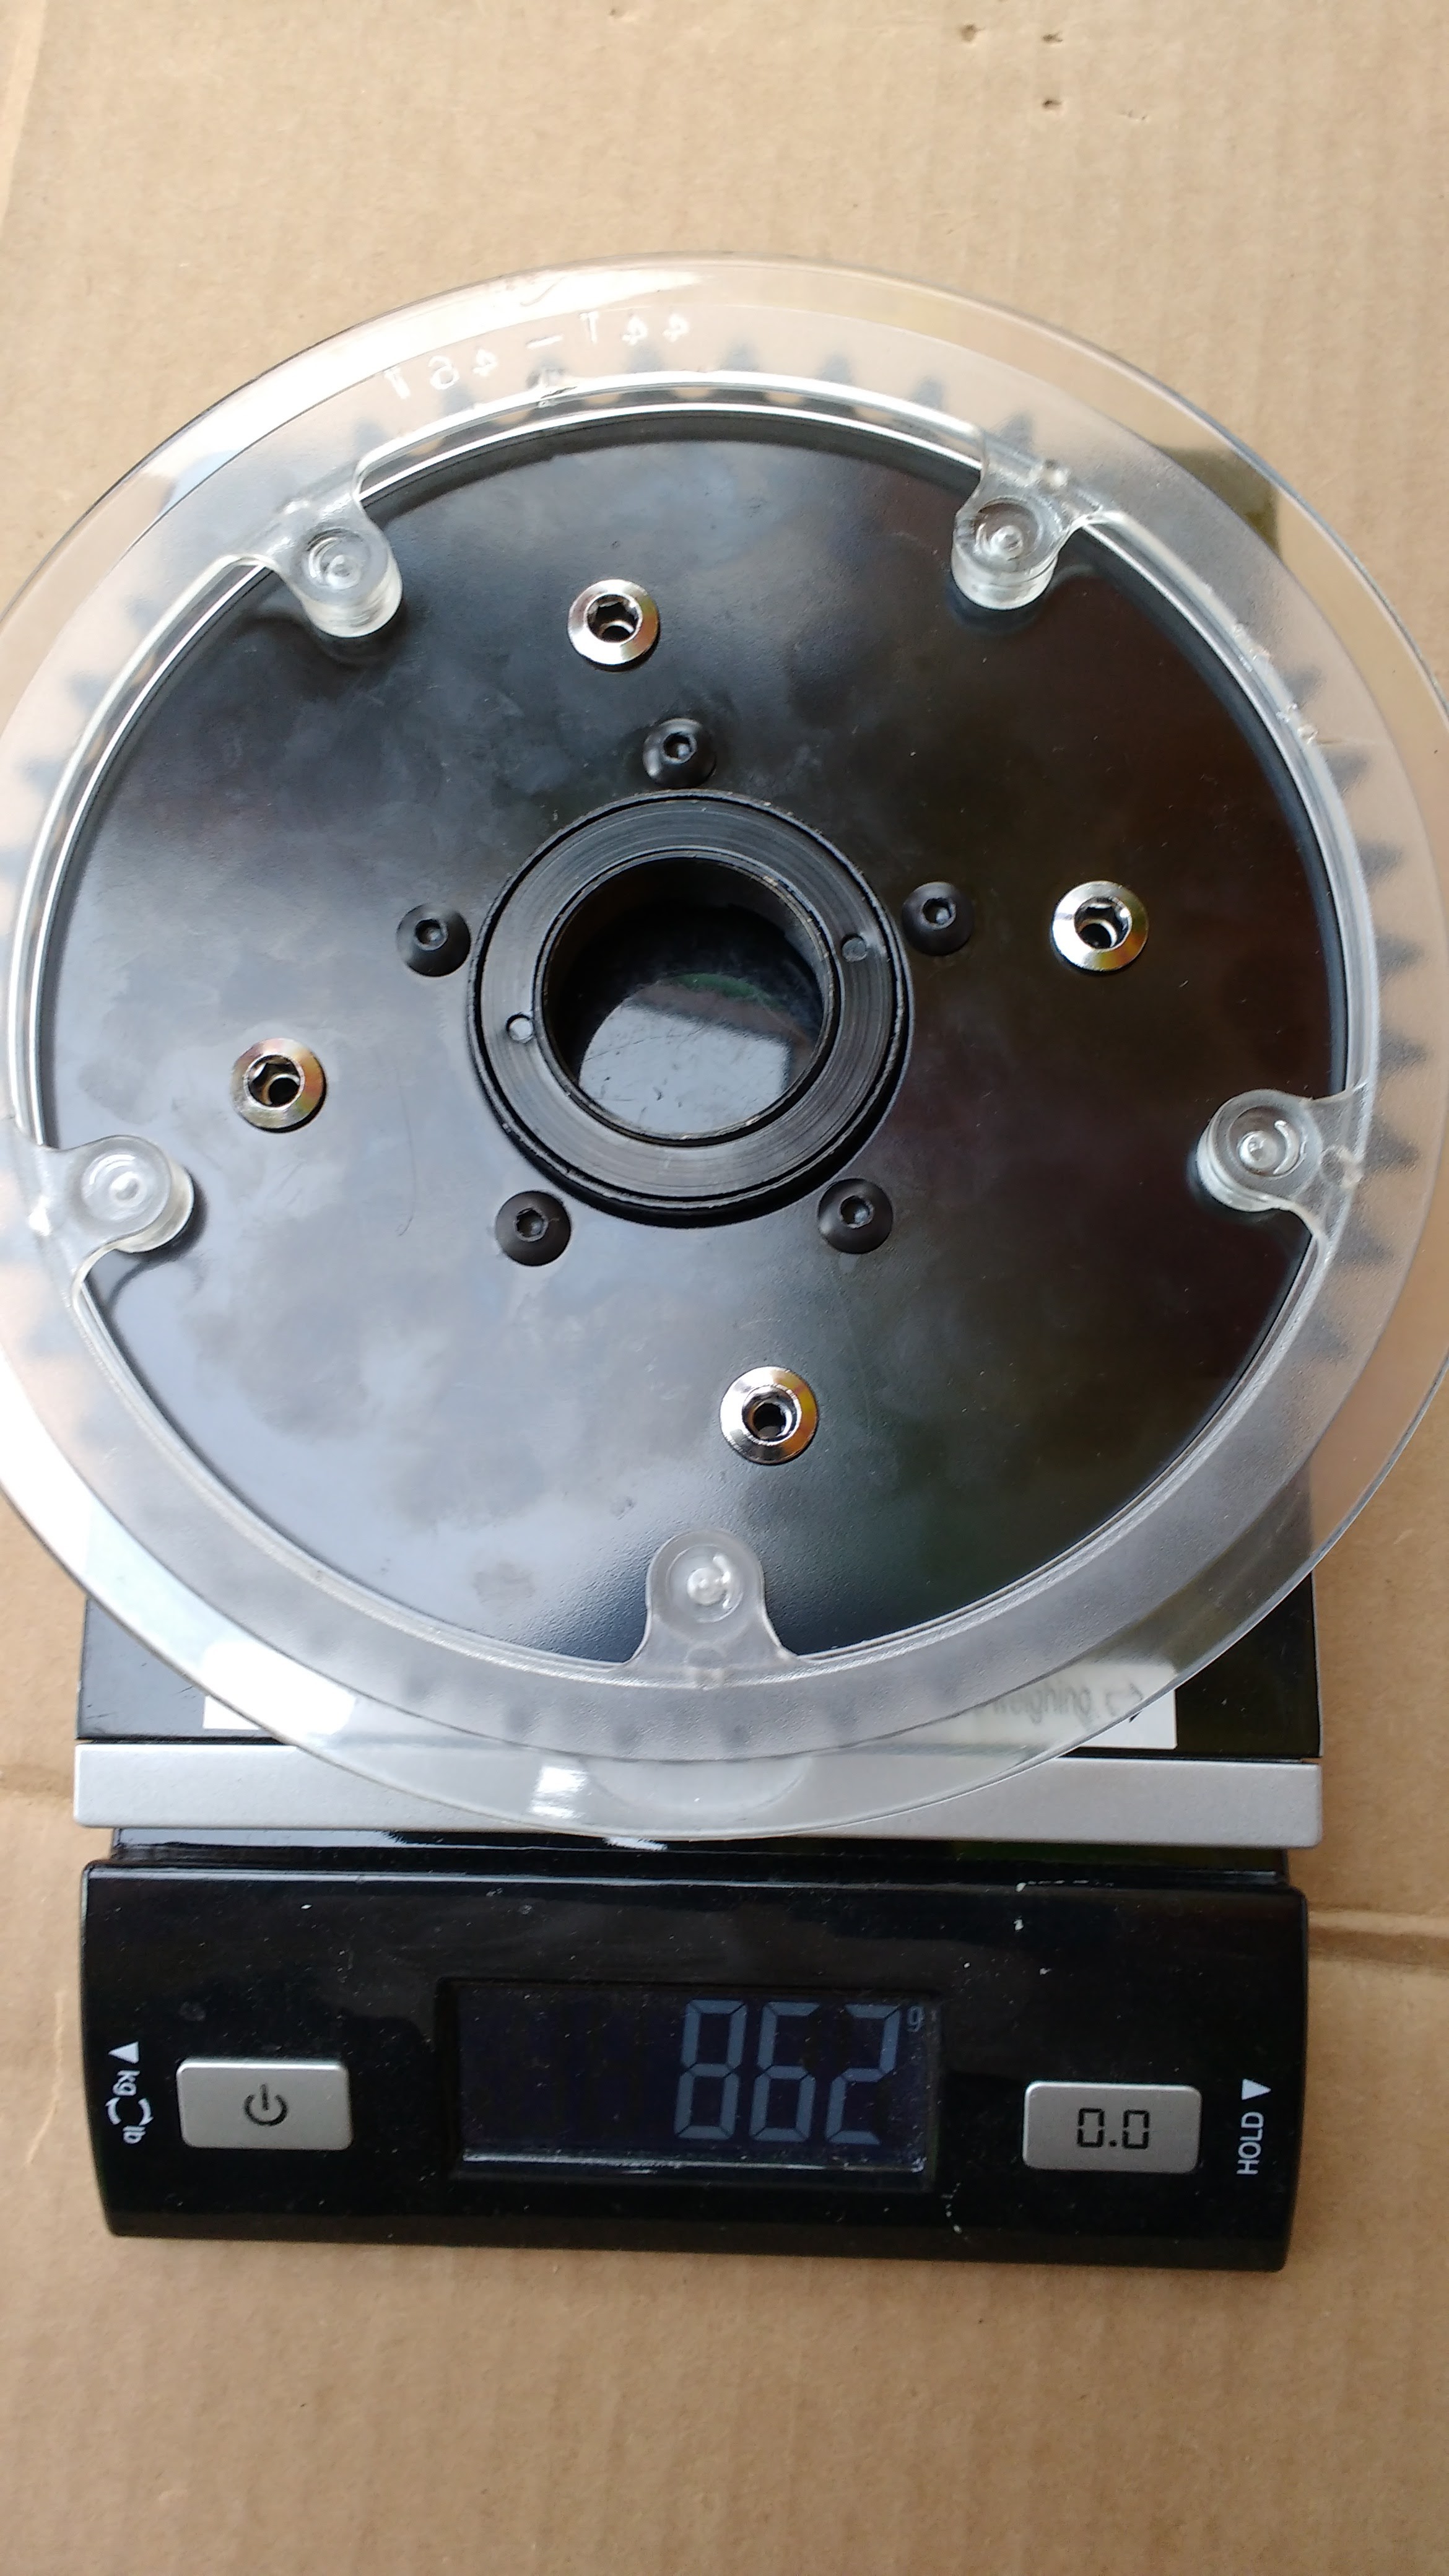
This freewheeling chainring makes the 558g BBSHD stock chainring look anorexic. Does it really need to be this heavy? Come on guys, this is a total overkill. Locktite the five black bolts, they will come out.
Now comes the hard part, setting the tension of the tensioner correctly using nothing but a zip tie. This is the ultimate test to see how well you will survive in a Zombie Wasteland, Macgyver. I recommend looping the zip tie around the top of the motor bracket and attaching it on the bolt on the other side. This pulls the tensioner more into the chain proper and not so much toward the bike. If you just attach the zip tie to the closest bolt then it won’t work that well. This zip tie is very important and if it breaks and you don’t have another one then you’re going to be walking. Moral of the story? Carry extra zip ties everywhere you go because you never know when civilization is going to collapse.

Notice how the zip tie goes around the bolt then over the mounting bracket to loop through the spring on the other side. Tricksy.
Once you think you have the motor tensioner adjusted right then it’s time to run the motor for a bit to see if the chain jumps off. Be aware that having an open running chain is incredibly fricking dangerous. If you treat it with the same respect that you would treat a chainsaw then you’ll probably be able to keep all your fingers. Unplug the motor once you’re done testing the tensioning adjuster and put the main chain on and adjust that.
Getting the right chainring in the front can be challenging, if you are building a commuter then I recommend that you stick with the 44T chainring. If you are doing trail riding then you are probably going to want something quite a bit smaller unless you are running a 42T granny in the rear. You can swap out the BCD104 inner chainring with whatever you want but at these power levels, you will regret using anything except steel chainrings. Aluminum will bend too easily and wear down too fast. My only complaint about this kit was my inner 104BCD steel chainring was bent pretty bad, probably from shipping damage. Although it wobbled about 5mm back and forth when the motor ran, it still worked OK so I used it anyway.
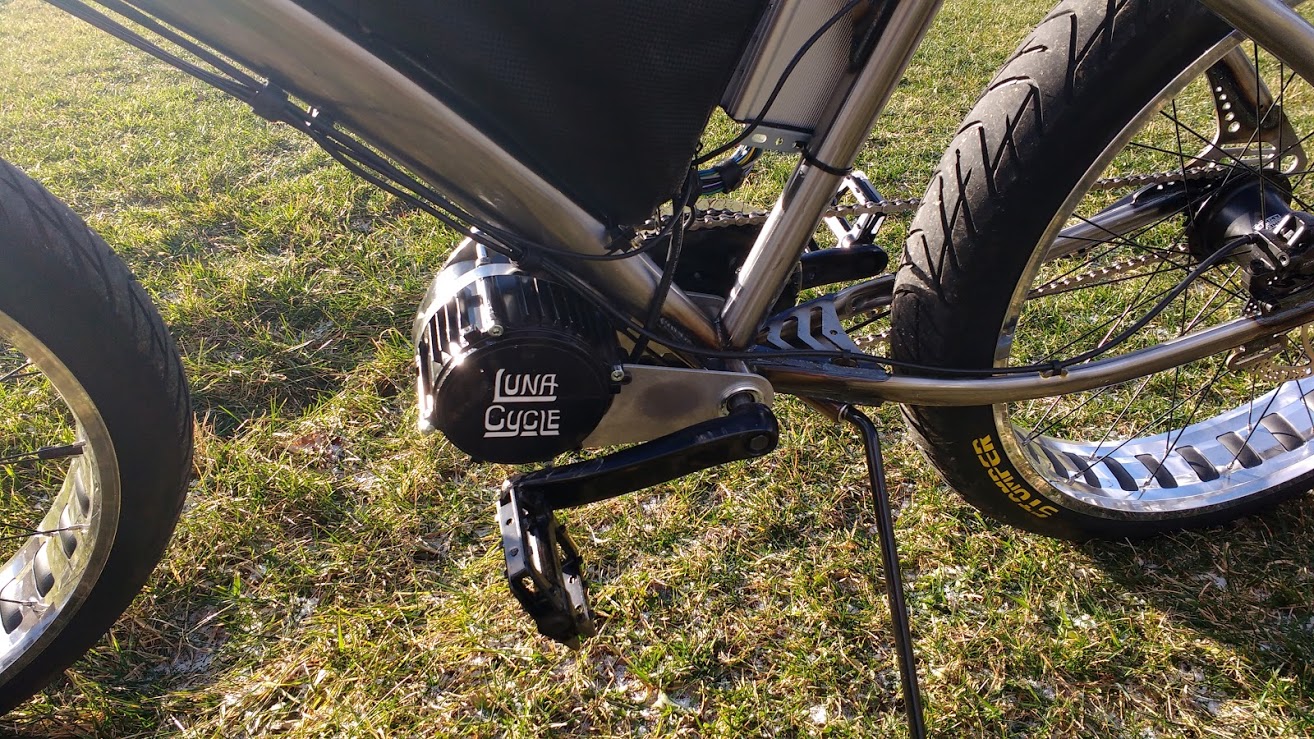
This kit looks pretty nice when it is finally mounted on the bike, the triangle bags are great at hiding the messy rats nest of wires
Installing the throttle is easy, I moved my 3-speed IGH shifter to the left-hand side because I decided I’d rather have my grip-shit shifter upside down than my Voltage readout and throttle. I strongly recommend installing an ebrake cut out on the motor because if something happens and the motor gets stuck on your brakes are not going to work that well otherwise. I chose to do my build with a Lunacycle ziptie bag (sold here) which works well to hide all the controller wires and still looks damn sexy. The ziptie bag does not cover up as much of the frame as other battery triangle bags. I wrote a separate build threads for the Soul Stomper that I call Burning Chome located here as well as the Sturmey 3 speed IGH which actually works surprisingly well even at higher power levels. I was up shifting under load and the IGH made no funny noises at all. It felt a lot like shifting a smaller displacement motorcycle and was smooth as silk.

When installed correctly the primary drive chain should look more or less like this. I want to steal this bike so bad … oh wait …. it’s already mine.
I really liked the ebike cutoff key on the throttle and think it should be an option on all e-bikes. It doesn’t mean for second that I’m still not gonna lock this sh!t up, especially when I’m driving something this awesome looking. It’s cool to be able to wire the lights of your e-bike into the controller so that everything shuts off with the turn of a switch. No more dead batteries because you forgot to turn off your rear led’s when you put the bike away.
The combination of the Cyclone and the 3-speed IGH felt a lot like a motorcycle and even at high-speed the steel framed Burning Chrome was incredibly stable. The brakes were good sporting Hydraulic on the rear brakes and BB7‘s with an ebrake cutout in the front and it carved down the dark snowy highway at night like a bat out of hell. With a 52v battery this kit tops out at around 35mph with 2000W of power. If you ran it with a 72v battery I’m certain that it would go faster than that. I tested it with a 16S LifePo4 Headway pack which can take 50 Amps continuous and has never really gotten that warm on me until I tested it with this motor full throttle for 10 miles. As a side note, any cop seeing you go over 40mph on a ‘bicycle’ is probably going to want to harass you, having bright pink hair won’t help either.
So is the Cyclone kit really a Bafang mid-drive killer?
The Bafang BBSHD/BBS02 and the Cyclone are all totally different animals. Geared low enough any of these drive units will be able to climb almost anything. Each drive unit excels in different applications:
- The BBS02 does best in lighter duty applications or singletrack trailriding where you can run the motor at higher RPM speeds than what you would want to pedal at. It performs best at around 25mph or so although it can go much faster for short periods.
- The BBSHD does best in high torque/high load applications where you want more power with normal pedaling cadences. This drive unit seems to do well at around 30mph although it can go quite a bit faster for extended periods.
- The Cyclone spins a bit slower but does seem to put out tons of power at lower RPM ranges. It really seems to excel at very high power outputs for highest speed or highest torque. It totally reminded me of the feeling of a stokemonkey motor without the 20lb+ weight. If you are moving lots of weight (think two people on the same bike) or want to go 35mph for extended periods than the Cyclone is a good choice (or a very large hub motor like the 25lb MXUS).
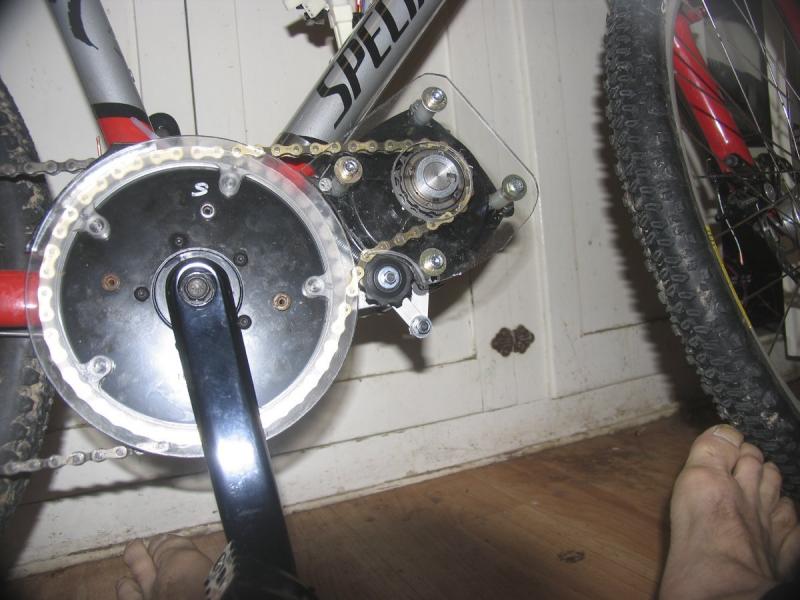
Dennis Horning designed this custom chain guard because he likes all his fingers and toes right where they are. Nice toes Dennis, makes me hungry just looking at them.
The optimum speed for ebikes is under 30mph for the following reasons:
- You can generally get away with 30mph and the cops won’t waste their time with you unless you are blatantly breaking traffic laws.
- You use a lot less power. Over 30mph a lot of your energy goes towards pushing the air out of your way and not getting you to where you need to go.
- Do you really need to go over 30 mph? If you start looking at fatality statistics your odds of seriously getting hurt from an accident increase dramatically over 30mph. Your odds of hurting someone else (another biker or pedestrian) also increase dramatically.
When I finished this build I got on the Soul Stomper and rode it for over 10 miles from my house on the road. It easily gets to the high 30’s for MPH and I had no problem running it at full throttle with a 52v battery for 5 miles until I couldn’t feel my hands from the cold and turned around to go home. I was surprised that the drive unit had absolutely no issues at all on its maiden voyage. I can only imagine what my neighbors thought seeing me riding along at over 35mph on a bicycle in the middle of winter.
I’m not addicted. I can quit anytime I want to. Really.
Ride On.
Update: David put together a bunch of articles on electricbike.com documenting his cyclone build here. David and I agree that the best kind of Cyclone is one that doesn’t drop a house on your favorite in law wicked witch.


lol lol lol …..man the ebike community really needed you man…i just love the title of this story. You are a breath of fresh air in what was a totally stagnant industry. Awesomeness……
LikeLike
Thanks Eric, I write the way I do because I find most other ebike articles essentially unreadable. Life is so much better when people say what they really mean and mean what they really say. As long as they don’t say anything that is really mean.
LikeLike
I get so excited reading your articles on eBikes, I wonder if this is really a porn site.
LikeLike
You could do a Kickstarter with this motor. What would a decent frame, a 1 kWh battery, and the motor cost? Have to sell it as off-road. Maybe this is the year Baffy gets killed by their high prices and their failure to pursue things like torque sensing PAS. In the words of the cheap TV melodrama: “Maybe they need killing?” At least this is competition.
LikeLike
oh and it was a well written entertaining story all the way through….your stuff keeps getting better and better….. i am loving it 🙂 Count me as pinky fan.
LikeLike
My friend has one of those. It’s louder than a combustion engine and overheats instantly after riding half a mile on more than half throttle. You don’t seem to have the overheating problem though. Interesting kit nevertheless!!!
LikeLike
I was running it at 2000W and no overheating for sure. It’s a nice motor for the price in my opinion.
LikeLike
Love your articles Karl, I’m waiting with baited breath for the Luna
LikeLike
To be blunt, I think my dog would be embarrassed for me if I put one of those on my bike. You should ask yourself if you want to ride your ebike or tinker with it all the time. Because once you start using hose clamps and zip ties to fasten electric motors that generate a lot of torque, you’ll spend more time in your basement fixing the thing than on the trails having fun. Maybe if I got the kit wholesale I would try it out. But even then I’d have to spend a couple hours with my AutoCAD program and a couple more hours in front of a CNC machine fabricating new brackets. No, the bottom line is that you get what you pay for. And you either pay for it with greenbacks or sweat and aggravation.
LikeLike
I hear what you’re saying, I felt the same way but I decided to try it because I only had $369 to lose.
I was pleasantly surprised. The brackets are not bad, the axle is not bad, everything seems remarkably solid to me, and I’ve destroyed a lot of crap. It might break down with serious trail riding, but for the road I think it will be fine.
I’m sorry that your dog is embarrassed by the things you do, don’t take it personally. I had that problem too so I got rid of the dog and became a cat person.
Karl
LikeLiked by 1 person
Go to a machine shop draw your idea up make it out of styrofoam use auto body filler to make it harder shape it then go to a machine shop I did
LikeLike
Got to disagree. The tinkering and repair work would be a problem if you had a crappy bike. However, if you put this kit on a decent frame with high quality components, it holds up just fine. I rode my Specialized Epic fully loaded 1000mi through the Blue Ridge Mountains, then put on the MTB wheels, dropped to the small chainring and have been riding it through the hills and dales with nary a problem. That said, you need to keep it meticulously tuned; the chain rings are made from soft steel and bend easily… my biggest problem has been with the front dérailleur shifting. Overall, I’m quite happy with my build.
LikeLike
My point was there’s a lot of work to be done to get one of these things working properly. And cyclone as well as GNG have been around for a long time. There are hundreds of accounts by owners of these products that they just aren’t worth the money. The motors themselves may be adequate but the parts are cobbled together to sell the whole package as a kit. About six years ago I helped a good friend put together a bicycle with a GNG kit. We ended up fabricating a custom bracket as well as replacing many other parts including the controller. Quite frankly we put so much work into it that by the time the project was finished it worked flawlessly. Unfortunately, neither one of us wanted to even look at it for at least another month. And if money was a factor we wouldn’t have completed it. In the final analysis he could’ve purchased and installed a Bafang and spent his spare time riding the bike.
But you know what they say about opinions! They are like what?
Incidentally, my dog is German and he has impossibly high standards but he makes me want to be a better person.
LikeLike
I’m sure I’ll feel that way when my Cyclone breaks and leaves me stranded 10 miles from home. My time is worth $80/hr so it doesn’t make sense for me to spend 5 hours installing a Cyclone instead of 2 hours for a BBSHD but I’m interested to see what’s out there so there’s that. I was not expecting much from this kit, but I was pleasantly surprised.
My wife is a lot like your dog, except Danish not German.
LikeLike
My father always said his time wasn’t worth anything to do a particular job of say, installing a garbage disposal. A penny saved was a penny earned, I suppose. And he was a rocket scientist (seriously).
LikeLike
Right, that’s why people spend so much on 250 W production bicycles. They can then jump on the bike and ride around all weekend and just have fun.
I think I’ll be able to find a way to modify the BBHD to gain much higher output. But that’s going to take time and research because I’m just doing it as a hobby.
LikeLike
Looks like a great ride. Love it all and the 3 speed IGH is sweet.
What I do not get is the worm drive hose clamp around the motor…what is that thing? Pictures of the business part of it would be great.
Thanks for leading the way to great light weight motorcycles/heavy duty bicycles!
LikeLike
Hose clamp just attaches to the big ziptie which keeps the motor from sagging down like a cow udder. It’s ghetto but it works surprisingly well.
LikeLike
Would love to,know how it goes on a trail Karl. Go on you know you want to throw it onto one of your badarse Trail Fat bikes.
LikeLiked by 1 person
Pingback: Burning Chrome – DIY 3000W Cyclone Soul Stomper 3 speed IGH ~$1268 63lbs w/ out battery | Electric-FatBike.com
Pingback: SX-RK3 Sturmey Archer’s 3 Speed IGH For Fatties : It’s Got The Power *dum* *dum* *da* *da* *dum* | Electric-FatBike.com
Hey loved this article. Saw that you are a burner, me too! Been going since 08 and think this is finally the year I bring out a e bike. Well at least bring out a wheel with a hub motor. What would you recommend? Looking to do the easiest thing I can such as buy a Walmart bike here (metro detroit) and have the same one waiting to be picked up in reno. Get it all working here, then take the motor and needed parts with me and install out there. Also I’ve seen over the last few years more and more powerful battery packs for multi tools and e mowers. Could any of them be used able for a burner ebike build??? Once more thanks for the awesome article.
LikeLike
Yup, been to Burning man a lot of times. I’m the pilot of the 42′ high EL wire bamboo puppets of the man that you sometimes see on the playa. I love big puppets.
You could throw a BBSHD on a dolomite would probably be the ultimate burner bike. Be careful about going too fast, you can easily go 30+MPH and the rangers are not going to groove on that. It would only take 2 hours to install the BBSHD, the problem will be getting off the BB. You might have to go to a shop to do that and the bike shops in Reno are busy as hell when BM starts so they are going to have a hard time helping you.
Cyclone is probably a total overkill.
LikeLike
How cold of weather have you run it in? Reason I ask is that previously I’ve had trouble with the plastic gears in geared hub motors shattering in sub-zero weather (we are talking below -10 F or so) and I’ve heard that this new more powerful cyclone motor uses plastic gears in the gear reduction head on the motor where as the smaller older motors use metal gears and have been very reliable for me in sub-zero conditions and thus I’ve been willing to put up with their noisy racket. Although the new plastic gears may be quieter then the old smaller cyclone motors and may hold up under the higher power levels normally. I have concerns about them shattering in sub-zero conditions.
Just wondering if you have run your build in weather cold enough yet to address this potential concern.
LikeLike
I have not run them in that cold weather. I suspect the gears are nylon which should be fine in the cold.
I’m doing a snow machine build in a week or so and I’ll be testing it more in the real cold.
Karl
LikeLike
Thanks, I’m a commuter so for me reliability is a huge concern; I’ll be watching for future updates as far as if it holds up in real cold. Would like to update my winter cyclone racket maker to something a little quieter and a little more power wouldn’t be a bad bonus but am not willing to sacrifice reliability to do so.
LikeLike
BBSHD is really, really quiet!
LikeLike
Pingback: Snow, Slush & Ice Can’t Stop You : How The BBSHD Is Redefining How Much Fun You Can Have In The Wintertime | Electric-FatBike.com
Great post. I just started building my kit. Tested it today and all works but sparked like a champ when I connected the power from battery to controller-not cool.
Will look into the spark arresting connectors you suggested. Is there a 3 way switch (with a key would be even better) being made that I could put near the battery pack that would have 1) on position for riding bike 2) off position for disconnect 3) charge position for when charging the battery
Switch would need to be able to handle 52 volts and 60 Amps.
LikeLike
XT90’s with the spark arrestors work great.
Karl
LikeLike
Pingback: It’s My Mid-Drive And I’ll Fry If I Want To : The BBS02, BBSHD & Cyclone Shopping Guide | Electric-FatBike.com
Pingback: Mission Command 4 : Sounds Like An Awesome Atari Video Game But Really Is Just A Mediocre Fat Bike Tire | Electric-FatBike.com
Pingback: The Dark Side – DIY Cyclone 3000W Nuvinci N171 Deadeye Monster ~$889 57lbs w/ out battery | Electric-FatBike.com
Pingback: My BBSHD Was Evil And It Deserved To Die A Horrible Death | Electric-FatBike.com
Pingback: Kicking It Old School With A Nuvinci N171 At 2400 Watts | ElectricBike-Blog.com
I just purchased this kit from Luna Cycle with the intent to install on a fat bike. However, when I ordered the kit I forgot to specify it was for a fat bike so they sent me the standard kit. When I contacted Luna about getting the parts for the fat bike kit, they told me they were currently out of stock.
I see I can get the correct 170mm BB cartridge from Sick Bike Parts. Will I need any other replacement parts to install the kit? Or do I just need the wider BB cartridge?
LikeLike
All you need is a wider BB cartridge. The motor and mounts are the same. You will have to move the brackets around for the new BB cartridge.
It must be a square axle so the crankarms and front freewheel will mount properly on it. Also the BB cartridge must come out and have a lip or flange on it. If it seats inside the BB and does not overlap it will not work.
Karl
LikeLike
I have got rid of the worm drive clamp by putting an aluminium angle bracket and a couple of small alluninium plates on the non-drive end of the motor.
LikeLike
I purchased a pair of 2016 model Sondors Fat Tire eBikes for my wife and me, and we’re expecting delivery in mid-October. My intention was to try the bikes out, and then upgrade both bikes for more speed, range, and much easier pedaling. Our primarily riding surfaces will be on the roads and paths in our northern California town, which feature some fairly steep hills. I don’t expect that we’ll be doing much true off-road riding, other than the dirt paths around Yosemite and Lake Tahoe. We also might like to ride on the beach occasionally, but if that’s not possible, it’s not a deal-breaker. We’d like the conversion/upgrade kits to be reliable, as quiet as possible, not too difficult to install, and with a top speed of 35 mph or so.
Finally, and I don’t know if this is possible, we’d like to use the LCD displays that we purchased from Sondors, if possible. If not, and assuming that another version of LCD display might be available for any kit you might recommend, we like this option as well.
Is there such a kit available, or am I being too specific here? Any advice you might be able to provide would be greatly appreciated. Thank you.
LikeLike
Luna sells a display. It is cheaper than getting it from sondors .
LikeLike
I am in the same boat. I bought a cyclone a while back.
Looking to get a nice display to monitor speed, volts, amps, whatever else?
Was told battman would be an option due to difficulty of install of the cycle analyst?
Is that my only option? Would prefer a larger screen like the nice full color display for the bbs motors luna has? Or if anyone knows how to hook up the cycle analyst?
LikeLike
Pingback: Tangent Ascent : Welcome To The World Of Impossibly Light Electric Motocross | ElectricBike-Blog.com
Pingback: Lunacycle Releases Their 50Amp BBSHD That I’ve Been Testing For 6 Months (But You Gotta Buy The Whole Bike) | ElectricBike-Blog.com
I have been considering between Cyclone 3000w and Mxus 3000w to my 24″ dirt jumper. I am running on single speed configuration and need lots of power to run on steep hills on our forrests. I want to keep up with my 3 year old boy running his light 2200 watts Oset electric bike, top speed about 28mph. What would you recommend?
LikeLike
Not a fan of the Mxus, it’s about 24lbs before you add the controller. I’d go with the Cyclone and a 72v battery. If you gear it right it will be a monster, climb anything and still will hit 28mph. Try a 36T or 38T on the front and a 20T on the rear. If you have a different rear cog just make sure the front chainring is about 18 teeth more than the rear or so. (ie 30T front 12T rear etc).
LikeLike
snap on 3d printed chain guard for cyclone 3000w https://www.thingiverse.com/thing:1857650
LikeLike
Pingback: Reminds Me Of A Ducati – 72v Cyclone Kit On A Luna Fatty Cargo Frame | ElectricBike-Blog.com
Pingback: Beat On Me, I Love The Abuse : Shimano CS-HG62 11-36T 10 Speed Cassette | ElectricBike-Blog.com
In theory, you CAN operate legally [presuming you live in the state of California]. According to CAL Vehicle Code 400(a), a motorcycle must be
1. A motorized vehicle having a seat or saddle for the rider
2. Having three wheels or less
3. Weighing less than 1,500 pounds.
According to CAL Vehicle Code 400(c), an Electric Bike must have
1. An Electric Motor
2. Max speed of 45mph
3. Weighs less than 2500 pounds
4. Otherwise conforming to (a). [The Saddle/Seat requirement + having three wheels or less]
According to CAL Vehicle Code 406(a) requires an automatic transmission with electric motor, and 406(b) limits electric bikes to 20mph or 1000w. The high performance electric bicycle defies categorization, yet it should be possible to obtain new vehicle registration for the Cyclone 3000-powered electric bike.
How can this be possible? The problem is most people think within the electric bike/scooter category, which the Cyclone 3000 does not qualify for. An entirely new vehicle registration must be applied for, as if it came from out of state, and requires vehicle inspections, safety compliance, and the like. The upside is that the Cyclone 3000 does not produce smog, which bypasses a lot of other requirements.
Why do I bring this up? Most people may not consider registering their electric vehicle with the DMV because it defies categorization. My suggestion is to attempt registration for a new vehicle, and write a story about it, if successful .In a few months, after I purchase and install a Cyclone 3000 electric motor kit, I will attempt to do this myself, and we can co-author a story how that went, if successful. Once the story breaks, I think your readership and electric bike riders in general would like to know how it went, what to avoid, and what to do, so they can do the same, because no one likes to experience the untimely traffic stop, and with an illegal vehicle, it gets confiscated and you lose it, not to mention fines and such.
If you want to run with the story sooner, you already have an electric bicycle that you can start your attempt with. If you run with it and complete registration successfully, once you publish, that article will be a ground-breaking reference point for other magazines to copy when they document their own attempt to legalize an electric bike that is not cookie cutter crisp for the DMV; things like what they need at inspection, how you met or got past financial responsibility, etc, and a resource for those who are considering purchasing a high performance electric motor for their bicycles, and for manufacturers who will discover can legally offer higher performance bikes in the state of California, if they just meet Air Board qualifications and such, which is yet another story to be written that would help the electric bike community.
LikeLike
Pingback: Take A Wild Guess : Selecting The Best Front Chainring Size For A Mid-drive Ebike On The First Try | ElectricBike-Blog.com
Pingback: The Lunacycle Apex : The Best Torque Sensing Ebike (a lot of) Money Can Buy | ElectricBike-Blog.com
Pingback: The New Age Of Affordable Electric Motorcross : The Sur-Ron 60v 32Ah eDirt Bike | ElectricBike-Blog.com
Hi,
I’m planning to start building an ebike with a fat stromper 3. What would you recommend? Thanks
LikeLike
BBSHD with a frame pack.
LikeLike
Does it matter if I use a stomper single speed or 3 speeds? Thanks
LikeLike
Get the 3 speed.
LikeLike
What do you think about this one? Merry Xmas to me!
https://soulbeachcruisers.com/electric-bikes/
LikeLike
Pingback: Rebel Scum II : 2500W Ultra Max Ludicrous DIY Torque Sensing Full Susp 10sp Ebike ~$2805 w/out Battery | ElectricBike-Blog.com
Pingback: Because The Wifey Demands It : Build A 3000W Electric Wheelbarrow Out Of A Cyclone Mid Drive Kit For ~$450 | ElectricBike-Blog.com
I just ordered a cyclone 3000w kit from Elite Motors, how long does it normally take to receive. I have not been able to get any update from Elite Motors.
Thanks Jim
LikeLike
I don’t know, I get all my Cyclone stuff from lunacycle.
LikeLike
Pingback: The New 64v 32Ah Sur-Ron Electric Bike 2022-2023 – Spolkasurrondbikes