For the last 6 months I’ve had a project that I’ve nibbled away on here and there, apprehensive about screwing it up and burning my house to the ground. I got a large 48v 26F triangle pack from Eric at Lunacycle that came to Lunacycle DOA with a faulty BMS that had drained down and killed 2 cell groupings (16 18650 cells) of the battery. This battery never made it past their in-house quality testing and I asked Eric to ship it to me so I could try to troubleshoot and fix it. I also told him that if I could get the pack working again I’d buy it from him. In retrospect this was a pretty crappy deal for me as I spent a lot of hours bringing this battery back to life, but in the end, it was worth it in what I learned along the way.

Don’t try this at home kids. I’m serious. While you’re at it you should stop reading this blog. It will rot your mind.
When I was young I told myself that I would never own anything that I couldn’t tear apart and put back together and fix when it broke. This attitude has done me well in life, as I save a tremendous amount of money fixing my own cars, washing machines, computers, lawnmowers and anything else that I own. I find it strange that people would own something as expensive and complicated as a car without knowing how it works or how to fix it. Ebike batteries have always been something of a mystery to me so I wanted to learn more. The best way to learn is to make mistakes and try new things. Unfortudently when you make mistakes with 1Kwh lithium battery packs things can often go very badly, for you and anyone unfortunate enough to be around you. Here is the only disclaimer you’re going to get. Taking apart ebike batteries is akin to building a bomb. It’s incredibly dangerous and one wrong move can kill you, maim you or leave you blind. If you take apart a Lithium pack you immediately void the warranty, no dealer in their right mind is going to take that battery back. Soldering the end of the lithium cells can cause them to blow up in your face leaving you blind. I’m not kidding. Do not under any circumstances do any of the things I’m showing you here that I’ve done unless you’re willing to take full responsibility for your actions.
Now that we’re done with that ugliness, onto the fun stuff.
Wear eye protection always when working with Lithium packs. No exceptions. I also use Nitrile gloves which I highly recommend using when doing anything with your ebikes. You can buy a box of 100 gloves for about $13 at any home repair supply store. The blue ones are thinner, the black ones are usually thicker. I like my Nitrile gloves like I like my coffee. Thick and black.
Educate yourself before you start by reading some threads like this one on endless-sphere. Damien Rene also has an epic youtube channel with countless videos of him building all kinds of packs for people. They are mesmerizing as well as educational, kind of like watching Sesame street, without all the damn muppets. I have watched almost every single one of his videos and I feel like I get smarter just watching him work. Best of all, he never seems to blow himself up or set the packs on fire. How does he do it? He probably just edits those parts out.
Another really good write-up I’ve found is from Micah at ebikeschool.com right here. His very informative article is an excellent resource for hot glue gun ebike battery building from scratch and a mandatory read for anyone venturing into the world of battery building or repairing. His website is a virtual treasure trove of valuable information on ebikes and a great place to waste countless hours educating yourself.
![IMG_20151222_082455752[1]](https://electricbike-blog.com/wp-content/uploads/2015/12/img_20151222_0824557521.jpg?w=700)
Some packs are glued together making repairs much harder than with the stencil packs
If there are cells that are physically damaged or badly corroded you may want to stop what you’re doing and just send the pack away to be recycled. If the battery starts producing smoke then the correct course of action is to bury it in sand outside for 30 days out of the rain, then dig it up and recycle it.
I was lucky that this pack had plastic lego style snap together spacing blocks. If the cells are hot glue gunned together then it will probably be impossible to get the pack apart to replace the dead cells. If the pack is glued together you can leave the existing cells inside the pack as dead weight and add new cells to the outside of the pack and reroute the cabling. Although this sounds pretty complicated it’s really not. The downside is that you are carrying around a bunch of dead batteries in the middle of your pack everywhere you go, but if they are drained down then it is extremely unlikely that they will explode.
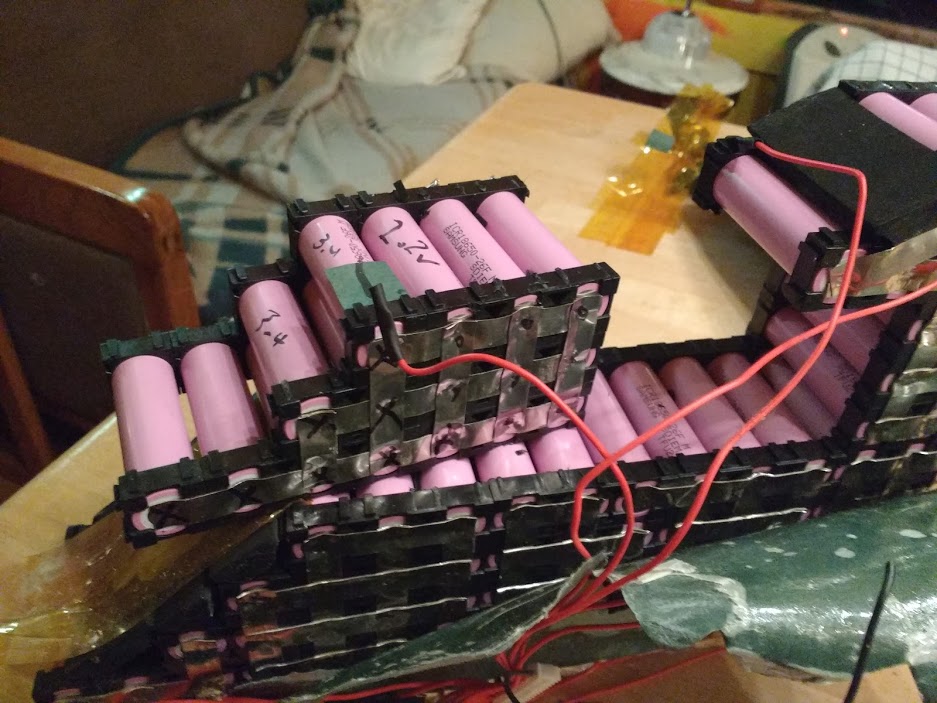
Notice how the cells are marked on the ends with a black X and the voltages are written on the sides of the cells
In order to remove the cells you will need to carefully insert a mat knife into the space between the blocks and carefully cut the plastic connector tabs off. It’s incredibly important that you don’t cut through the cells while doing this because cutting though a lithium cell is bad (you will have to trust us on this one). Where the nickel plate connects the cells to the rest of the pack you will need to cut those plates away before you can carefully remove the bad cells. Before you start cutting I suggest you take a bunch of pictures of the pack from both sides in case you forget how you need to configure the nickel plates on the replacement cells. If you get lost you can just look back at your old photos and try to make your new replacements look exactly like the old one looked.
If you cut all the tabs on one side the cells should slide toward the other side and then will slide out of the pack easily. Take your time and don’t force anything. Once the cells are removed then it is time to carefully remove the spot welded nickel plates. I used a pair of vice grips to grab the nickel plates then gently rocked the vice grips against the top of the battery pulling the spot welds off the end of the cells. Do not throw the old Lithium cells in the trash, you must take them to any home supply store to recycle them. There is usually a bag to throw them in by the entrance. It is against the law in NYS to throw away recyclable cells of any kind, they must be recycled.
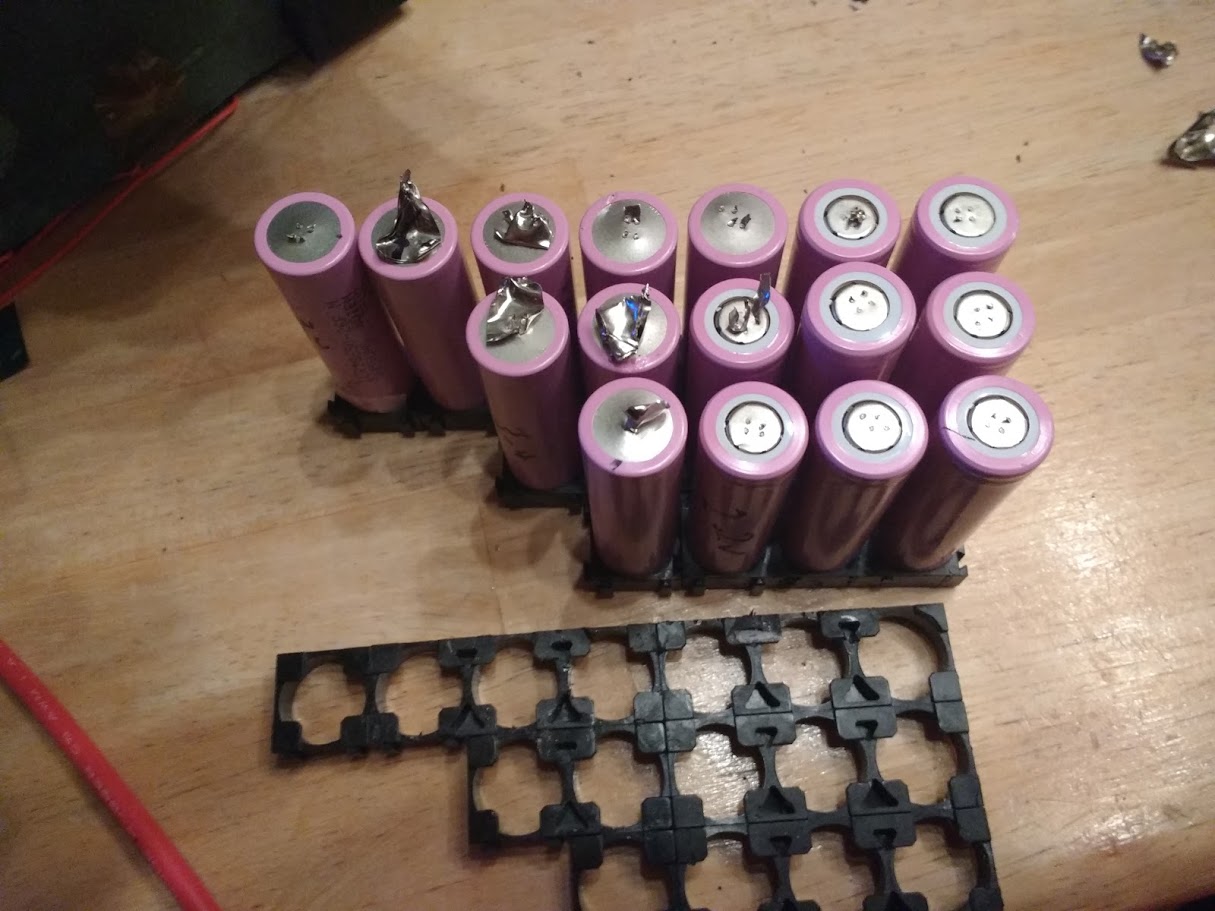
Once the nickel strips are removed you can remove the plastic pieces.
I replaced the bad 26F cells with 25R cells. If you chose to replace batteries in your pack with a different kind of lithium battery (not recommended) you should use packs that are similar in capacity and power capability as the cells you are replacing. I used 25R cells because it was what was easy for me to get my hands on and they only have 100MaH more capacity than the 26F cells. It’s often hard to find non-counterfeit cells individually, I bought mine from wakeandvape.com which is a site owned by Eric of electricbike.com so I know the cells are legit. You can get the 25R for only $5.25 in qty of 4 right here which is pretty cheap for a cell that can take 100A bursts and 20A cont. Lunacycle.com is also selling these 25R cells wholesale for a whopping $3.75 each right here if you buy 50 of them at a time. If you try to buy cells from alibaba or ebay then it’s buyer beware. The market is flooded with fake cells and Eric buys his cells thousands at a time directly from the factories that make them.
Before you put all the cells in the new pack make sure they are all at about the same voltage. The voltages on the cells should be within about .1 volt of each other. Any more difference than that then you are going to instantly equalize the cells when you weld them together and it could be bad for you. If the cells are out of whack then charge them all so they are at about the same voltage before you start putting the pack together.

Spot welding the 25R cells with a $123 ebay welder. You can pay more, but why would you want to?
The next thing you need is a welder and some nickel strips. I could write a whole book about selecting the right welder and nickel strips but I’ll it would be pretty boring and no one would buy it. I bought this cheap spot welder from ebay for $123 and I have to say it seems to work just fine. The manual is a joke and the nickel strips they throw in with it are basically useless, but it makes a decent weld for a dirt cheap welder. The only problem I had is that the contacts for welding don’t come out that far from the unit so you’re only going to be able to weld batteries two deep. That means that you packs can’t be any bigger then four cells deep or you won’t be able to weld the cells in the middle. For most <20Ah packs that should be a non-issue. To use the welder just increase the current till you get welds that hold. I had to put mine up to 70, but it will vary depending on the welder, the thickness of the strips and whether they are nickel or steel with nickel plating.
Sourcing nickel strips is a royal pain in the ass. There are lots of bogus alibaba and ebay sellers selling ‘pure nickel strips’ which are actually just nickel plated steel. If you scratch the strips you get and leave them in salt water overnight it’s pretty obvious if they are steel. You can also hit them with a grinder and if you see sparks then you’ve got steel. You don’t want steel, you really want 99.9% nickel strips. I bought this set for $14 and it was real nickel although it was much more expensive than buying it in a bigger quantity from elsewhere. Sometimes it makes sense to pay a little more when you know you’re going to get what you order than to mess around with the cheapest sellers and just hope you get what you want.
The completed cells, they look so pretty. Nowhere near as nice as Damien Rene’s packs, but I don’t really care.
If you are building a high power pack (over 50 amps) then you should double up on the nickel strips to make sure that you’re not getting your current limited by the resistance of the strips. That’s how my pack was built and so that is what I did with the replacement cells as well.
Keep your work area clean as you work. When you do the first side of the batteries you can relax a little bit, but when you do the other side you should pay attention to what you are doing. If you accidently bridge the gap between the positive and negative cells on the opposite side then BOOM. Think carefully about where you are putting each strip before you put it there. If you have screw drivers and tools around the batteries make sure not to short the ends of the cells with the tools accidently either.

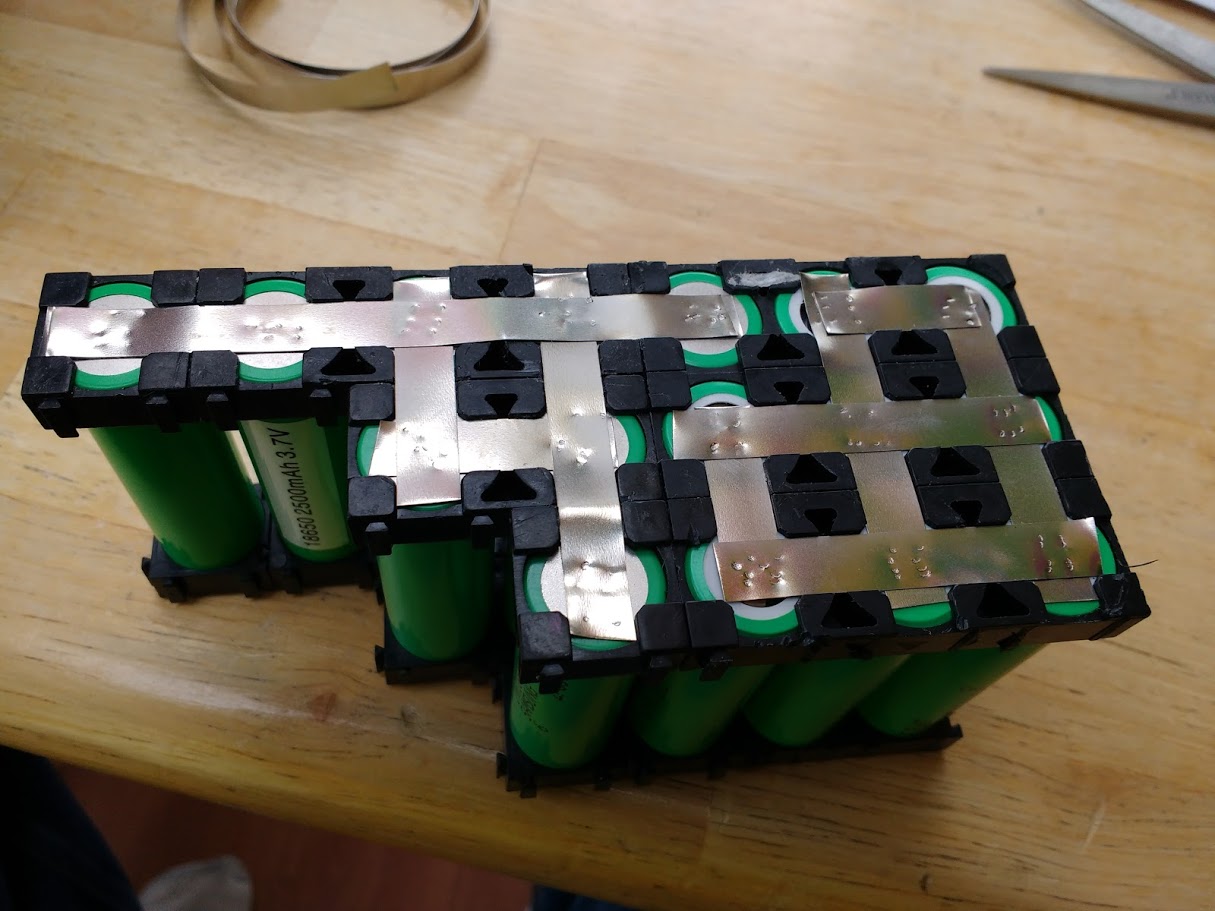
The new replacement cells put into place in the pack. Now I just have to spot weld the new cells to the old ones.
Once the replacement cells are put back into the pack you will need to reconnect the cells together using the spot welder. Refer to the pictures you took earlier if you can’t remember where the connections were from. You will also need to reconnect the balancing wire, which will need to be in the same place it was before you took the pack apart. Again refer to your old pictures if you can’t remember where it goes. I prefer to spot weld the balancing wires to the pack, as soldering the wires directly to the nickel strips makes the ends of the battery get pretty hot.
When you are connecting the large ground or positive wires to the pack you can try to solder them to the nickel strips on the pack or you can solder them to a scrap of nickel strip and then spot weld that strip to the pack. If you weld directly to the pack make sure you do it in between cells so that the cell does not get too hot from the soldering gun. If you solder it to the scrap then make sure you spot weld it in at least 8 different places to the pack to make sure the connection is very good. This pack had several wires connected to the ground to make sure that there was plenty of copper to carry all that power.
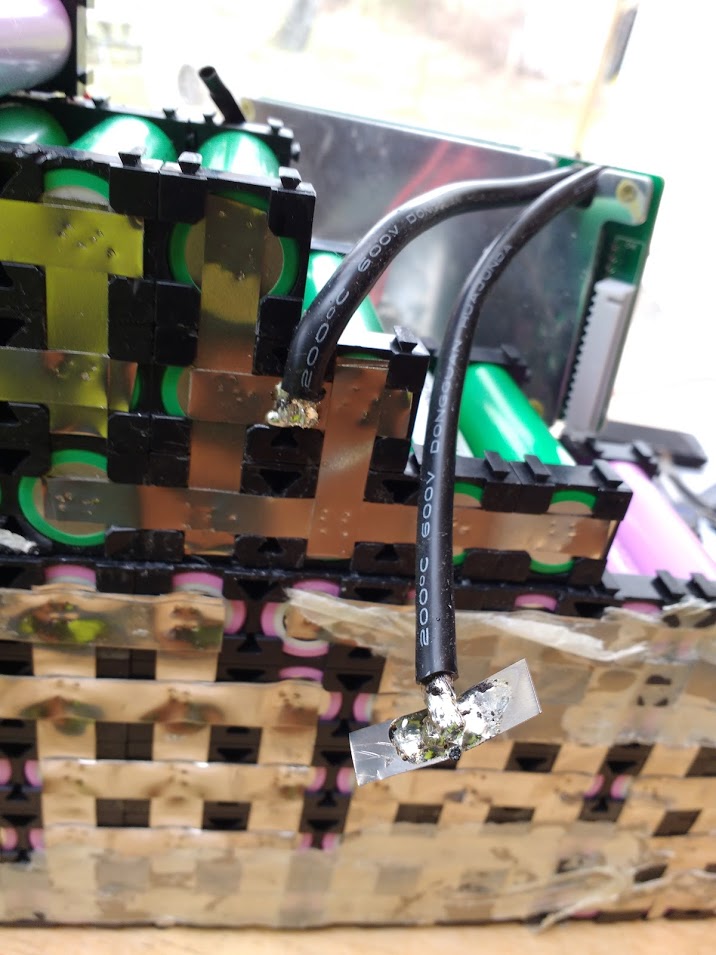
I tried both ways, soldering to the pack (left) and soldering to a scrap strip (right). I found the scrap strip to be less nerve-wracking than welding directly to the pack.
Replacing the BMS is pretty straight forward, but you should figure out if you even need to replace the BMS before you do it. If the BMS ‘leaks’ and slowly drains down and kills your cells then it probably needs to be replaced. If the cells are physically damaged then the BMS is probably fine. Make sure you have the right BMS for your pack (13S, 14S etc) and also make sure that the BMS is for the right kind of cells. A LifePo4 BMS will NOT work with 18650 cells (and vise-versa) as they work at completely different voltages. When you solder the wires to the BMS I strongly recommend using a flux to help the solder adhere properly to the pad. Lead-free solder does not work anywhere near as well as lead-based solder and sometimes if there is no flux you will have a hard time getting the solder to adhere properly to the pads. Don’t let a bad solder joint cause your pack to not be able to reach it’s peak power. If you splice wires together then make sure you cover the splice with heat shrink tubing. When you are done with replacing the BMS (if you need to do that) it’s time to test the battery. First check the voltage and make sure it’s normal before charging it. The first time you charge it I recommend doing it outside or inside in your woodstove just in case. If your house burns down it’s going to be an awkward story for the insurance company. When you sue me I can guarantee you’re not even going to get enough to cover your cab ride to the lawyers office. I am the 99%.
Once you are sure the pack works it’s time to heat shrink wrap it up again. Measure the height + the width and add a little and order that width PVC heat shrink tubing from Alibaba. It’s pretty tough to find the right stuff, I bought mine here for about $5/meter + $2.50 for shipping. Ignore the diameter measurement and focus on the flat dimension (mine was 300mm or 30 cm). I use a paint stripping gun to shrink the tubing and find that it works pretty well.
With a little luck, and a lot of blood sweat and tears a normal person just like you can bring a dead pack back to life, or maybe you’ll just die trying.
Ride On.


if you’re electronically inclined you can make a spot welder out of an old microwave transformer too.
LikeLike
I gotta say I’m impressed by this cheapo $123 shipped welder. It barely sparks and felt pretty safe even though welding Lithium batteries is inherently pretty risky business. I might feel differently when the spot welder burns my house down, but for now I love it.
LikeLike
Can you make a project of it? It would save lot of our money. Commercial spot welder is in the range of $300-$800.
LikeLike
It’s been a few month that I read your articles. Always with great interest because the knowledge you are sharing is gold. I’m an e-bike enthousiast from France and I see myself as a “white belt” in this art, I assemble bike parts, adapt some parts for the bafang kits to fit and make palstic box for OEM battery packs. Next step for me is making my own battery pack, with spot welding, soldering… Thank you again for all your reviews, very informative (it will save me months and euros) and also sometimes very funny.
Akim
LikeLike
Pingback: How To Swap Out A BMS On A Frame Pack … Lickity Split | ElectricBike-Blog.com
Love your blog. I think you are past this $123 welder now. Some other post ideas; how to use and fix these welders, DIY probes for bigger packs, converting a 36v pack to 48v (or 52v), reviews on the various eBay bms products that come with no manual. Keep up the fun and informative writing!
LikeLike
Pingback: How to sell a used ebike and never lose more than $100 | ELECTRICBIKE.COM