It’s not winter yet, but as summer comes to a close and I start thinking about wintertime coming there is something that you hardcore winter riders may want to do. I’ve ridden electric fat bikes in the snow for several years now and because of all the problems I’ve had with frozen derailleurs, brakes and chains I keep my electric fat bikes inside where it is warm overnight. I never transport my fatties on the outside of the minivan, they always go inside and then as soon as I’m done riding they come right back inside to melt again. One of the major shortcomings of the BBSHD motors is that although they are weatherproofed, they are not completely waterproof. In the wintertime when the bikes move back and forth from extreme heat to extreme cold you get water condensing on the inside of the motor casing like beads on the outside of a glass of water. The first run of BBSHD’s also had a cardboard gasket that the motor mounts to the frame of the BBSHD case. I’m hoping that Bafang will make future versions of the BBSHD that will have a rubber gasket instead of the cardboard one.
Adding a thin coat of varnish can prevent this problem when winter riding with your BBSHD
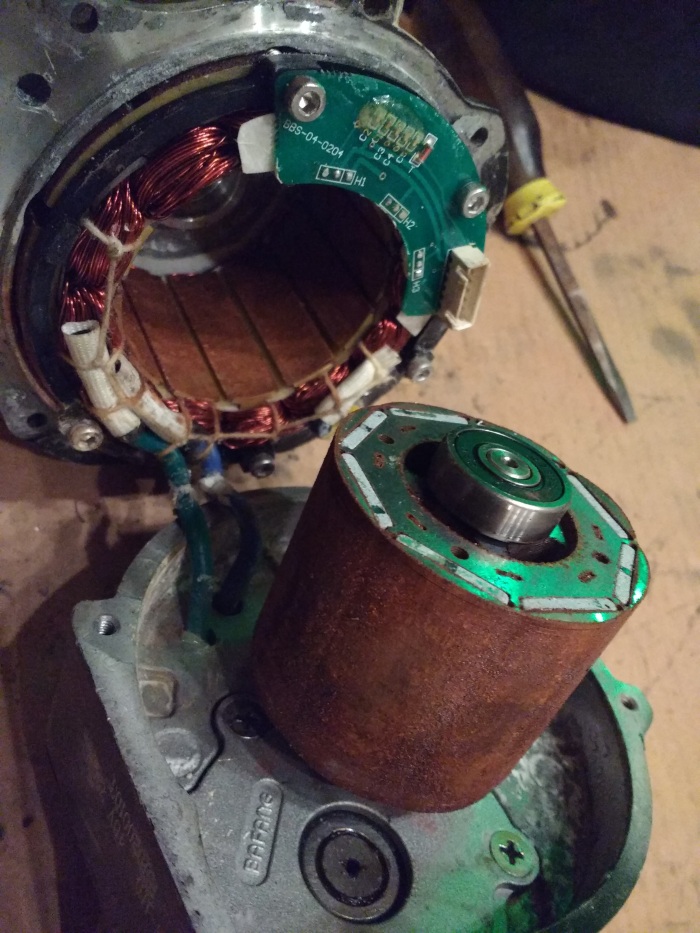
After a full winter season of beating on the BBSHD in the snow I took it apart and found a fair bit of rust on both the rotor and stator. If you look at your starter or alternator in your car you can see that the insides of it are covered with a varnish which is sometimes clear, but often it is brightly colored. This varnish is not normal spraypaint, it is specially designed to waterproof the stator and rotor. There are plenty of ebike geeks on endless-sphere that have taken apart, cleaned and varnished DD motors. This article will show you how to disassemble, clean and prepare your BBSHD rotor and stator for varnishing. This is not a beginner project and it is intended only for people who are comfortable disassembling and reassembling the Bafang BBS series mid-drives.
In the interest of full disclosure, when I first got my BBSHD I took it apart and pulled apart the motor. In the process I am quite certain that the cardboard gasket between the motor casing and the cast case ripped in one place. While riding the BBSHD in the winter it would often get a lot of snow and ice buildup on top of the motor casing which would then melt when I brought the fatbike inside. By writing this article I am not saying that the BBSHD design is flawed in any way, only that it might be possible for snow and moisture to work its way into the drive unit and cause problems. Although ebike motors could be varnished very cheaply at the factory, every ebike motor I’ve ever seen has not been varnished at the factory.
I purchased a spray can of red electric motor varnish on ebay for about $18 shipped which had enough varnish to do about a hundred electric motors. I rode this BBSHD after varnishing it for the entire summer at a much higher power level than the rated 30 Amps and have not had any issue with this varnish. Although I have not taken the motor apart again for inspection (I will do this after this winter riding season). I’m publishing this article now so that people who want to varnish their motors before the winter comes will have a chance to.
In order to get the motor apart you will have to follow these steps.
- Take the BBSHD drive unit off your ebike and then remove the secondary reduction cover.
- Remove the controller and then clean off the silicone where the 3 main phase wires come through the case. You should also unplug the larger plastic connector that goes directly into the motor through the aluminum case. This connector will have silicone all around it that will need to be removed as well.
- Take off the bolts on the motor side of the BBSHD and then carefully pry it apart. This is the hardest part and is easy to do if you don’t mind destroying the cardboard gasket but is very difficult if you want to keep the gasket intact. I recommend that you just buy a replacement gasket before you start the procedure which only costs about $5 right here.
- Once you get the motor apart from the case you will have to carefully pull it apart while feeding the phase wires through the holes in the case. If you are not careful the insulation on the phase wire will tear and then it can short out against the case. You will want to completely remove the motor then you will need to remove the plastic connectors if your controller has the Anderson Powerpole style connectors or just pull off the rubber boots if they are the banana plug style connectors.
- Once the motor is loose you will have to pull the rotor out of the stator. This process is extremely difficult and I recommend doing it by putting the motor in a vise and grabbing the very tip of the rotor with a pair of vise grips and pulling directly straight up away from the motor. Be careful with your fingers, if they get trapped between the stator and the rotor they can get pinched pretty bad. There is a lot of energy holding the two together and you will have to pull very hard.
- If the magnets on the rotor or stator are rusted then you will need to sand them very carefully. Make sure not to hit the winding insulation or the hall sensors when you sand and carefully collect all the rust that comes off. I started with 120 sandpaper and went all the way to 220 grit sandpaper using rubbing alcohol to carefully clean off the rust between sandings. There are people that use baking soda and vinegar to clean off rust, but I ended up just making a big mess without getting off any rust using this technique.
- Once all the rust is removed you should using blue masking tape to cover the windings, hall sensors, helical gears and bearings as well as the case of the motor around the stator and do a final cleaning of the magnets using rubbing alcohol.
- Using several light coats spray both the rotor and the stator in a controlled environment away from direct sun so the pain can dry slowly. I waited and hour or two between coats. I had a bunch of pictures of this process, but somehow they all disappeared.
- Remove the masking tape and carefully reassemble the drive unit being careful of your fingers. Make sure to feed the 3 phase wires though the case housing before you line up the motor to the case. When the motor is mounted back on the case it will take some force to get it to seat properly. Make sure it is lined up carefully then press straight down hard keeping your fingers out of the crack. Make sure to use a new gasket.
- After bolting on the motor you will need to pull the phase wires through and check for damage. If the insulation is torn then cover them with some heat shrink tubing. Silicone the 3 phase wire openings as well as around the connector that plugs directly into the motor.
- Connect the controller. Put the secondary reduction cover back on.
- Test the drive unit before you replace it on your bike.
If you don’t mind trashing the cardboard gasket getting the drive apart is actually easy.
When taking the motor apart occasionally the rotor will get stuck on the motor casing side of the unit (as shown in the first picture of this article). When this happens you must make sure that as you pry the motor stator off that the phase wires can feed through the holes properly and the connectors will fit through the holes. It is extremely hard to remove the motor in this way and you must make sure to not get your fingers pinches between the rotor and the stator.
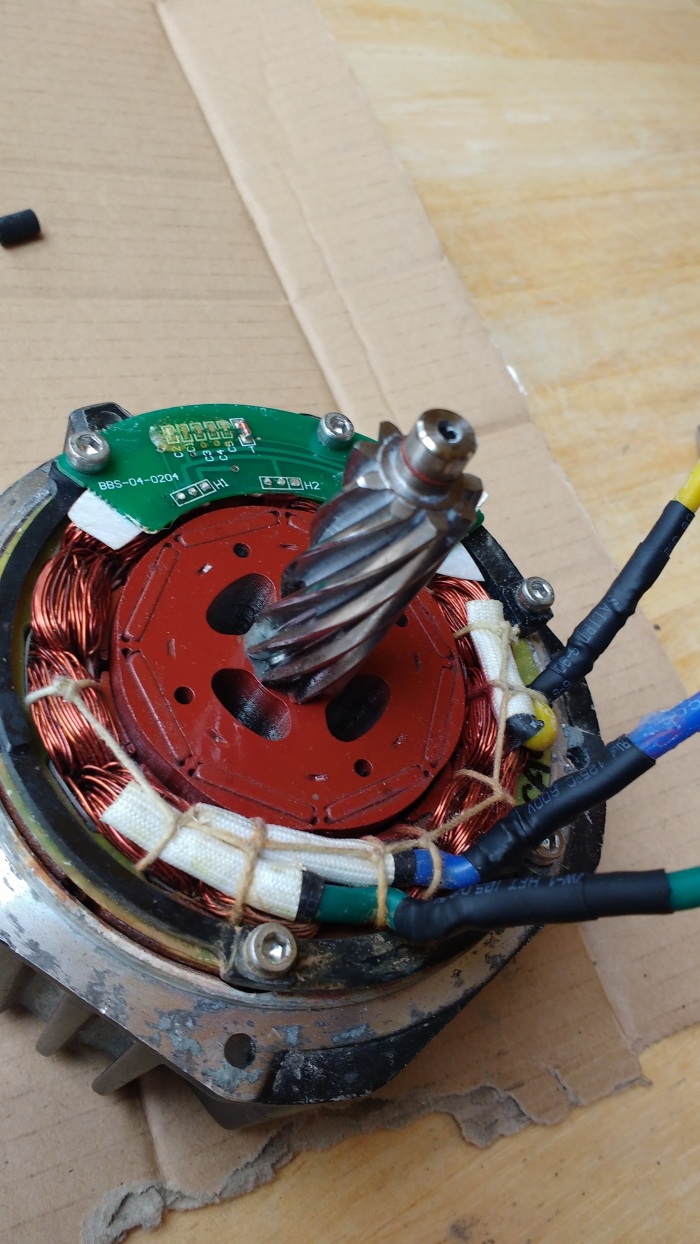
The final varnished product put back together. You can see the heat shrink tubing on the damaged phase wire insulation. Also notice that the entire helical gear was masked off.
With a few hours of work and about $18 worth of varnish you can ensure that your BBSHD mid drive will last for many winter months of abuse in the deepest snow. I own nine 750W BBS02’s and have never had any problems with the rotor or stator rusting so I am not recommending this process for that drive unit at this time. If there are any updates regarding rusting of these units I will update this article.
Ride On.


Do you have any documentation on cleaning the magnets on the BBS02? Both my motors have issues there.
LikeLike
The process should be the same as with the BBSHD.
LikeLike
My BBS02’s sound like they are grinding rocks or popping popcorn. Was told that was due to debris accumulating on the magnets. I think it is different than what you are describing her fix wise?
LikeLike
Unlikely dirt on the magnets is the problem. Most likely you need to regrease the secondary reduction, a 5 minute job. Pull the plastic cover off and throw some mobilgrease 28 on it before your pinion gear self destructs.
LikeLike
Tried that. Still grinds. No damage anywhere when I pulled it apart. Only thing I did not take apart was the magnet area. I had it fixed once before at a shop that closed down and recall the magnet being dirty was his solution. It worked great for another 500 miles now doing it again and startting to on wife’s bike as well. Short video is linked. https://www.youtube.com/watch?v=OSPc8baoeoE
LikeLike
That noise sounds like something is just not right. Check to make sure the chain is not hitting anything, check to make sure the noise still happens when you are pedaling. Your chain looks very very loose. The motor spins 15x faster than the crank turns and your noise seems to coincide with the speed of the chainwheel turning.
LikeLike
I would recommend checking over the rotor bearing for play (the bearing shown in the first picture). I would do a rebuild of your unit. There are videos about the tear down of these motors and they are not really that complex, just make sure you take your time and do a bit of research before. Having some replacement parts on hand is also really nice.
LikeLike
I am sending to Doug at California E-Bike. It’s not the chain and the noise is coming from inside as I can feel the activity with my hand on the motor. Perplexed as to how I have 2 motors purchased at different times from Lectric Bikes and they both have the same problem. Lectric Bikes won’t even look at them, wants me to buy new motors.
LikeLike
Hi, that sounds like the rotor inside the motor is hitting or rubbing against the winding housing. This could be due to the fact that rubber o rings at both ends of the rotor may have worn out this causing the rotor to wobble around inside the bearing hole. You should not be riding in this state before servicing the motor.
LikeLike
What about just spraying the internals with ACF-50? It does a great job of preventing rust and lists “motors” and”pc boards” as applications. I don’t know how long it would last on the armature.
LikeLike
You could use high temperature black silicone as gasket instead of the cardboard gasket.
LikeLike
Hello I’m just in the process of doing 50amp mod and thought I might as well do this, did the varnish hold up fine when you next stripped it down? Cheers Alex
LikeLike