Remember the good old days of Lead Acid when you could just throw your car batteries on a $12 float charger and then forget about them for years? How I long for those days. Welcome to the new era of Lithium batteries where long-term storage without degrading battery performance is not a simple nor elegant procedure. The problem with Lithium is that unlike Lead Acid it does not like to be stored for more than a few months at a time fully charged, and instead it wants to be stored at 40-50% charge. The reasons for this are complex, but for the purposes of this non-technical article, we’re just going to talk about the practical applications of lithium battery storage and just assume everything that happens inside the cells is magic. The problem is most people have no way to easily charge their packs to 50% and running them down from a full charge without using your ebike properly can be something of a hassle. This article will talk about different ways to drain your battery to the proper voltage, how to store your packs and the dangers of doing either procedure improperly.
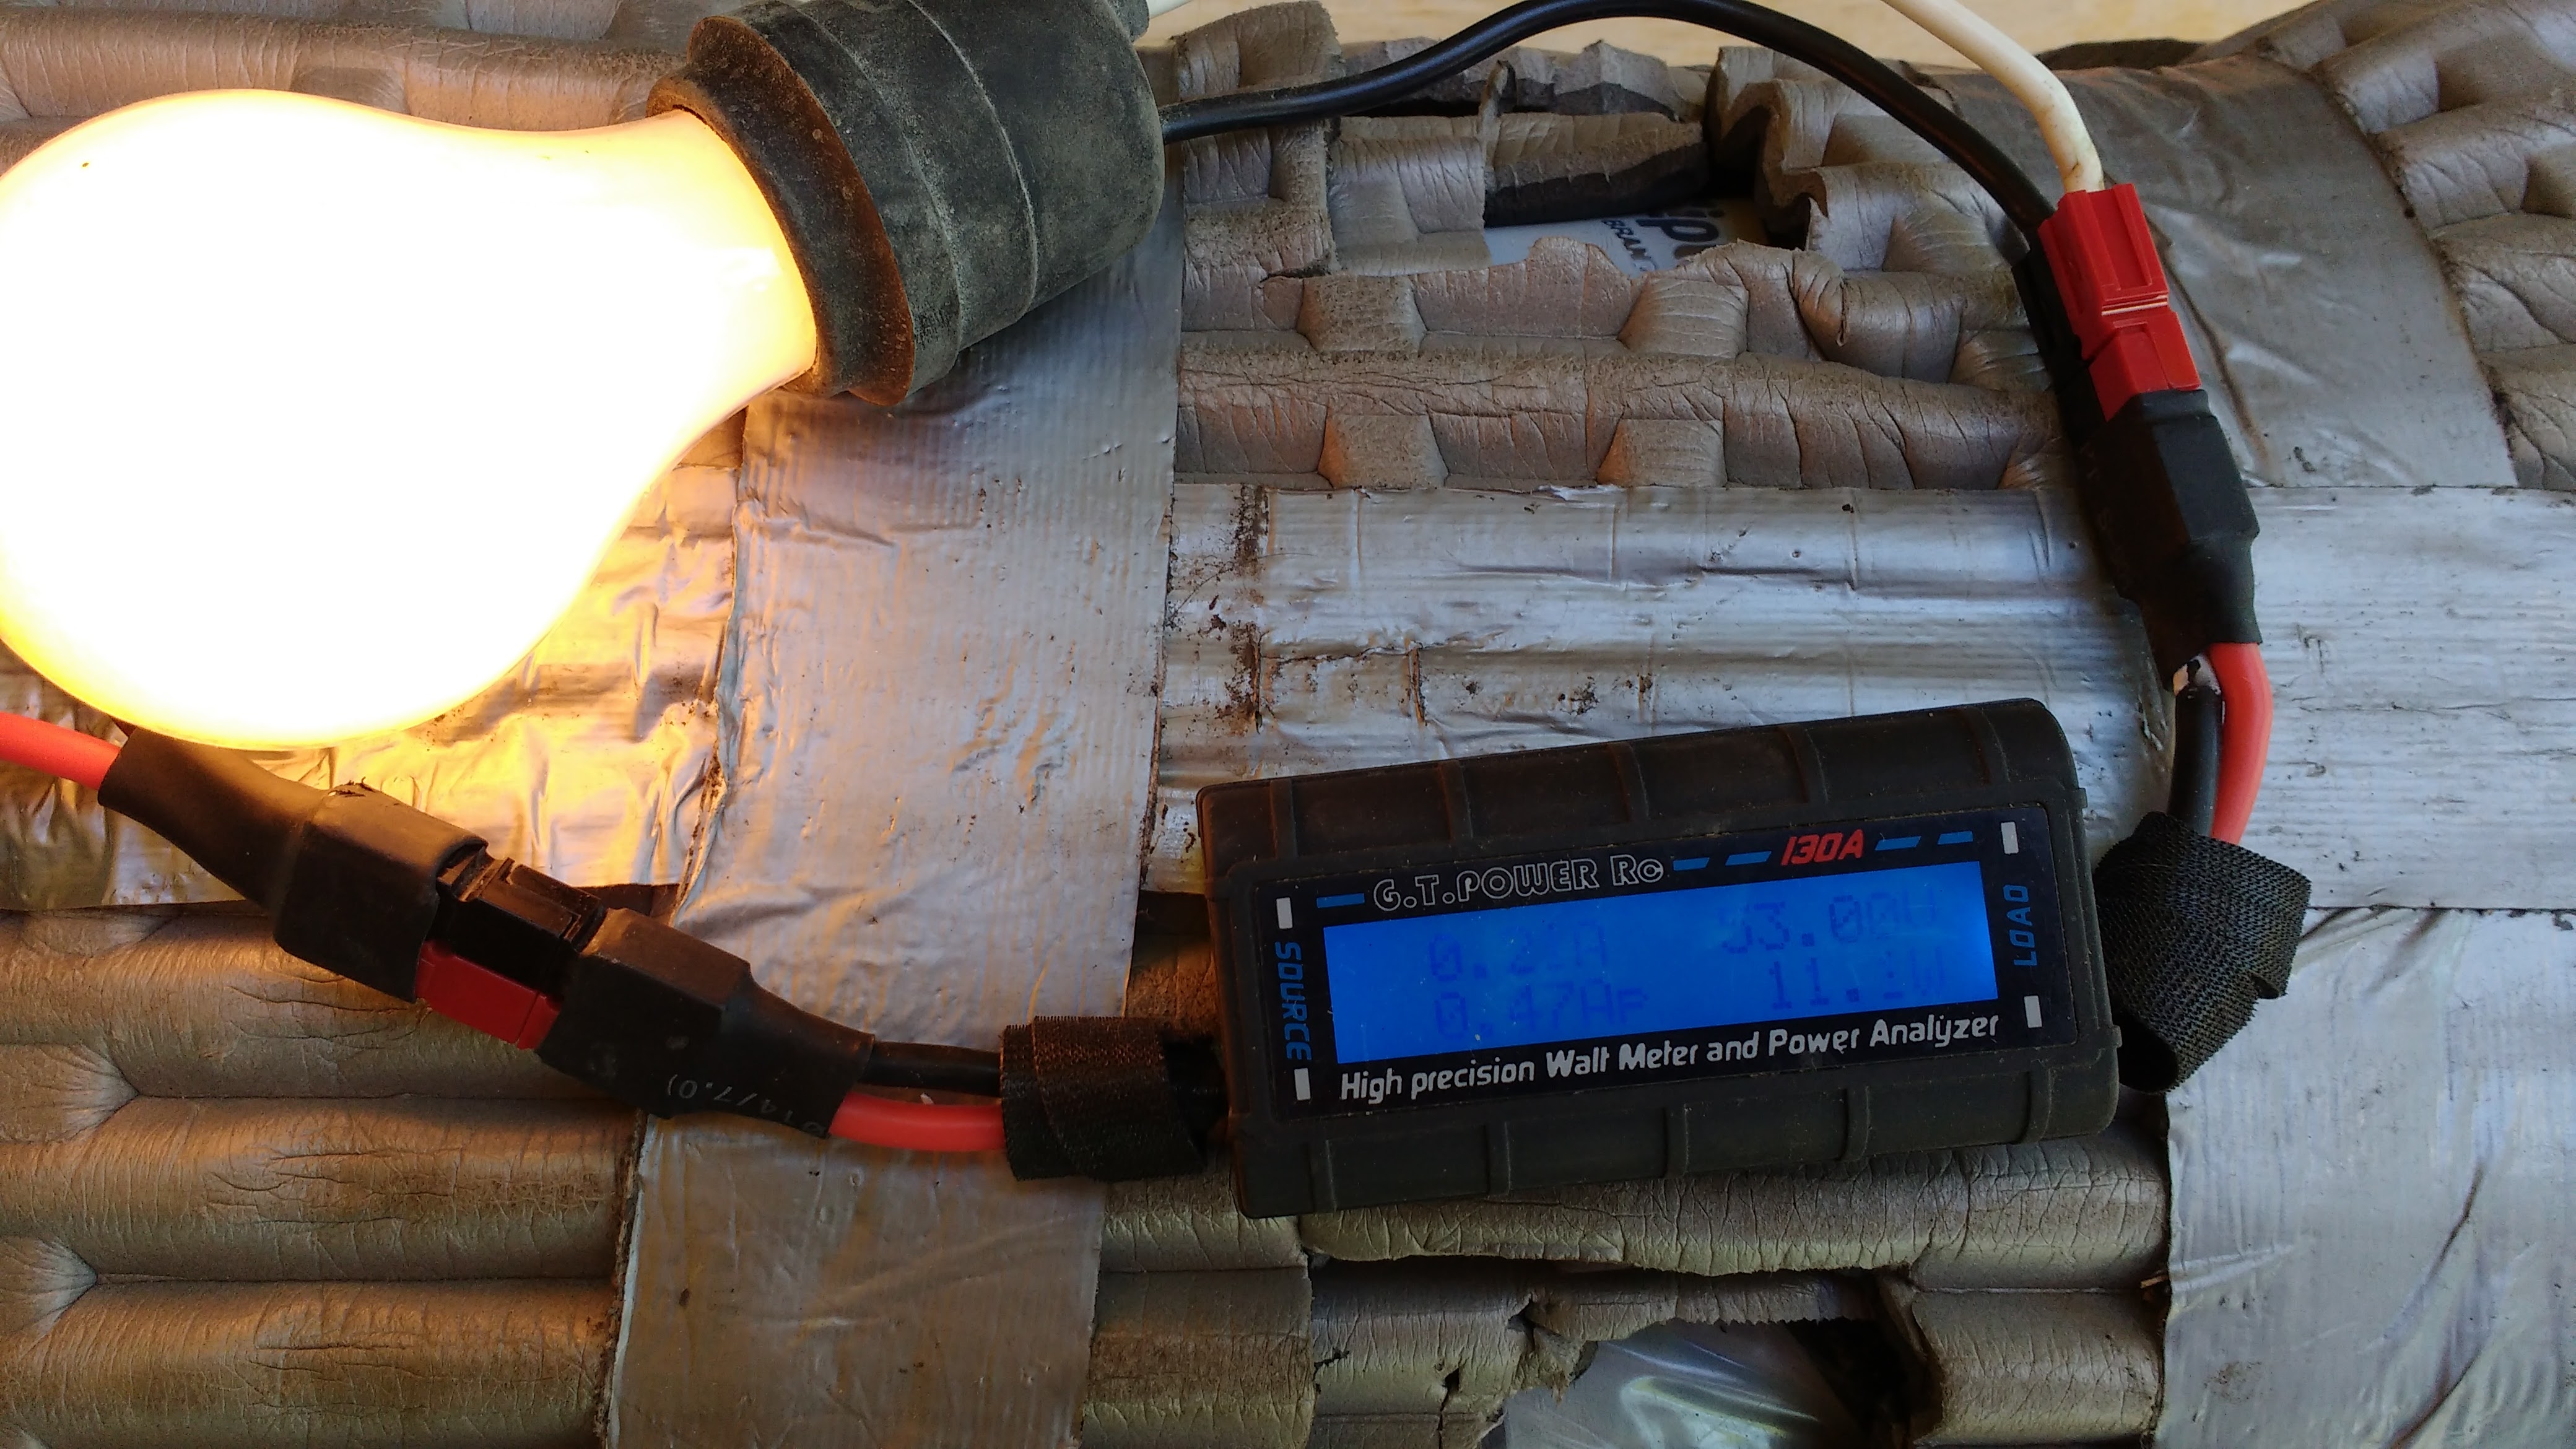
You can build this very safe pack-draining tool in 2 minutes for about $2 using nothing but two Anderson connectors and a 100W incandescent bulb and lamp base. Drains at about 8-12 Watts.
If you’re interested in reading a more technical description of battery storage you can check out this article on Battery University. In summary, all batteries self-discharge over time which is not really a problem. Different chemistries self-discharge different amounts based on their State of Charge (SOC) and the temperature they are stored at. The cooler the batteries are stored at the less they will self-discharge, but no battery really likes to be below freezing. Not having too much humidity is also important, around 50% relative humidity is best but when in doubt I err on the side of dryer rather than wetter. The self-discharge is not much of a problem unless the lithium battery is left so long that it self-discharges below the LVC of the BMS in which case your expensive lithium battery becomes a very expensive doorstop. You can try to force charge the pack using the discharge wires to jump it back to life then switch to the normal charge wires after about an hour but this is a risky proposition (I’ve done it twice with success but I charged it outside my home far away from my house). Storing Lithium batteries for long periods by starting out at a fully discharged state is an absolutely guaranteed way to kill ANY lithium cell, so just don’t do it.
It’s important to distinguish between recoverable losses which is just a battery discharging normally and then charging back up again and non-recoverable losses. Non-recoverable losses is the dent in battery capacity that you could suffer if the batteries are stored improperly. When you charge a Lithium pack it charges to a certain voltage and then pretty much stops. Once the charger shuts off the voltage drops back to the peak rest voltage for that pack. The only way to tell if you pack is losing capacity is when the peak voltage gets lower over time. This will happen naturally with ALL lithium cells, but the scientific consensus is that storing Lithium packs at 100% charge and not using them will accelerate this process of degradation.
What voltage to store your pack at
The recommended voltage to store your pack at is 40-50% but for this article, I’m going to recommend that you store your batteries at 40%. If you have a 52v pack then store it at 53.2v, if you have a 48v pack store it at 49.4v. This system breaks down with some power tools that have the voltage of the packs listed as the fully charged pack voltage like my much loved 56v Ego packs. This is a confusing marketing gimmick to make the uninformed consumer think that their battery systems have more power than they actually do. For the Ego packs, the charge will automagically discharge the pack if it sits in the charger unused for more than a couple of months so you don’t have to worry about discharging the batteries manually. My wife and I have 3 Ego batteries and almost every Ego power tool made and use them on a daily basis on our organic permaculture farm.
With most lithium packs the individual cell range for 40-50% SOC is somewhere between 3.7 and 3.8. Lipos and LifePo4 cells will have completely different voltage ranges you need to calculate what the correct SOC for your pack would be. Shipping requirements for NMC (most common cell) are 3.6v per cell which is about 30% of capacity. For a full run down on the battery types and their voltages check out this article on Battery University. When in doubt just charge the pack to around its nominal voltage for long term storage and it should be fine.
Every 6 months or so you should check your packs and charge them back up to 40%. Although I often let this process slip for about a year, you should make sure that whatever you do that you don’t let the batteries slip below the LVC of the BMS for the cells otherwise your battery might go to sleep and never come back to life again (unless you kiss it). Before I hook up the charger I think roughly about how much I want to charge it then set a timer to check it to make sure the pack does not get over 50% SOC. If I have a 10Ah battery and I need to charge it about 20% with a 2 amp charger then that means I would have to have it on the charger for an hour (2 Ah / 2 Amp charger = 1 hour).
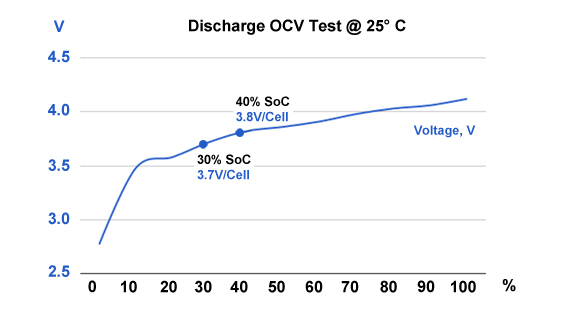
40% SOC for a Lithium manganese oxide battery is 3.8 or 49.4v for a 48v pack and 53.2v for a 52v pack. For NMC (most common cell for new packs) it is slightly lower at 48v for a 48v pack and 52v for a 52v pack
How to get your packs to the right voltage
One of the problems a lot of people have is that it is a pain getting the packs to the right voltage for storage. When the charge shuts off the packs are full charged and then you have to drain it back down again. You can’t just put your ebike on a stand and run the motor because running without a load at full blast will cause any ebike motor I’ve ever touched to overheat. You can get on your ebike and go ride around until the display reads the voltage you want to store the battery at, but that can be annoying to do as well. I’ve discovered two ways to adjust battery voltage quickly and safely without leaving your home.
Incandescent light bulbs
You can make a quick and dirty bulb adapter for about $2 worth of stuff. Get any normal light bulb adapter with pigtails from a hardware store and then just crimp a couple of Andersons or solder and XT60 to it. The power/ground doesn’t matter because the bulb is basically a giant resistor that will slowly drain the battery down at about 8-12 watts or .2 Amps. If you don’t have a decent power meter that goes inline with the battery then you’ll have to guesstimate how long it will take by calculating amp draw * time. If you want to drain down 5 Ah in a 10 Ah pack then it would be about 25 hours (5 / .2 = 25). It doesn’t have to be perfect, it’s just an estimation. Don’t ever check your battery voltage by sticking your probes on the XT60 male charging port, you risk shorting out the pins which will cause the pack to weld your probe to the pins and possibly explode. Only check voltage on the female XT90 discharge plug end where it is impossible to cause a short with your clumsy monkey fingers.

This shows the power draw when plugged into my toaster oven, close to 300W
Using your toaster oven
If you’re impatient like I am then you don’t want to wait for days for your pack to drain down there is a much easier and faster way to do it. By crimping Andersons connectors onto a normal 120v AC house extension cord plug you can make a $5 adapter in about 10 minutes. It doesn’t matter whether power and ground go to whatever plug as with the lightbulb the heating element is just a large resistor that turns your battery power into heat. The ground connector on the AC extension plug is left unused. Using this cord my crappy little $30 toaster over drains about 300 watts of power at around 5.5 amps. As above to calculate how much power you want to drain by multiplying the amp draw * time to discharge. If you wanted to drain 10Ah out of a large 20Ah pack then you would want to toast nothing for about 1.8 hours or so. (10 / 5.5 = 1.8) Under NO circumstances should you ever plug your battery into space heaters because although they might work, most space heaters have a fan that probably won’t run properly and you could accidentally (or purposely) burn your house down. I also do not recommend plugging in ANY other appliance to your homemade cord as 58v DC is NOTHING like 120V AC and you’d almost certainly destroy 99% of the products that you plugged in.

If you are dumb enough to build one of these things you accept all liabilities from its usage
Lithium Batteries are safer when half discharged
One of the more interesting things Eric and Luke\Live for Physics have been working on at the Lunacycle Battery Destruction Laboratory is systematically crushing perfectly good 18650 cells using a hydraulic press. One of the first things they realized is that cells that were at 50% SOC were not that likely to blow up, if at all. On the other hand, if the cell was fully charged or even *gasp* overcharged then you are guaranteed to get a good fireworks display. I’ve never heard of a Lithium pack blowing up that was not either charging or discharging, but theoretically it could happen. Your best bet it to store your batteries in wood stove when charging like I do or in a modified ammo box ($20 from Luna here) in the garage if you don’t have a fireplace. The smoke from a lithium fire is incredibly toxic and just the smoke could ruin everything in your home. While discharging packs using lightbulbs or toaster ovens I also recommend that you keep the pack in your wood stove or garage in an ammo box just to be safe.
Where to store your packs
Although some people store their Lithium packs in the refrigerator, I don’t recommend that because the humidity inside your fridge can be quite high and that can cause problems with corrosion on the connections and the BMS. The best place to store them is in a very cool, dry place where animals and pets can’t get at them. Don’t ever store packs in your car where temps on summer days can get well over 100 degrees F. Heat kills battery packs and you want to keep your packs as cool as you can.
Storing your Lithium Packs for months on end is easy and safe if you do it right. Proper pack storing technique could greatly increase the life and capacity of your pack, so why wouldn’t you do it? I hope you have found this article helpful and even more than that I hope you don’t accidentally do something stupid and blow yourself up. Remember the easiest and safest way to get your pack down to 50% is to just go on a bike ride and burn up half of the power in your pack. Remember that when you charge your pack it will read higher than it really is for about 15 minutes after you pull it off the charger and if you use it under heavy load it will read slightly lower than the actual pack voltage for a few minutes after the load is removed. The most important thing to remember that it’s not an exact science so just do the best you can to get the pack to 40-50% and that will be enough.
Ride On.


Absolutely great topic, and article, Karl. Like you mention, I was used to the ‘old way’ for a long time and had to re-teach myself SOC and storage habits for 18650s. Learned the hard way, as before I knew all this stuff (just last year, actually), I had fully-charged my Evolve GT skateboard before storage – I went to Ukraine for a month. Thinking batteries should be stored long-term is fully charged, I was blissful in my ignorance of how Li-Ion cells work. Came home a month later (thankfully no fires), and found my pack had lost capacity by almost 40%. Whoops, expensive lesson. Replacement Evolve packs are $500.
Now that I’m more enlightened, I drained all my packs to about 35% SOC before putting them away for storage this time. Oh, and the best place to keep them? All stored packs are resting nicely in my fireplace.
LikeLike
Thanks for the great reminder! A subject not preached enough!
Storage here is in a 65F 60% humidity controlled basement, in a flammable cabinet with screened vents. Zoro often has a 20% off coupon with free shipping, on cabinets, and the 12 G holds 10-12 Dolphin packs on the top shelf. Lots of room and it latches tight with double steel walls and screened vents. Lots of nasty smoke will pour out, but the fire will be contained.
For discharging AND load testing, while certainly not as cheap and convenient, the Grin Load Resistor, 6.8 Ohm 300 Watt load resistor, is a bit quicker. There are lots of load resistors on eBay and Aliexpress as well. Higher load resistors are nice for seeing sag in packs as well. Micah Toll also did a design for a load discharger and load tester. A device good for revealing pack problems.
LikeLike
Pingback: What A Good Idea : Long-Term Lithium Pack Storage Without Incurring Non-Recoverable Losses – E-Bike News and Information
Pingback: Here's information about how lithium batteries die. | ELECTRICBIKE.COM
So all of those consumers who buy commercial ebikes with downtube mounted dolphin packs that they store without a thought in their garages or basements or front hallways are playing with fire, so to speak?
LikeLike
I own two 52v triangle Li-ion packs. One is 28.6Ah., the other is 30.06Ah. (LG MJ1 cells). You covered how to store the battery but haven’t stressed how to properly initiate and maintain batteries for daily use. This is how I maintain mine. Upon receipt, a pack is fully (slow) charged using a Satiator and then fully discharged until the Battery Management System (BMS) in the pack shuts it down. I then again slow charge to 100%. Once that is done I don’t discharge the pack pass 20% and only slow charge up to 80%. This allows me to use and stress only 60% of the batteries storage capacity. Every 30’ish or so charges I fill to 100% again. I am told by the manufacturer this should extend the life of the pack significantly. Some suggest over 30% more recharge cycles. That’s huge! People need to know how to store their batteries but more importantly how to use and maintain them.
LikeLike
If you have a Luna charger you can wind down the voltage trimpot (there are 3 trimpots, the one you want is the one I by itself, the other 2 are together) so it cuts out at the voltage you desire. I had a faulty one that stopped working to 80% and 90% presets so I just wound the voltage down to one that would give me ~80% charge, 55v out of the charger resulting in 54.6v at the battery.
LikeLike
Here’s a trick maybe some of you know and some of you don’t. If your lithiums have been sitting in storage. put your bike on a bike stand (with the batts attached) turn your power on, plug in your charger. Your charger does not turn on. It does not see your batts. Now crank your pedals because a motor is also a generator. Do this for a few minutes and your charger will turn on.If you don’t have a bike stand ride the bike about 5-10 mins then plug it in. “The lithium jump start”
LikeLike
I don’t believe that will work on geared hub motors.
LikeLike
Sorry to quibble here. I’m probably going to come off kind of pedantic. But…
53.2 for 52V pack and 49.4 for a 48V pack seems like higher than 40% charge. That’s 3.8V per cell. A chart I got from the electricbike.com forum (Luna mod) says 3.8V is more like 60% of capacity.
I totally trust your judgement here. Just wanna clarify the discrepancy.
LikeLike
Depends on the chemistry. With most lithium packs it is somewhere between 3.7 and 3.8. Lipos and LifePo4 have completely different voltage ranges and are not applicable to this article. Shipping requirements are 3.6v per cell which is 30% of capacity.
LikeLike
3.8V=40%. Convinced.
LikeLike
yes I can confirm what Skymon is saying. I charged my 52v battery from Em3ev to 53,2v based on your advices (with the grin satiator), and it seems to be 60% according the android app connected to my Bluetooth enabled BMS of my battery.
In fact I have a mnemonic way to associate correctly voltage to SOC. 52v corresponds to 52% of battery SOC!
LikeLike
Actually my HP calculator calculate 3.8 being 90% of 4.2. 30% of 4.2 is 1.26. On my 13 S battery pack peak voltage at full charge should be 54.6 V. 3.8 V should bring the pack to 49.4 V. Others have commented 30% is the ideal resting voltage for long-term storage. Personally I’ve never scene to 30% number talked about before when it comes to long-term storage of lipo packs.
LikeLike
I recently purchase a 72v 26a off. beat. The vender tell me leave it 1st full charge, also it those not have 72 v power on take off with phoenix electric rider kit
LikeLike
Sure glad I read this article. I tend to charge to 80% but did not know storage at 40-50% was better. Certainly less risk. We store two batteries in a large metal military box. One is the kids’ Hoverboard (real Samsung batteries) and the other is my Lunacycle Dolphin 42V pack.
LikeLike
Pingback: Destroy Everything You Touch : Managing The Repairs On Your Ebike Fleet | ElectricBike-Blog.com
Pingback: Investor, Consumer & Crowdfunder Beware : Is The Entire EV Industry Becoming Fraudulent? | ElectricBike-Blog.com
Pingback: Make it last, baby: Best practices for Lithium ebike batteries | ELECTRICBIKE.COM
Pingback: Here's information about how lithium batteries die. - eBikes
Pingback: ≫ Aquí hay información sobre cómo mueren las baterías de litio.