If there is a way to screw something up with mid-drive DIY ebikes, you gotta believe at some point I’ve done it. The newest addition to the long list of stuff that I’ve broken is the chainstay on my SnowShoe 2XL 5.05″ tired Phat Phuk build which has long been my favorite snow bike. When mounting the BBSxx with intrusive chainstays I’m often just too darn lazy and I don’t take the time to space out the drive unit away from the drive side chainstay. This causes the secondary reduction housing to pinch the chainstay which over time can cause severe metal fatigue and eventually will cause the chainstay to break. This article is about how including spacers on the drive side of any BBSxx drive unit is not just a good idea, but really a mandatory one for long-term mental sanity and safety. We’ll also talk about how to repair alloy bike frames properly if you don’t want to heat-treat them after the repairs (most people say repairing alloy frames just can’t or shouldn’t be done).
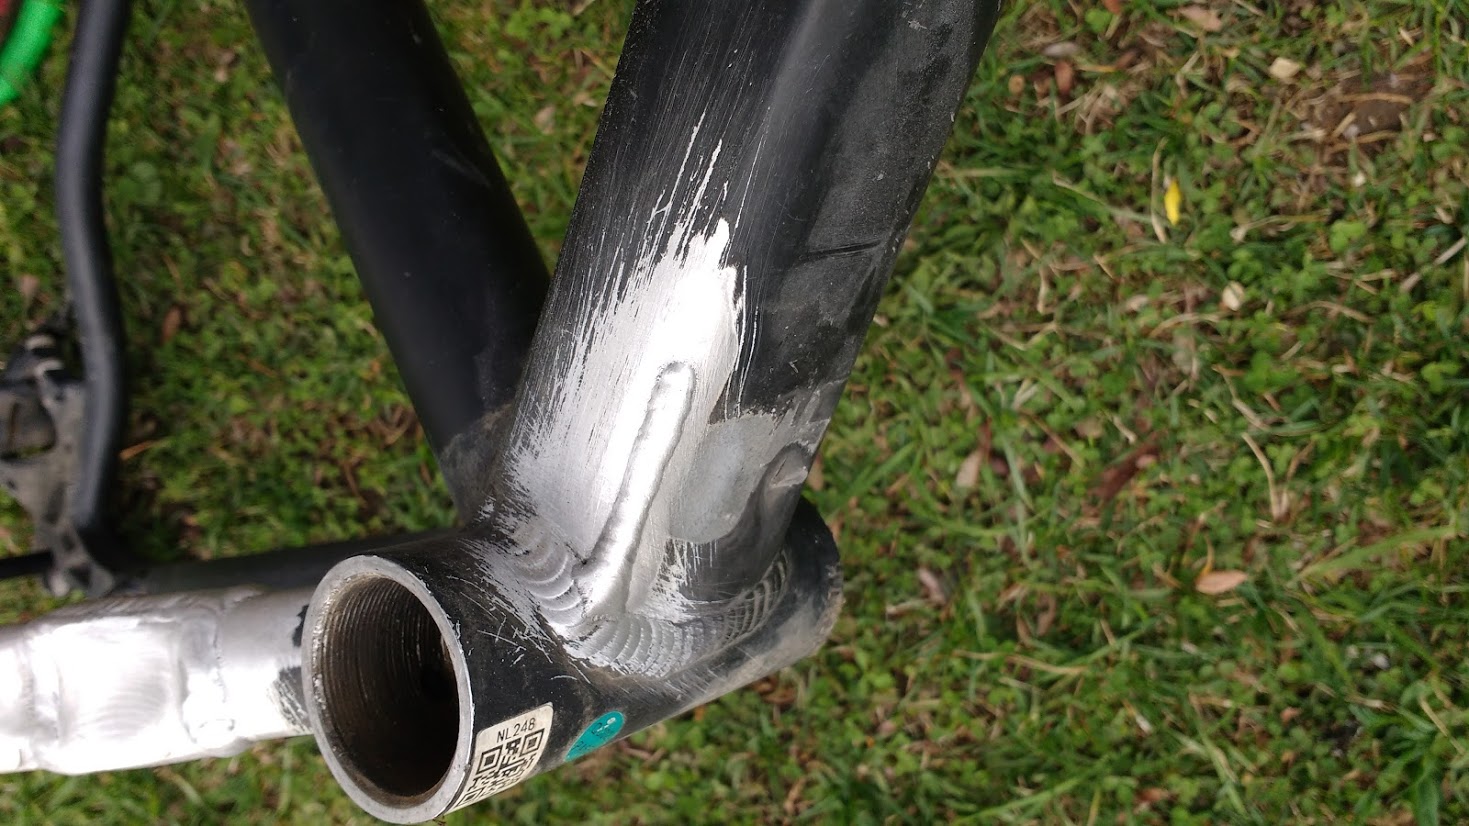
It’s enough to make me cry, you can see the BBSHD wear marks on the chainstay
Over the last 4 years, I have a pretty good collection of BBSxx drive spacers collected. Although I have steel spacer rings, I never use them, the best ones I have found online are the Luna kit for $10 here, or you can buy an individual 4mm ring for $3 here. I only recommend putting spacers on the drive side, if you put spacers on the non-drive side then the locking plate can’t hold the drive unit up using friction against the bottom bracket. If you have a fat bike with intrusive chainstays you need to mount I highly recommend reading this article I wrote on how to deal with BBSxx mounting. When you are done you should be able to slide a piece of paper between the secondary housing reduction and the chainstay, if not then you need take it off and add more spacers to the drive side until the BBSxx secondary reduction doesn’t touch the chainstay. Remember that the friction plate on the non-drive side must be flush with the BB housing, which usually involves a few washers between the plate and the BBSxx unit.
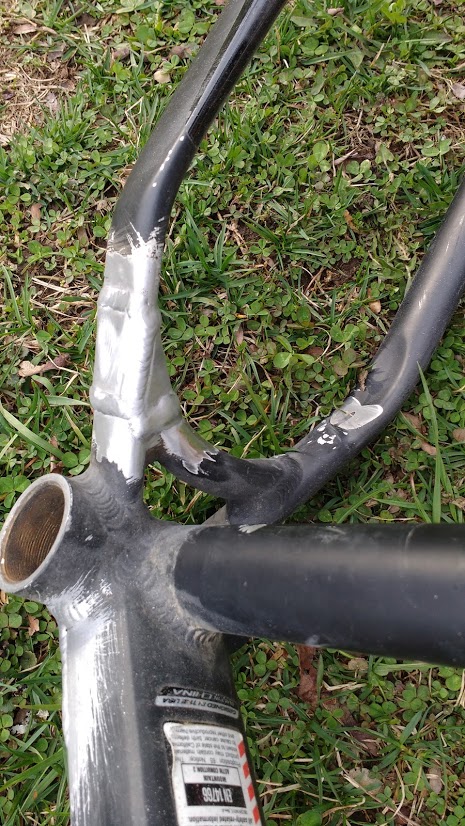
The BBSHD with a 2500W Ludicrous controller caused a tiny stress fracture on the downtube as well
One of the big issues with aluminum frames is that if you don’t heat-treat your welds you only get about 40% of the original strength of the material. Once the frames are coated it’s a major hassle to heat-treat them again even if you have access to a kiln with a pyrometer that can heat-treat it properly. The easier way to get around heat treating your frame is to just use a bunch of extra material when repairing the bike. I took my frame to Accufab in Ithaca and for $80 they fixed the chainstay as well as repairing a stress fracture along the downtube. After they welded the chainstay Accufab took a thick piece of 6061 aluminum and wrapped it around the chainstay and welded that piece of aluminum in place. The added weight is nominal but the added material will help offset the fact that I don’t intend to heat-treat the frame after the repair. I will update this article if the frame breaks again so you know not to try this yourself.
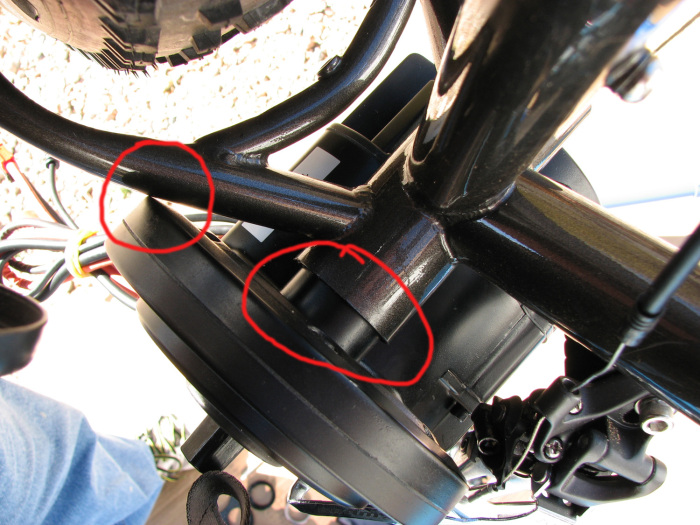
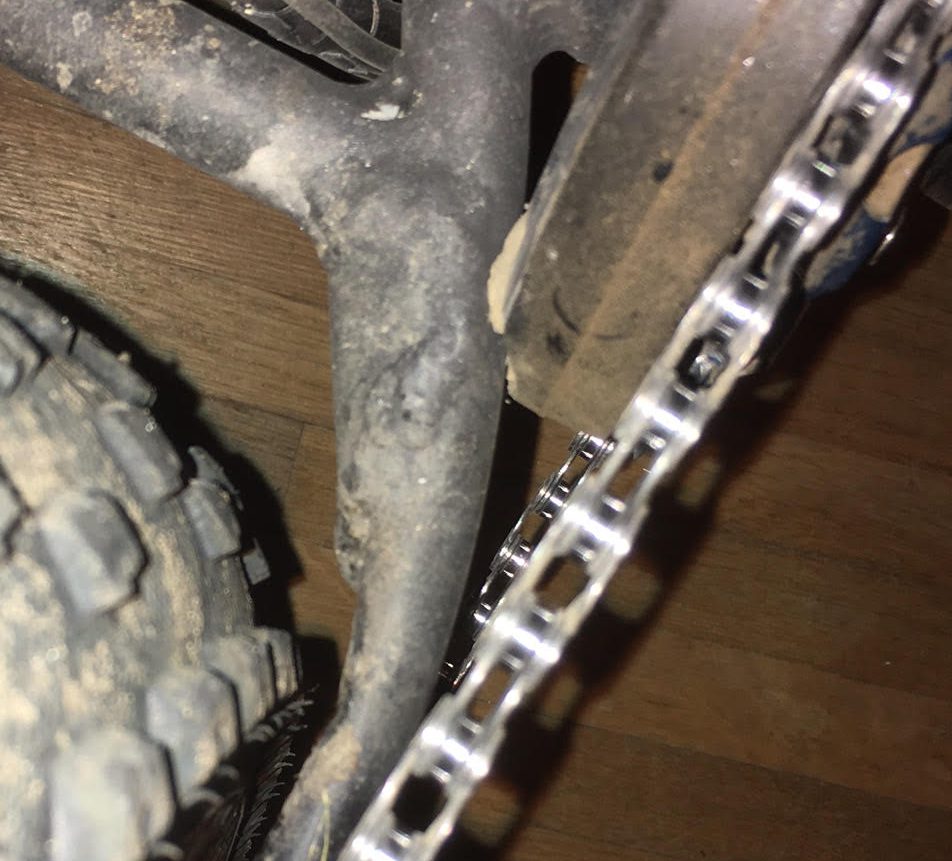
The left circle shows you where you should be able to slide a piece of paper, the circle on the right shows where you need to put spacers
Make sure that whatever aluminum you weld to your bike is from a similar alloy that your frame is made out of, for the majority of bike frames that would be 6061. If you have any doubts about the alloy your frame uses then look up the specs or contact the manufacturer. Don’t tell them that you’re trying to weld their crappy frame which broke when you tried to run 2500W though it and then went singletrack riding with it. They will probably just laugh at you, I would.

You can see the large piece of aluminum that was welded over the entire repair on the chainstay
The mainstream biking world says that if your alloy frame breaks then you just need to throw it in the trash, but I think that is wasteful and short-sighted. Alloy frames do suffer from metal fatigue, and when you are thrashing on them at high speeds with a 2500W Ludicrous controller that is doubly true. There isn’t really any reason to throw away a good frame when it breaks when you can fix it for <$100 professionally and maybe get another year or three out of it. When you find something that works for you it’s hard to just throw it all away and just start from scratch. The Phat Phuk is my favorite build and it would be hard for me to find something else that works anywhere near as well for me.
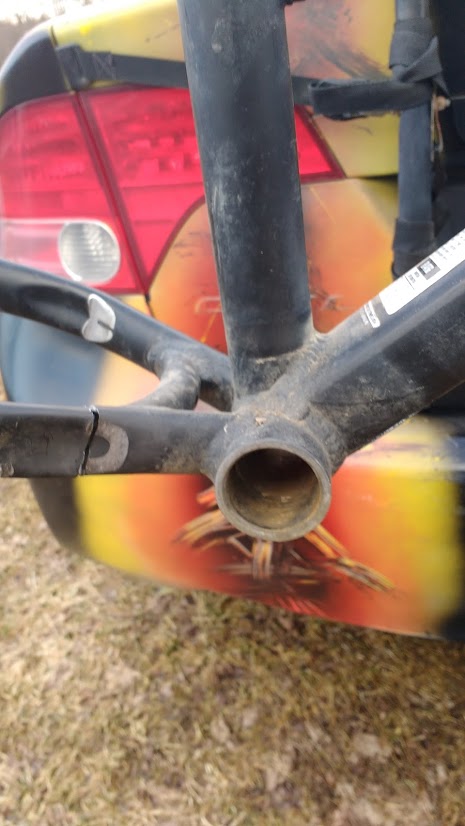
One of the depressing parts of pairing a 2XL with an alloy frame is the wearing down of the frame from the lugs on the inside of the chainstay
My latest build is a Lurch steel frame (Phatter Phukker review here) that I got for $700 from BikeIsland.com without a front fork. This is the only other factory frame that I know of that will fit the snowshoe 2XL in the rear without modifications. I’m going to call this new build the Phatter Phukker, (build thread is coming, stay tuned) and it seems to work at least as well as the Phat Phuk without the problem of dealing with a fragile alloy frame. This build is only a few pounds heavier than my 51lb Phat Phuk but for the peace of mind, it’s worth it. Steel frames can also be repaired to within 90% of the original strength of the frame without heat treating.
Curt Fisher was the OG of alloy frame repair, his bravery has inspired millions, or at least me…
From a safety standpoint should you trust a frame that has been welded? I’ve taken some pretty bad wipeouts on a bike and I can say I think most catastrophic frame failures are probably recoverable without serious injury. I would never ride with an alloy fork that was repaired but with a properly repaired frame, failure is much less likely. Since the frame is built out of triangles and triangles are inherently pretty strong, my biggest fears are of a catastrophic fork failure which would have me plowing over the handlebars at high speeds completely out of control.
Remember my mantra … safety forth.
Go ahead and sue me, all you’ll get is a shed full of broken ebikes and a really big lawyer bill.
Ride on.

It’s gonna hurt…


invest in a better frame. Try a smaller builder who can do custom builds. Expensive but you wont break it.
LikeLike
I have a BBSHD Lurch build and I have one recommendation. Cut the chainstays off the BB and weld in a spacer so the motor will clear. It is the cheapest and easiest way to clear the chainstay, and yet retain strength in the frame. Instead of doing it the easy way on my build, I cut almost completely through the drive side chainstay, then reinforced it with 3/16 steel on the inside, and filled the holes outside. My frame is currently being repaired for a seat tube crack that went clear around the seat tube. It turns out that having the fender push on the cable stay at the back of the seat tube caused a lot more damage than I thought it would. I will include links to pics in my next post when I get the frame back.
LikeLike
I’d be interested in seeing the photo. I just used the 120mm BBSHD and a whole lot of spacers. The chainline is whack but it does OK with a 30T mighty mini ring.
LikeLike
Somehow, I find comfort in your frame failure, rather than a drive train failure. Speaks well of the bbshd.
LikeLike
I wouldn’t complain if someone gave me a shed full of broken ebikes.
LikeLike
I have to say I admire Carl’s indifference to basics of engineering while at the same time he keeps us up to date with ways to have fun on a bike. Add his entertaining, light prose to the mix and here he goes with yet another Molotov’s cocktail of ebike content ! Keep up the bad work Karl!
LikeLike
Thanks man, until my Karma catches up to me, I don’t plan on stopping.
LikeLike
The problem with not heat treating Al welding is that it’s not just the welds that are a lower strength (40%) but also the “heat affected zone which extends beyond the weld & any reinforcement into the original metal. The only real solution is to extend the reinforcement piece to an area of less stress.
That’s why they sometimes call them “spreader plates”
LikeLike
Another helpful phenomenon is that over time a “soft repaired weld” can work harden itself bringing the mechanical properties up to what heat treated frame would have. This somewhat depends on using the correct weld filler rod. The welds on Karls frame looks to be very professional.
LikeLike
Recently put a Bafang BBSHD on a KHS 1000 Fat Bike, works great but my install looks very much like the picture with the motor case against the chain stay. Guess I better go check out the clearance or lack of clearance. Thank you for the write up on this issue!
LikeLike
Confirmed……motor case firmly against the chain stay! Looks like I have some work to do.
LikeLike
Reworked the clearance on the KHS, the 3mm spacer that came with the Luna Kit provided ample 2mm of clearance. Believe the frame will last for years to come as only a small wear mark developed over the 60 miles of improper clearance.
Will order an Eclipse Chain Ring as soon as they are available for better chain alignment.
LikeLike
I checked both my bikes for the drive touching the frame, fortunately neither was touching. I have a Boris Evil/Brut sprung and neither bike has failed as far as the frame. The evil brut did crack the derailleur hanger but I think that was due to crash that hit the derailleur. I just hope I don’t have a frame failure, I do weigh more than you and frame fatigue also involves weight for rider, brutality of the terrain, and how hard the rider stresses the frame by doing things like jumping.
LikeLike
Great post
Thanks for sharing
LikeLike
Pingback: Get Skunked : PSC vs Silica Rubber Fat Bike Tires | ElectricBike-Blog.com
Pingback: Phatter Phukker : Snowshoe 2XL Steel Lurch DIY BBSHD 10 Sp Ebike 55lbs ~$1780 w/ out battery | ElectricBike-Blog.com
Damn that crash is going to HURT!😂😂
LikeLike
Pingback: Carbon, Alloy or Steel: Which is the best for ebike frames? | ELECTRICBIKE.COM
Pingback: Power vs Pedal: An In-Depth Look at the Maintenance Needs of Ebikes vs Bicycles | ELECTRICBIKE.COM
Pingback: Power vs Pedal: An In-Depth Look at the Maintenance Needs of Ebikes vs Bicycles - eBikes
Pingback: Power vs Pedal: An In-Depth Look at the Maintenance Needs of Ebikes vs Bicycles – EV News Hubb
Pingback: ≫ Potencia frente a pedal: una mirada en profundidad a las necesidades de mantenimiento de las bicicletas eléctricas frente a las bicicletas
Pingback: Power vs Pedal: An In-Depth Look at the Maintenance Needs of Ebikes vs Bicycles | Africa Connect
Pingback: Energy vs Pedal: An In-Depth Take a look at the Upkeep Wants of Ebikes vs Bicycles - Customised eBikes March 11, 2023
Pingback: Power vs Pedal: An In-Depth Look at the Maintenance Needs of Ebikes vs Bicycles - Random Review
Pingback: Power vs Pedal: An In-Depth Look at the Maintenance Needs of Ebikes vs Bicycles - E-cyclist.co.uk