One way that the BBS02 middrive unit shines over other competition like the Bosch is the ability to program the controller yourself. Although the process of programming the controller will void any warranty that you got with the unit, to many people the risk of voiding their warranty is outweighed by the possibility of getting more performance or having the PAS settings more to their liking. There are 3 settings that most reputable resellers of the BBS02 will set for you.
- Low Voltage Shutoff (in Volts)
- Limited Current (in Amps)
- Speed Limit
Update: The BBSHD is programmed the exact same way as the BBS02 with the exception of the Limited Current (Amps) which should be set to 30 not 25.
Many US vendors will be resistant to remove the 20mph speed limit as that may make them liable for any accident you are in with their motor. The BBS02 at 750Watts is really only powerful enough for about 25mph or so on level ground, although with a 52T chainring on a downhill stretch I have reached 40mph. At higher speeds your batteries get used up very fast.
It can be somewhat confusing as many of the settings on the drive controller have a setting of ‘By Display’s Command‘ which means the controller on the drive until will defer that setting to whatever the display is set to. There are 3 different displays which all have different settings on them and ways to set different variables like wheel diameter, speed limit and PAS levels. For instruction manuals for all three display types look here. The C965 and C963 are generally set to 5 PAS levels, although the C961 is easily set to 9. You can also adjust the C965 PAS levels up to 9. The last page after the Password has been entered is the PAS page, it can be adjusted up to setting “0-9”.
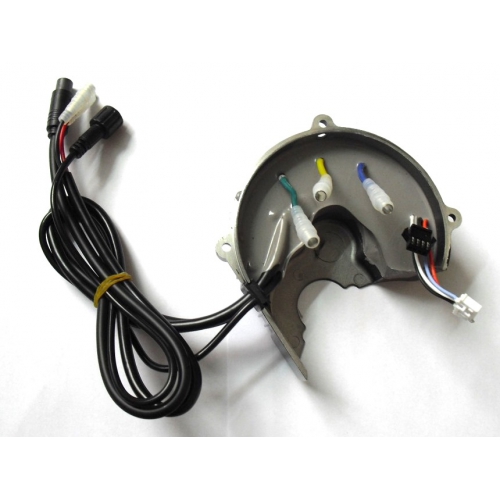
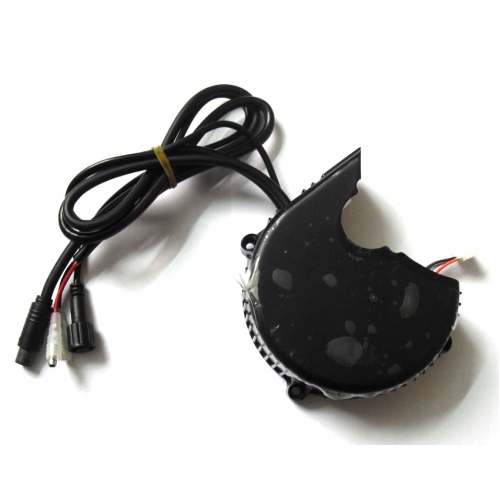
Your controller will have silicone all over the connectors and will be far less pretty than this one (notice I didn’t say ugly, I hated being called ugly when I was a kid).
Before you start programming your controller, here are some important quotes from Paul at em3ev.
- “The PAS functions like a switch, it either assists at a certain speed and current percentage or it doesn’t. It is on or off. The motor does not know how hard or how soft you are pedaling, it is not assisting you, it is not reacting to your behavior. It only knows that you are pedaling or you are not. The only change in the so-called assistance, is because the motor has been moved to a different point on the motors power curve and that is not a programmable parameter, it is just a case of pedaling that bit closer to the no load speed of the motor/controller combination, where the motor will deliver less torque and therefore less power. That is why the PAS settings are best left pretty much like they come from the factory, with gradually increasing speed and corresponding increases in current values too, as you go from steps 1 through to 9”
- “Users can change the LVC, change the current level (reduce it preferably)”
- “Users can also change the speed limit to be controlled by the display (but that does leave the kit more liable to blow).”
- “Setting the throttle to 100% and without speed limit is what everyone wants, but is also a good way to blow the controller.”
- “Once anything is increased, or the response is made faster, the controller is more liable to blow. Setting every PAS level to 100% is a terrible idea.”

A smaller chainring is critical for singletrack riding controller conservation. I prefer the 34T Raceface narrow\wide ring.
The biggest problem with the BBS02 is when it is turning under too much load at too low of a speed. The best way to keep the motor spinning fast is to get a smaller chain-ring and to make sure you are in the right gear for any hills you want to climb. The surest way to blow your controller is to use full throttle in too high of a gear on a hill where the pedals are turning too slowly. If you use a large chain-ring on your commuter (mine is a 52T because I like to go fast) make sure you shift down into a lower gear before coming to a stop even on level ground so you are not repeatedly trying to start moving in too low of a gear. Your pedaling cadence should always feel normal to fast, especially on hills.
Another strong recommendation for not frying your controller is to install a temperature probe. Instructions on how to do this are here and it takes about 7 minutes to do and costs $2 shipped.

A $2 temp probe can save your $80 controller and a lot of headaches.
In order to program your BBS02 you will need a windows PC with a USB port, a programming cable (from Empowered Cycles) and the software. More info on those three items can be found in this article.
Clicking READ FLASH or WRITE FLASH buttons changes or reads values from all 3 tabs at the same time. You should always click READ FLASH, then FILE->SAVE as a .el to make a back up copy before making any changes to your current settings.
There are 3 pages of programming variables. You can click READ for each page but it will only load the current settings on the controller on that page before you change them. Sometimes the serial connection is unreliable and a variable will have a totally wrong setting or garbage in it. I suggest clicking the READ button twice before you start changing the settings to make sure it read the controller settings correctly. I’ve never had garbage persist through 2 READ clicks, it always seems to get it right on the 2nd try. When you edit the variables you want you will then need to click the WRITE button for each page you change or WRITE FLASH for all pages. I would click the READ button again on each page after waiting a few seconds to make sure that the settings you changed were actually written to the controller firmware when you clicked WRITE.
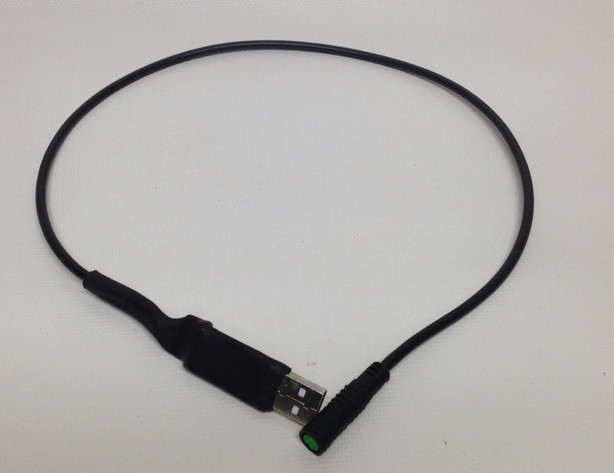
Programming cable that plugs into the display port of the BBS02 from Matt at EMPowered Cycles
Variables are color coded based on how safe they are to modify
- Green variables are safe to change
- Orange variables can be changed but there is some risk
- Red variables should never be changed unless you know something that I don’t
The color of the variables are what defaults from various drive units as well as the .el configuration file for each vendor. You must save the file to your drive then rename it from .doc to .el then FILE->LOAD it directly into the Bafang program. All variables will be automatically set on all three pages and you need only to WRITE FLASH to write it to the controller.
- Black is for em3ev settings. .el File is here
- Blue is for Lectric Cycles e-RAD settings.
- Brown variables and text is EMPowered Cycles settings & quotes. .el File is here
- Purple variables and text is Kepler from Endless-sphere’s settings & quotes. .el File is here
- Aqua variables and text is Karl’s special sauce, which are pretty much the only settings I ever use. The .el file for the BBS02 is located here and the BBSHD is located here.
These .el files are designed for the BBS02 but work just as well for the BBSHD. If you use them with a BBSHD make sure to change the Limited Current(A) on the first page to 30 amps. You do not need to lower the amps on the BBSHD, it can do 30 amps all day long without breaking a sweat.
BASIC TAB

Special Sauce Basic Settings for the BBS02, the BBSHD would want 30 Amps
Listed below are the settings and what little we’ve learned about them. This article will be updates as we experiment more.
Low Battery Protect(Volts): 41/41/41/41 to 43/41 – This number will change based on the pack size and configuration. Most likely your battery will have a BMS that will shut off power when it gets too low. This setting is mostly useful when you are running a battery setup without a BMS which is not advised. Kepler notes,
“I use 43V on my 14S 4P 18650 pack setup”
If you are running a 48v nominal pack you’ll want to set this a lot lower (like 38v) to keep the drive from shutting off when the pack still has a little juice in it.
Limited Current(Amps): 25/25/18/18 to 20/25 This sets the power level that the drive unit will pull from the battery pack. Be aware that just because it is set lower, does not mean that it will not draw more amps for brief periods. If you don’t want to stress the BMS you may want to set this number lower than you think it should be by 2-3 amps then slowly increase it over time if your $15 watt meter shows that it is not pulling too much power on a regular basis. This variable will be set lower than 25 if you have a BBS01 or a BBS02 with a lower power level rating than 750W. If this is set lower than 25 from the factory you CANNOT RAISE it safely unless you are sure it is a 750 Watt unit & controller and your battery can handle the draw (it should say on the bottom of the unit). Matt from Empowered Cycles has this to say:
“I recommend 18 amps in most cases. You still get amazing performance, prolonged controller life, more charge cycles from your pack, more range on your rides. If you have an internally geared hub, I recommend 15 amps and changing the “start current” on pedal assist and throttle all the way down to the lowest setting of 1. Even at 18 amps the 750 watt motor keeps up with an 8T geared MAC hub motor that is pulling 1500 watts. You do not need 25 amps for this motor to perform.”
Kepler has this to say
“ I agree that 18 amps is a good all-round setting. I then rely on the Limit Current Assist level to fine tune the max power best suited to bike.”
If you have a BBSHD make sure that this is set to 30 and no lower.
Asst0 Limit Current(%): 1/0/0/100/1 – This is the setting for the PAS at level 0. The throttle might not work in PAS 0 unless this is set to 1 on more recent controllers. You must set limit speed to 1 as well as well as setting the Designated Assist to 9 on the throttle page.
Asst0 Limit Spd(%): 1/0/0/1/1 – At power level 0 causes the controller to lower current gently to maintain motor rpm when 44% of speed limit is hit. Speed limiting is done based on motor RPMs not road speed. The throttle might not work in PAS 0 unless this is set to at least 1, it is really nice to have a hand throttle setting without any PAS intervention.
Asst1 Limit Current(%): 52/20/52/10/52 – Power cut based on road speed at power level 1.
Asst1 Limit Spd(%): 44/44/36/100/44 – Power cut based on motor RPM speed at power level 1.
Asst2 Limit Current(%): 58/20/58/20/58 – Power cut based on road speed at power level 2 if set to 9 power levels.
Asst2 Limit Spd(%): 51/51/44/100/51 – Power cut based on motor RPM speed at power level 2 if set to 9 power levels.
Asst3 Limit Current(%): 64/30/64/30/64 – Power cut based on road speed at power level 3 if set to 9 power levels.
Asst3 Limit Spd(%): 58/58/52/100/58 -Power cut based on motor RPM speed at power level 3 if set to 9 power levels.
Asst4 Limit Current(%): 70/40/70/40/70 – Power cut based on road speed at power level 4 if set to 9 power levels.
Asst4 Limit Spd(%): 65/65/60/100/65 -Power cut based on motor RPM speed at power level 4 if set to 9 power levels.
Asst5 Limit Current(%): 76/50/76/50/76 – Power cut based on road speed at power level 5 if set to 9 power levels.
Asst5 Limit Spd(%): 72/72/68/100/72 -Power cut based on motor RPM speed at power level 5 if set to 9 power levels.
Asst6 Limit Current(%): 82/60/82/60/82 – Power cut based on road speed at power level 6 if set to 9 power levels.
Asst6 Limit Spd(%): 79/79/76/100/79– Power cut based on motor RPM speed at power level 6 if set to 9 power levels.
Asst7 Limit Current(%): 88/70/88/70/88 – Power cut based on road speed at power level 7 if set to 9 power levels.
Asst7 Limit Spd(%): 86/86/84/100/86 – Power cut based on motor RPM speed at power level 7 if set to 9 power levels.
Asst8 Limit Current(%): 94/80/94/85/94 – Power cut based on road speed at power level 8 if set to 9 power levels.
Asst8 Limit Spd(%): 93/93/92/100/93– Power cut based on motor RPM speed at power level 8 if set to 9 power levels.
Asst9 Limit Current(%): 100/100/100/100/100– Power cut based on road speed at power level 9 if set to 9 power levels.
Asst9 Limit Spd(%): 100/100/100/100/100– Power cut based on motor RPM speed at power level 9 if set to 9 power levels.
A quick note on power levels. If your display is set to only use 3 power levels then the controller uses settings for Asst1, Asst5 and Asst9 and ignores all the rest. If it is set to 5 levels than it ignores every other power level setting (but uses Asst1\3\5\7\9). On the C963 display I have still not figured out how to set the display to 9 power levels, so you may be stuck with only 5 PAS power levels with that unit.
Wheel Diamter(Inch): 26/26/26/26/18 – Set this to whatever your wheel diameter is. I always set this number so that if the display is set to show kph that it really shows mph instead. For a 26″ fatbike tire that is about 18″.
Speed Meter Model: ExternalWheelMeter / ExternalWheelMeter / ExternalWheelMeter / ExternalWheelMeter / ExternalWheelMeter – As far as I know this is the only speed sensor that is set up for the BBS02
SpdMeter Signal: 1/1/1/1/1
PEDAL ASSIST TAB
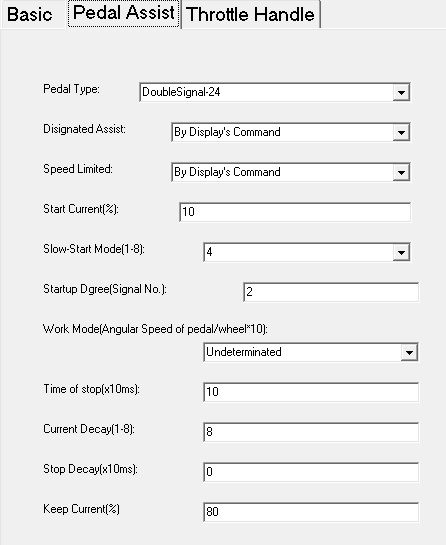
Special Sauce PAS settings, the Bafang factory settings are unusable & dangerous
This page is for the Pedal Assist Settings. Change conservatively, make small incremental changes and test rather than large ones.
Pedal Type: DoubleSignal-24 \ DoubleSignal-24 \ DoubleSignal-24 \ DoubleSignal-24 \ DoubleSignal-24 – Unknown
Disignated Assist: By Display’s Command \ By Display’s Command \ By Display’s Command \ By Display’s Command \ By Display’s Command – This setting if set will override the Limit Speed setting on the Basic Tab and also overrides the speed limited on the Basic Tab.
Speed Limited: By Display’s Command \ By Display’s Command \ By Display’s Command \ By Display’s Command \ By Display’s Command – Cuts power when the road speed from the mag sensor hits the number set here. If set to By Display’s Command then it uses the Display’s set speed limit.
Start Current (%): 10\50\40\30\10 -This variable is vital for not killing the controller. The lower the Start Current is set the less power is directed to the PAS system upon startup, this will create less strain on the controller when starting from a standstill, especially if you are in a gear that is too high. 100% Start Current will peak at well over 1kW draw. With Kepler’s settings this should be set to 30% or less. This can be set all the way down to 1, very useful for IGH bikes and for people wanting a more gentle start
Slow-Start Mode(1-8): 3\4\5\6\4 -Controls how quickly the power ramps and how much it overshoots. If this variable is set too high the PAS start will be jerky, if set too low you risk blowing the controller as with Start Current above. If you are in too low of a gear to start and this variable is set too low it can blow the controller.
Startup Dgree(Signal No.): 4\4\4\4\2 – The number of sensor steps before the start up commences. The maximum accepted is 20. 24 is a full pedal revolution. Too few makes start-up occur with too slight a pedal movement. Lower number is less pedal movement to start the motor. Does not work properly with 1 or 0.
Work Mode (angular Speed of Pedal/wheel*10): Undeterminated \ Undeterminated \10\10 \ Undeterminated — Adjusts the amount of power that can be applied to each pedal rotation. The higher the number the greater the power applied to each rotation. This might affect at what rpm peak power sits in PAS operation, changing it doesn’t seem to be noticeable so we advise to leave it alone.
Time of Stop(x10ms): 25\25\25\25\10– This affects how quickly the drive stops after you stop pedaling. Some people report that setting this lower (as low as 5) may affect the startup delay on the throttle. If you set it to 0 the PAS system ceases to work. 25 is probably too high. This setting disables the PAS if it is set less than 5. I strongly recommend setting this to 5, especially if you want to use the PAS system without using ebrakes. If you set this less than 10 on the v2 of the BBS02 controllers then your PAS will not work properly at all. On the older BBS02v1 controllers and the BBSHD controllers you can set this as low as 5 before you start having issues with the PAS.
Current Decay(1-8): 4\8\6\8\8 – Determines how high up the pedal cadence rpm range it starts to reduce power, 8 being the highest. There is no detail on actual rpm speeds for the Current Decay setting. The lower this setting is the sooner the drive unit will start cutting back on the power as you pedal faster.
Stop Decay(x10ms): 0\0\0\20\0 – The amount of time the system takes to cut after pedaling stops. Lower is faster. Kepler says,
“I prefer a smooth stop transition. It is still quite quick to shut the drive down when you stop pedaling”
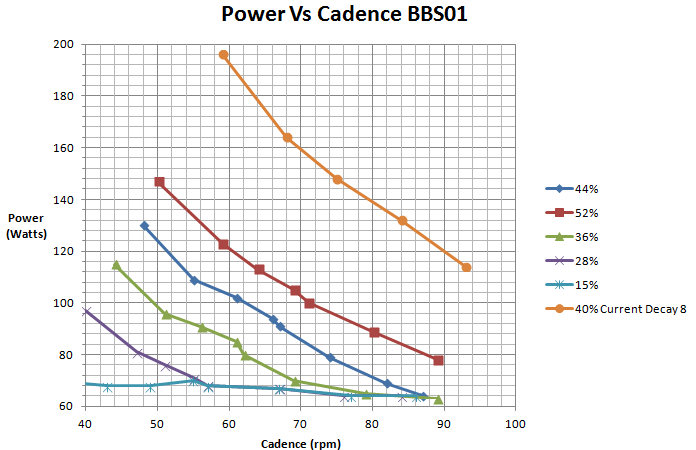
Current Decay settings mapped vs Power. Image from Ken Taylor on Endless Sphere
Keep Current(%): 60\60\60\60\80– What this setting does when set at 60% is ramp the current down to 60% of the PAS level selected based on pedal cadence rpm, so at low pedal cadence you get 100% of the level selected but as your pedal cadence increases the power is reduced down to 60%. As you pedal faster the motor does less work down to whatever this number is set to (60% of max current or 15 amps on 25 Amp system).
THROTTLE HANDLE TAB
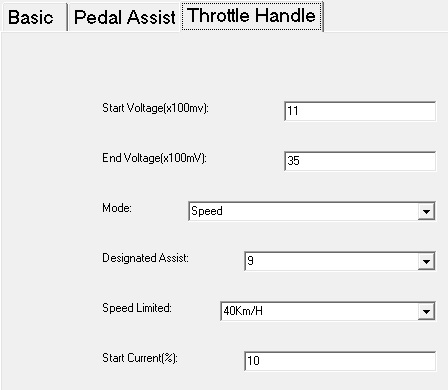
Special Sauce Throttle Settings. Kid tested, mother approved.
Start Voltage(x100mv): 11\11\11\11\11 – The is the throttle input starting voltage, the point at which the controller responds to input is at 1.1 volts, so set value to 11 which = 1.1 volts. As you begin to roll on the throttle the voltage moves up from zero and when it reaches 1.1v the motor begins to turn. Best to leave between 10 and 15. Too low and the display will throw an error as the motor will want to run continuously. If you change the throttle you will need to find the new lowest setting.
End Voltage(x100mV): 35\35\42\35\35 – You can set the max range to 42 which is the max input the controller accepts from throttle input 4.2v. If you set lower than this value your throttle response is not as linear or smooth as it could be. Matt suggests you set start voltage to 11 and end voltage to 4.2 for a wider range of throttle response and smoother control of motor output. If you use an aftermarket throttle you will need to test to see what voltage the hall sensor throttle is giving off at full throttle and set this number slightly lower than that voltage shown on the meter (times 10).
Mode: Current\Speed\Speed\Current\Speed – Switching this to Current Mode (instead of Speed mode) has an improvement in the throttle response smoothness. If you change this then set the Start Current % on this page to 10 or less. Personally I prefer the intensity of the speed setting, although setting this to Current will be much easier on your controller. Some users of the newer BBS02’s say that the CURRENT setting can cause jerkyness with the throttle, in which case you should set it to SPEED mode.
Designated Assist: 9\9\9\9\9 – If you disable the PAS system (step 5 here) then this will give you the same number of levels of throttle power as PAS settings. If you don’t disable the PAS system then you should probably set this to 9. If your bike is in a rental fleet and don’t want to deal with fried controllers then you should set it to something much lower like 6. This setting if set will override the Limit Speed setting on the Basic Tab and also overrides the speed limited on the Basic Tab. If you set this to 9 be aware that you can and will fry your controller if you are in too high of a gear on too steep of a hill and you peg the throttle.
Speed Limited: By Display’s Command\40KmH\40KmH\40KmH\40KmH – Cuts power when the road speed from the mag sensor hits the number set here. If set to By Display’s Command then it uses the Display’s set speed limit. However this setting can sometimes cause severe Throttle lag in PAS0 so if you set it to 40km/hr the 2-3 second throttle lag should disappear.
The speed limit only applies to the PAS and in ignored by throttle input, so in other words, if you want to go past the speed limit, just use the throttle. This is a setting that allows the rider to set a pace or cadence when using pedal assist for a comfortable steady pace. Almost like cruise control, when you begin to go past the speed, the motor cuts out to maintain a lower speed. It is a useful way to extend range. The max speed limit of the display is 45 mph.
Start Current(%) : 10\10\10\10 to 20\10 – Percentage current of available when throttle initially applied. Unwise to raise beyond 20, but fine to lower, however motor will give less power when the throttle is engaged. If you set the throttle Mode to Current (which I think you should) you will want to lower this number substantially or it will be very jerky on startup. 5-10 gives a much smoother startup. This can be set all the way down to 1, great for IGH bikes and smoothing out power delivery.
So what do you recommend?
For smooth throttle control and less delay the Current Mode on the Throttle Handle Tab is the way to go, but you should keep the Start Current % low (below 10 is safe) otherwise the throttle is far too jerky and wheelie prone. If you want max power and torque then set the Throttle Handle to Speed Mode.
I have 8 BBS02 controllers from various manufacturers and I’ve only had one controller failure from the first one I bought from elifebike. The two I have bought from Lectric Cycles and all the ones I have bought from Paul and Doug at California-Ebikes (which both use em3ev’s settings) have given my absolutely no problems. The Lectric Cycles settings has a jumpy throttle and a little throttle delay which could be corrected by switching the Throttle Mode to Current. I have hundreds of hours beating the living piss out of my drive units with em3ev’s and Lectric Cycles settings with no complaints and no controller failures. At this point I’ve set all my drive units to the “Karl’s Special Sauce” settings which is the only way to fly if you want max throttle power without blowing your controller and PAS that actually is usable.
There are plenty of people who say Kelper’s settings are very reliable, but I have not tried them yet so I cannot say. I would not advise using Kepler’s settings at a full 25 Amps, as you are asking for trouble. 100% Limit Speed at every PAS level at is going to put a serious load on the cheap-ass controller mosfets.
In some ways it’s great that we can get into the software and change so many of the settings for the BBS02. Along with this flexibility comes taking responsibility for the controllers and drive units we end up destroying by tweaking the settings. This guide is a way to share information that others have discovered the hard way, but by no means is definitive. All the information here could be wildly inaccurate as no one that I know of has gotten any real technical guidance from Bafang on how to program these units at all.

It broke, I fixed it with mosfets that didn’t totally suck. You can too if you visit here and are good at following instructions and soldering.
Program at your own risk. Don’t program your controller, fry it, then try to get it replaced under warranty pleading innocence. If you fry your own controller then have the common decency to spend the time and energy to fix it yourself or just suck it up and buy another one. Paul has had so many problems with people ripping him off by custom programming and frying their controllers and then trying to get free warranty replacements that he no longer warranties the individual controllers. Can you really blame him?
This article is the culmination of many hours of work and was contributed to by Paul(cellman) from em3ev, Matt from Empowered Cycles, kepler and drprox from Endless-Sphere and this insanely long 37+ page thread on ES. Many thanks to everyone who contributed. I could have done it without you but the results would have been really laughable.
Ride On.
UPDATE: A hacker from Norway named Penoff used the source code and completely rewrote the Bafang programming software. All the settings are the same but the software that Penoff has written fixes a lot of the annoying bugs (like the com ports not showing up properly) and works the way the original Bafang software SHOULD have worked. I’ve tested it pretty extensively and emailed back and forth with Penoff who seems to be a stand up guy. If you want to download his application you can do it through his website here. You won’t be disappointed.


Pingback: Programming The BBS02 Without Frying Your Controller And Losing Your Sanity | Electric-FatBike.com
Fantastic write up !!
Possibly an indication of which settings favour Speed and which are more Torque related would be helpful, personally i`m more interested in conquering these steep hills around here.
LikeLike
Frankly these motor settings have little to do with Speed and Torque. Speed vs torque is about what gear you are in, not the controller settings. If you want to go really fast then put a 52T in the front and a 11T in the rear. You can go 40mph downhill with this setup. If you are climbing any hills your controller will fry unless you shift to a lower gear. The lowest gear you will probably need is a 10 tooth difference on a 29 inch wheel and a 12 tooth difference on a 26 inch wheel. That means if you have a 42T Bling ring on the front and a 36T cog in the back you are set because that is only a 6T difference. For commuting you can get away with a few more teeth of difference on your lowest gear, my commuter has a 52T front and a 36T rear and I can get up pretty steep hills with it even though it is a 16T difference on a 29 inch wheel. In the right gear your BBS02 will go up almost any hill without frying the controller but you must be in the right gear. How do you know if you are in the right gear? If you have to pedal really fast to keep up you are in the right gear.
LikeLike
Great with practical facts and would like more of any useful information please. age 76 in Australia and bike on way after 60 years
LikeLike
Hi, thank you very much for an easily understandable and useful article. Is it possible to adjust the throttle handle so that it only works when one pedals, but still provide extra power to the engine?
LikeLike
No
LikeLike
Pingback: New Bafang BBS02 750W mid drive for electric bicycles | ELECTRICBIKE.COM
Hi Karl!
Really REALLY good work compiling all this info on one page!!!
I have a little more info about the: Start Voltage(x100mv) -setting.
I was trying to get my throttle free play a bit smaller and lowered this setting to 9. There was still no error, but the PAS was very, very jerky especially at lower cadences. And I mean unbearable jerky. I don’t know why this happens, maybe the 5V “reference” signal is unstable and altering when motor is under heavy load or something like that.
Might be a good to know for others too, because I’ve had some minor jerking problems with other drives I’ve assembled too.
Of course this might be effective only with some other setting modifications I’ve made. If someone else could also try this out and confirm, we’d have a new little piece on information about this set.
But as I said, this page is VERY VERY good thing for all of us BBS owners. Thanks!
Jarkko
LikeLike
Hi Karl
There is a Bafang multi language programming software version (english , español, french, german, italian, portuguese, swedish, turkish) out.
Would you give us your permission to take some of your parameter explanations for using it directly in the program?
Kind regards from Germany
https://www.dropbox.com/s/2kloq1693e4n186/Bafang.zip?dl=0
LikeLike
No problem. Thanks for asking.
LikeLike
Hi Karl,
Thanks for taking the time to put this guide together and publishing it.
I followed it bit by bit and have successfully reprogrammed my controller. My bike feels a whole lot better now.
Cheers,
Darren.
LikeLike
Pingback: Biktrix New 100mm BBS02 – The Best Thing To Come Out Of Canada Since Peanut Butter | Electric-FatBike.com
Pingback: Care And Feeding For Your New BBS02 | Electric-FatBike.com
Pingback: Wish List For Future Bafang Mid Drive BBSxx Kits | Electric-FatBike.com
Pingback: Troubleshooting Problems On Your BBS02 Unit | Electric-FatBike.com
Pingback: To BBSHD Or Not To BBSHD? That Is The Question | Electric-FatBike.com
Pingback: BBSHD First Impressions : Meh. | Electric-FatBike.com
Pingback: Phat Phuk : FB 5 2.0 Snowshoe 2XL DIY BBSHD 1000W 10 Speed ebike 51lbs ~$1850 w/ out battery | Electric-FatBike.com
HI
Do you have any similar .el-files for the BBS01 motor? (I only see BBS02 .el-files here)
Something that makes the BBS01 motor run equally good and the controller “not-blow-up”? 😉
LikeLike
I do not, sorry. I have never touched a BBS01, although lots of people really like them. You should be able to use this software on your BBS01 and tweak the settings yourself. It will not allow you to set the power to the unit higher than what the unit can tolerate. Good Luck.
Karl
LikeLike
It is normal to have burned 2 controllers when connecting the battery? it is possible that the programming cable were crossed? Thank you
LikeLike
Not enough info. Did you drive the units? Did they work at all? Were you on a hill when they burned out? You can’t troubleshoot a problem with so little information. Sounds like you have other problems (not the controllers). Did you swap the controllers onto other drive units and see if they are really fried? Did you reprogram the controllers?
LikeLike
> Slow-Start Mode(1-8): 3\4\5\6 -Controls how quickly the power ramps and how much it overshoots. If this variable is set too high the PAS start will be jerky, if set too low you risk blowing the controller as with Start Current above. If you are in too low of a gear to start and this variable is set too low it can blow the controller.
I think you meant to say, the higher the setting, the more likely it is to blow the controller. Makes more sense especially with the Start current Setting above it. Please recheck that. especially since this is in fact one of those “dangerous settings”
LikeLike
Yes I am kind of confused on that point too, someone could clarify if it is indeed correct as it is stated in the article or it should be the other way around? It is a very important point.
LikeLike
I also found that setting ‘Slow start mode’ too high caused a really irritating pulsing or juddering effect to the drive under PAS. Dropping this to 1 on my setup completely eliminated this issue.
LikeLike
detrexer, you’ve probably figured it out, I wrote this anyway to be clear in my mind and in case it helps anyone concerned with smooth soft starts.
Some definitions to begin, here’s what the ES member Petroff’s (Stefan Petrov) own v2.0 distribution improved software and user manual has, copy/pasted below: (Pedal Assist page of course)
“Slow-start Mode (1-8) – This setting controls how quickly the start current is reached.
You can make your bicycle accelerate smoothly and make it respond quickly. A value
around 4 usually works well for normal cycling. If you are mountain-biker then setting to
a low value will make the acceleration faster which might be useful but you should be
careful not to fry your controller and motor.”
Also useful to revisit the manual’s Start Current definition that is what’s being achieved:
“Start Current [%] – This is the startup current when you start rotating the pedals. It is
good to set this to at least 10% to make sure the bicycle will start moving and the motor
won’t be stalled. Setting this to very high value will make the bicycle accelerate very fast
at start which might damage its internal gears and also the motor. Recommended value is
one between 10% and 30%. You should also make sure you don’t start pedaling at a too
high gear which will load the motor too much.”
So detrexer, to the conclusions:
When Karl was recommending mode 1 seemed odd to begin with, but realise that’s quick/smooth but not overpowered when combined with a low Start Current %:
– Slow-start Mode (1) is the fastest rate increase of current to achieve Start Current (%). Mode (1) and 100% start current would be most brutal PAS engagement.
Mode (1) and 10% start current seems to be suggested between Karl and the help file.
– Slow-start Mode (8) is the slowest rate increase of current to achieve Start Current (%). Mode (8) and <10% too low a start current stalling motor causing juddering jerking (anecdote from Geoff's comment here not recommending mode 8).
I've got a Rohloff XL wanting soft start on throttle and PAS, I'm starting with 10% start currents, mode 1 slow start mode so it's fast (hoping smooth) to the low current. With a gentle throttle hand I'm hoping to avoid pulse power like an electric hammer drill or impact wrench.
Echo the above thanks to Karl again for the effort compiling and updating this page. I hope he doesn't get a real job to take him away from this =D
LikeLike
Work Mode = Winkelgeschwindigkeit Pedal/Rad *10 1=10 (0= unbestimmt, 1-71 = 10-80 10=1:1 )
= rpm [without dimension] Wheel/Pedal
LikeLike
I,m writting you for the following question. Your article about the settings of the engine has been very useful for me but I have a probem I’m not able to solve.
When I ride my bike and I start pedaling and the PAS starts, I feel a delay in it .When the battery is top charged it,s not very noticiable but It,s more evident when it beguns to discharge . Under 38/37 v. beguns to feel very annoying (I remind you that my engine is the 36v. version)-
Which settings could influence in it?. I,ve tried many settings but I,m not able to avoid it
By the way, is not very important for me because i use it in few times but in the throttle I feel someting similar
I hope you can help me
Vicente Martinez
LikeLike
Obviously I mean during all the ride, not only in the start. Each time I stop pedaling and I start to do it again I feel 2 or 3 complete revolutions of the pedals with very week assistance till all the power of the level enters completely
LikeLike
Pingback: How To Reprogram Your BBS02BBSHD So You Can Use Pedal Assist On SingleTrack Without Getting Killed | Electric-FatBike.com
“Startup Dgree(Signal No.): 4\4\4\4\2”
Karl, have you tried what happens when you pedal backwards? In my motors, setting this value to 2 will make PAS activate when pedalling backwards. That’s why I also keep it at 4 (or maybe 3).
LikeLike
No, mine do not do that. I’ve ridden it pretty extensively. How old are your drive units?
LikeLike
I’ve got BBSHD, so it’s not THAT old… I’ve had the same problem with three of my units. Two BBS02 with older mosfets and one BBSHD. Updated BBS02 I’ve not tested for this.
LikeLike
Is that a pretty well-acknowledged fact that the BBS02 is only capable of ~25MPH on flat ground?
I would assume that a 750W (nominal) motor would be capable of 1,200W at peak, and hence could reach 35MPH without overheating. My 500W (nominal) direct-drive hub motor puts out ~960W at peak and I can hit 32-34MPH.
LikeLike
It all depends on the gearing. The BBS02 can do PAS at 700W all day long at 25mph. I have no problems with my road bike getting close to 40mph (gps verified) on slight downhill (1 or 2% grades) with a 52T ring at peak power.
The BBS02 really shines on hills. No DD can compete.
LikeLike
Cameron, my BBS02 500w, de-tuned to 15 amps will do 50kph (32mph) using PAS 7 or higher before the controller cuts the power due to reaching the maximum speed allowed by the display (C961). Cadence is also a limiting factor. My bike has 700c wheels and a top gear of 42t chainring and 11t smallest sprocket. 32mph equates to around 108 rpm. But I can ride up a 25% gradient in bottom gear for miles at 15mph, that’s faster than any professional cyclist…………………….(at least until the battery dies!) I could re gear the bike (say 52×11) and set the wheel diameter to 18″ and units to KPH to roughly equate to a 50 mph max cut off. I reckon it could then reach 40 mph @ 108 rpm, range would be severely limited though.
LikeLiked by 1 person
Pingback: 3 Months Of Singletrack Abuse On A BBSHD : This Masochistic Mid-Drive Still Begs For More | Electric-FatBike.com
Pingback: It’s My Mid-Drive And I’ll Fry If I Want To : The BBS02, BBSHD & Cyclone Shopping Guide | Electric-FatBike.com
Thanks for this awesome writeup. You state in the article, “If you have a BBSHD make sure that this is set to 30 and no lower” in reference to limiting current. I want to make sure you made this statement purely in reference to the fact that limiting current was sometime done on the BBS02 to increase its life, and that the BBSHD is built well enough to run at 30 amps “all day long.”
I’ll be installing a BBSHD on a cargo bike with an IGH (Nuvinci N380) and was thinking of limiting current and changing the “start current” on pedal assist and throttle to protect the IGH (at the expense of my own joy). I find Matt from Empowered Cycles’ advice compelling.
Can the BBSHD run safely on lower amps (as low as 18)?
(Why buy the BBSHD if I am going to detune it? Well, maybe I won’t always, or maybe I like to tinker, or maybe I just like it.)
LikeLike
Leave the current limit at 30, if you are worried about your IGH change the ‘start current’ on the PAS and throttle page to a lower number.
The IGH really has problems with jerky startup power, it can run with full power all day long as long as it doesn’t get too hot.
I know it’s only rated at 350W but it can take so much more.
LikeLike
Pingback: Kicking It Old School With A Nuvinci N171 At 2400 Watts | ElectricBike-Blog.com
Similar IGH question here, to run lower max current with BBSHD here. Mine came with 25A max current limit, but definitely reads controller spec 30A max on the Bafang Config “Controller Info” bottom right panel, along with BBS3 model, v1.1 hardware version, v0.0.1.1 firmware version, 48V nominal voltage, 30A max current.
I only got the BBSHD for fat bike bottom bracket fitment, not the higher power bonus, I need battery range to last all day so want to have minimal assistance by throttle on demand usually, or PAS if it’s end of day riding below avg. trip speed with battery left to burn to get to a recharge motel.
I wanted a conservative max on the throttle that I’ll use on demand without pedelec. The low start current on both pedelec and throttle is good as I’m not going to be braking traction with fat tyres anyway, but I’d like to run 15A max throttle if it’s not problematic and can restrict battery consumption. I’m usually going to be using assist in low speed with a Rohloff XL in bottom 7 gears, so don’t have an issue with reduction getting plenty of torque, and generally won’t be burning up battery using assist into wind resistance at speed.
Layman alert may sound silly – I’d heard before but never learnt/understood, in layman sense that a controller passing the power through with least “controlling” effort puts the power/heat through to the motor, not burning up as heat in the controller. If can make the leap to here, I can imagine too much constant limiting getting more problematic? How does it differ to a 25A BBS02 down to 18A say?
LikeLike
You don’t need to limit the BBSHD, it seems to be quite happy at 30Amps all day long. When the motor is spinning too slowly and you are putting too much power into it that extra power gets shed as waste heat.
LikeLike
I was looking for gentle low power to the Rohloff XL, and mostly for low battery consumption for long range full day distance offroad riding.
I tabled the PAS splits with 25A max current limit and liked it as-is so left it.
The soft start works well, for anyone that’s ridden motorcycles 2 stroke and 4 stroke, it’s gentle on the drivetrain like a 2-stroke. You hold the throttle open (or pedal the PAS) and it slowly gently increases RPM until full power comes in and it takes off, just without the ring-a-ding-ding of the smoker.
Hitting the throttle is harsher compared to low PAS level driveline take-up, but I’m usually pedalling with PAS1 (225W) active before applying the throttle for momentary max power boost, handy when crossing ruts.
LikeLike
Pingback: Is The Gearsensor A Total Waste Of Money Or A Must Have? | ElectricBike-Blog.com
There are 9 Pas level setting, as shown in the Basic Tab. But maximum PAS is “5” in my BBS02 LCD display, which means that the number of PAS levels is different.!!
In this case, is the values in 9 pas level setting automatically mapped into PAS 5?
Thank you.
LikeLike
Yes, only the C965 does 9 levels and you have to program the display to do it. The default is 5. It skips every other setting from the programming screen with 5 levels.
LikeLike
Have you tried to program the BBSHD?
The software won’t let you write 30amp because it is designed for the BBS02. You get a write error with a 30amp value. Does someone have an updated software link? Or a workaround?
LikeLike
It works with the software linked to in the article.
Where did you get your BBSHD from?
In the bottom right there is a listing that the firmware on the controllers shows what the max amps is. What is that set to?
What error do you get?
LikeLike
Thanks for the info! You mention that you haven’t been able to get more than 5 assist levels on C963 display. Mine is stuck on 3 assist levels – do you know how I can change my C963 from 3 to 5 assist levels?
LikeLike
http://www.king-meter.com/upload/files/KM5S%20Specification.pdf Page 50.
LikeLike
Unfortunately, although the KM5 (as referred to in that manual) and the Bafang C963 are the same hardware, the Bafang display has a firmware that cripples much of the functionality of the KM5
This file https://electricfatbike.files.wordpress.com/2015/01/manual-of-c963.pdf is the Bafang controller and describes its functions.
(This refers to the currently supplied C963 display, it may have been different in the past)
The C963 is very neat, but has very little functionality 😦
LikeLike
When I connected the computer to the BBS02 green five pin my pc closed down and wont power up again. I’m wondering if the capacitor in the control unit gave the pc a high voltage spike. The BBS02 is unaffected , it still works fine. I loaded the software, found the com port, plugged in the green connector. Bike battery was off and bang the pc blew. Does anyone have any thoughts?
LikeLike
That sucks if it’s a laptop just shut it down unplug it and remove the battery and wait for 30 seconds then plug it back in and see if it will power on. If it’s a desktop then I would test the power supply and see if that is still working.
LikeLike
Thanks Karl, sadly it was a laptop and its now dead. More worrying though is how/why I got sufficient voltage to blow the laptop. The cable must have been incorrectly configured to send 36v into the USB of the computer.
LikeLike
Excellent effort to document all the variables. One thing I think wasn’t addressed very clearly, current vs speed. This is one of the most fundamental issues. You get to decide: Do I want the PAS level to control the cadence or do I want it to control the current? Do I want the throttle to control the cadence or the current? The most common setup is throttle = current and PAS = cadence with some current limit as well. But you might consider other variations for different purposes.
LikeLike
It seemed controlling current was covered as part of mitigating the dead controllers issue. I tabled the 9 PAS table for mine and didn’t see scenarios in the splits that seemed problematic scenarios, so never really considered alternatives. Disclaimer I’ve had long range battery economy in mind with PAS, knowing I’ve got throttle to take over and give extra current on demand, or step up PAS levels for more current or pass a PAS speed limit.
Do you have a scenario in mind as example of variations for different purposes?
I found it helpful writing the figures down and thinking through the onroad/offroad scenarios. After testing I typically only use PAS 1-4 and throttle on demand. 25A max current limit on BBSHD.
LikeLike
Does anyone have a view on what happens when in Basic Settings the limit speed% for each PAS is set to 100%, while the Limit current % is limited as per David’s table and keep current is set to 100%? I’ve done this with my 36v 500W BBS02 also limiting max current to 16 amps from the stock 25 amps. Start current is set to 15%. My view here is that its safe as far as the controller transistors are concerned…………….I can do the mathematics, but then I’m not an electronics engineer. Am I missing something?
LikeLike
Pingback: Bafang Completely Redesigns The BBS02 … And Tells No One | ElectricBike-Blog.com
Would it be possible to set the “Limited Current(Amps):” to 5 amp and make it street legal in Europe? I done some fast calculation and figured out that 250W/48V=5.2 A i guess there are some loss in heat and mechanical friction so to be on the safe side i figured 5 amp would be okay.
LikeLike
Legal is what you can get away with. Leave it alone and run it at pas1
LikeLike
Not sure what country you’re in Henrik but I ride a BBS02 750w here in the UK and find it’s not really worth getting too hung up on the legalities. From what I hear most police officers here aren’t familiar with the ebike regs and probably couldn’t care less what wattage your motor is as long as the bike is being ridden sensibly.
The bbs02 is a fairly stealthy unit, I use a saddlebag battery and keep the wiring tied away neatly, most people who look at it don’t even notice its guilty secret….:-)
TBH, being hauled in front of the judge for having too powerful an ebike motor seems an unlikely scenario to me here in the uk, other countries may see things differently of course.
LikeLike
Henrik, here in the UK we also have a 250w limit, I believe using the same EU legislation (for now!) My understanding is that the motor should be nominally rated at 250w, and no more than 48v. My wife has a 250w 36v BBS01 (stamped on the casing 250w 36v) which is “street legal”. Maximum current is set to 15amps in the factory for export to the UK. That equates to 540 watts using volts x amps = watts assuming the controller allows this. It’s not a question of what you can get away with……………(sorry Karl). I see the main problem to be keeping the ambulance chasing lawyers away when an ebiker hits and kills a child at 40mph while riding their “illegal” and/or re-programmed ebike. The bike would be taken away for tests……………….the manufacturer would be approached to provide specifications from the serial number. The riders insurance (if any) would be void. The implications could be very serious for the ebiker. (apart from a dead child on the rider’s conscience) I’m just pointing out a worst case.
LikeLike
Hi,
Is there a way to skip h07 over voltage protection by software.
Trying to get my 15S pack to work with BBSHD
LikeLike
None that I know of. If you have a charger that will charge it to only 80% that might do the trick.
LikeLike
Would it be possible to set the Limited Current(Amps): to 5 amp and make it street legal in Europe?
250W/48V=5.2A
LikeLike
Sorry for asking the same question twice but is it possible to set it to 5 amp in the controller? I have spoken to the authority (transportstyrelsen) that’s regulates all these questions here in Sweden and as long as the net output is no more than 250 wats it should be ok. And as a daily commuter it would probably last a lot longer. Thanks Chris Ulyatt for pointing out what i was thinking ; -). Better safe then sorry.
LikeLike
Hello Henrik. Yes you can set Limit Current to 5 amps if you want to but I’m not sure you’ll like the outcome unless you change most of the other settings as well. I’d also mention that the BBS01 250w-36v controller is set to 15A at the factory. Using Volts x Amps = power (watts) this gives 540watts, and yet the unit is “legal”. Of course its not that simple because the other controller settings limit the motor further, but you see what I mean. I’d just ask how come you have a 48v BBS02 when you are so keen to comply with the law? Why don’t you sell the 48V BBS02 and buy a BBS01 36v-250w unit? As I mentioned in my earlier post my wife runs the BBS01 250w and after some modifications to the controller settings the bike rides much better than it did out of the box. The 15AH battery gives a range of around 120km (using lower PAS levels) with top speeds of 40kph using higher PAS levels (on flat roads). It will also climb any hill using the 42 x 11-34 9 speed gearing.
My own BBS02 36v-500W (25A) motor has been reprogrammed to feel more like riding a bike than a moped. I ride it off road mostly. (Hence I’m not too concerned about limited use on public roads as I live in a very rural area, but I certainly wouldn’t assume that all police are ignorant of ebike legislation)
I’ve Limited Current to 16 amps and set the controller to Keep Current 100% . I allow 100% “Limit Speed” in each PAS and progressive % of current in each PAS. (PAS 1 = 22%, rising to PAS 9 = 100%)I’ve also tinkered with other settings before arriving at my own “optimum”. I’ve now done over 1500km with these settings, I’ve ridden up 25% hills, and I use the gears to maintain cadence at over 80rpm. If my cadence drops below 80rpm in bottom gear, I increase the PAS level. My typical ride is 50km, but I have done over 100km on a single charge. (18AH battery pack using 60 x 30Q cells) The battery voltage had then dropped to 32v, but was still delivering sufficient power to get me the last few km home in PAS 3 (of 9). If you do set Keep Current to 100%, you should also change some of the other settings to protect the FET’s. I’ll send you my settings if would like to try them. They are all based on Karl’s findings.
LikeLike
From what I remember when I read the EU regs the regulation is for the motor’s continuously rated output power NOT the actual output power.
So a motor rated for 250W but one that can run at 750W albeit not continuously is legal
A motor capable of running 750W continuously but de-rated by programming to 250W is not
There are also rules about speed limits (25kmph) and assistance cutting off when rider stops pedalling
LikeLike
As I have understood it Sweden has got a new (and fairly unique) legislation since jan 2016. It basically allows for a 1000W help engine on a bicycle as long as the speed is limited to 25 km/h. Did “Transportstyrelsen” not inform you of this change?
LikeLike
It is quite not that simple because to have a 1000W motor you have to do a inspection or have a Certificate of Conformity unfortunately the inspection requires the same test that’s you do to get a coc and that is really expensive. I have tried to get hold of Dekra that does this kind of tests to get hold of what kind of information they want but i haven’t got any answers yet. I think it is frame material, welding method, emc tests and brake retardation but that’s just a guess.
LikeLike
Thanks for all the good replay. I guess i am not that concerned about the legislation in worse case if u cause a serious accident it probably doesent matter if the motor is sett to 15 amps or 5 amps you are still in a lot of shit its always better to ride safe. I am going to have a trailer with my kids and some baggage in a slightly hilly area for a total of 180 km per week.
So i want to sett it to a low amperage probably around 16 amps and keep it cool because i am going to inclose the motor a little bitter more to protect it from all the salt we keep getting on the roads here in Sweden for about 5 moths of the year. Thanks Chris i would really appreciate if u would share your settings.
LikeLike
Hi Henrick, Ahh…….now I understand why you have the 48v motor. You’ll need the additional torque of that motor to pull the loaded trailer up those hills. Regarding enclosing the motor, I’d be careful not to fully enclose it as it will need ventilation to dry off . I’d fit a big mud flap if I were you and just throw a bucket of clean water over the motor at the end of the days riding and just wipe it over with a dry towel. These motors are a little prone to condensation inside the casing (so I read somewhere).
My motor being 36v will have slightly different characteristics from your 48V unit and given that I’m quite light at 70kgs, with a fairly lightweight bike (<20kgs inc motor, battery and some luggage) You’ll probably need a bit more power and lower gearing than I do to get up steep hills. Your 48V unit will be putting out 33% more power than my 36V unit for a given current, so I fully expect you’ll be fine even if you “restrict current” as I’ve mentioned below.
Programming. The first thing I’d suggest is as you mentioned change the Limit Current to a lower value. Probably 18A is a good place to start as I’ve read reports from 48v owners that find this to be a very good compromise between brute power and battery preservation. If you then find the 25kph speed restriction annoying, go into the display and reset to a higher value. I went all the way with mine and set it to 50kph max, while retaining the correct wheel size to ensure the indicated speed is correct on the display.
If you find (as I suspect you will) that the motor is still pulling very strongly at medium PAS levels (PAS 5-6) and that you never need to use PAS 8 or 9 you might try reducing the Limit Current to say 15A.
If you then wish to change the characteristics of the motor to make the bike feel more pleasant to ride without the odd reduction in power as you are cruising along nicely (caused by the “limit speed” parameter) you might want to try my approach. I cant guarantee anything, apart from “it works for me”. You should keep a copy of your standard settings before you start to change anything in case you need to revert. Be very careful with the green 5 pin male/female plugs, if you don’t line them up properly, you’ll blow something. You should also read Karl’s thread here before you do anything. https://electricbike-blog.com/2015/06/26/a-hackers-guide-to-programming-the-bbs02/
A few observations regarding my settings below
• You may need your start current to be a bit higher, say 20% as you’ll need more power to get rolling, but don’t set it too high as you’ll risk blowing the fet’s.
• Stop decay. I use standard brake levers (without the microswitch) I need the power to cut as soon as I stop pedaling.
• Gear changing. You may need to fit the Bafang gear levers and tune one of the levers to cut motor power with just a slight squeeze of the lever. The 48v motor has loads of torque and you could cause damage to the cassette/chain unless you are careful.
• You’ll find that the PAS levels are quite close in terms of Amps/Watts. This allows the rider to find a comfortable PAS level without massive jumps in between.
• I have only ever used PAS 9 once, just to test the performance. I don’t suppose I’ll ever use it again, unless my life depended on it!
• I don’t have a throttle fitted.
Reprogrammed controller settings for 36v 500w 25A
Display KPH
Low Battery Protect V 31 50
Limit Current (A) 16
Limit Limit
9 PAS levels 5 PAS Levels Current (%) Amps Speed (%) Watts Increase
0 1 0.16 1 6
1 1 22 3.52 100 127
2 24 3.84 100 138 9%
3 2 27 4.32 100 156 13%
4 32 5.12 100 184 19%
5 3 40 6.4 100 230 25%
6 50 8 100 288 25%
7 4 62 9.92 100 357 24%
8 79 12.64 100 455 27%
9 5 100 16 100 576 27%
PAS Settings
Start Current % 15
Slow start mode 4
Startup degree 4
Work Mode Undetermined
Time of Stop (x10Ms) 5
Current Decay 8
Stop Decay x10ms 0
Sorry formatting doesn't carry over.
LikeLike
Hi Chris,
I don’t suppose you’d share your bbs01 settings as well, so we can see how to set up a legal bbs01 for europe and australia?
LikeLike
Hi chipipink,
You want road legal settings for the BBS01? So in the EU you’ll need the 36v 250w motor to start with as the 36v 500W motor exceeds the power limits as do all of the 48v options. That said, I have reprogrammed my wife’s BBS01 250w motor, but its not road legal because I’ve de-restricted it (ie removed the 25kph speed limit and it has a top speed of about 40kph on a flat road, nil wind). I don’t think my settings would be suitable for a fully road legal ebike as the settings would take you up to 25kph nicely and then simply cut power like an on/off switch, so it would be really unpleasant to ride. If however you’d be happy to de-restrict for off road use, let me have your email address so I can copy you the settings
LikeLike
Anyone know how to get rid of that delay when you activate the throttle? Mine is taking about a full second before it comes on. Already tried changing to “current mode” as opposed to “speed mode” and it made no difference.
LikeLike
Thanks for nice information. We like it. We also provide same services.
LikeLike
Hi Karl (or someone who has an idea of what could be wrong)
I have used the “Special sauce settings” and they have worked fine, but yesterday after my daughter borrowed the bike (yes I know – I should not have done that) it seems that the “PAS0 Throttle only mode” has stopped working properly. Before there was (almost) no power from the motor unless the throttle was activated, but now it seems that there is much more power (approximately equivalent to PAS4-5) applied in PAS0. I have checked and rewritten the settings with 1/1 on PAS0 setting table but that has not remedied the fault. I have now set it to 0/0 and then I get no power in PAS0 from pedalling and also no power from throttle (as it should be). The problem is that I cannot use PAS0 for throttle only – any ideas what could be wrong?
P.S. The “walking mode” i.e. some 6 km/h with low power when press/hold – button still works so it seems that the motor can control the output to lower power than PAS4-5. Not sure if this is a clue.
Thankful for any suggestions!
/Claes
LikeLike
Karl, Thanks so much for all you provide for e-bike enthusiasts. I’d like to ask if you could update this as it might relate specifically to the BBSHD and using the more recent version of the firmware, as it has additional options. Thanks!!!
LikeLike
I notice this page focuses on Off-Road Application
What do you suggest to use on a Track Bike with an Aline 8 Speed IGH?
LikeLike
Depends on what kind of track.
If you want to jump you need something FS, if its a flat track you could go with a skinny tire road bike but it would be scary at 45+mph. Really scary. I’d stick with a hardtail frame and then put non-knobby tires on it. I run small-block-8 tires (8 treads pre inch) on my XC non-electric bike and I can’t say enough good things about them.
LikeLike
That’s great but my application is on, for all intents and purposes, a road bike.
Anybody have road bike settings?
LikeLike
@Bernard Manansala – You should probably use a BBS01, a 500W BBS02, or a 750W BBS02 if you’re doing an electric road bike build. There’s no need for a 1000W BBS03/BBSHD on a road bike. I’ve got a 1000W BBS03 on my full-suspension mountain bike with road tires and it offers way too much power. In fact, of the 9 pedal-assist modes on my bike, I generally stay in modes 3-5 (less than 1000W), and rarely use the motor to its maximum potential (1764W when my 52V battery is fully charged).
If you really enjoy riding your ebike at 35MPH and you like to rip up hills going 20MPH+, then I’d suggest getting either a hardtail or full-suspension mountain bike with shock lockout and putting road-tred balloon tires (Schwalbe Big Ben, Schwalbe Super Moto X, Schwalbe Marathon Plus) on it. Regularly traveling 35MPH on an aluminum road bike frame is a recipe for disaster. In fact, if you’re regularly traveling above 25MPH, I suggest sticking to full suspension frames. Hardtails are great because they’re more efficient when climbing hills and they’re easy to mount rear cargo racks on, however, the discomfort from hitting potholes and road imperfections at high speeds is outrageous, so full-suspension is king when we’re talking about high-speed electric bikes for road use. The only region on Earth where I would recommend using a BBS03/BBSHD on a rigid road bike would be the Middle East (Saudi Arabia, Dubai, Abi Dhabi, etc), because their roads are brand new and lack potholes. For anywhere else, get yourself some suspension.
LikeLike
I’ve just fitted Schwalbe Land Cruisers 700x40c to my hardtail 29er for the winter. They’re much lighter and cheaper than Marathon Plus. Personally I’d rather fix the odd puncture than ride a heavy tyre. I don’t do much mud-plugging, so don’t need a wide tyre. I don’t know what gearing these guys use on the 1000w motor to ride at over 35mph. I reckon I’d need a 54 chainring with an 11t smallest at the back to keep the cadence manageable. (100rpm = 40mph) I’d than have to fool the controller/display as mine has a 50kph limit……..trade off would then be lack of small enough gearing for hills. You could go 11 speed with a 11-42 cassette, you’d need a very long chain though, probably 120 links. But I agree, you’re getting into small motorcycle territory if you plan to ride at >35mph everywhere……….certainly need 180mm + discs, full suspension and 2.5″ tyres.
LikeLike
Pingback: Too Much Is Never Enough : Reprogram Your 50 Amp Luna Ludacris BBSHD Controller To Run At 60 Amps | ElectricBike-Blog.com
Is it really correct that the limit current (%) is just cutting of the power at a certain road speed? Isn´t it what it says ie a limit of the current in %. So if I set it to 50% at assist level 2 it will give me 50% of “limited current (A)” So 25A x 50% = 12,5A?
Also between the “limit current (%)” and the “limit spd (%) is the limiting factor what ever I reach first?
LikeLike
Yes, Limit current will limit the current to the controller.
Limit speed is the limit that the MOTOR will spin at (not the bike) so depending on your riding environment you may hit the limit speed first (going downhill) or limit current first (going uphill)
LikeLike
Thanks for quick reply!
My understanding of your text explaining it is different “Asst1 Limit Current(%): 52/20/52/10/52 – Power cut based on road speed at power level 1.” To me this says that setting this to for example 50% will cut the power once I reach 50% of the maximum road speed. Why does it not say “Power cut based on current at power level 1” Or even clearer “Power cut based on percentage of “Limited current” current at power level 1″
Maybe I am misunderstanding but I read that over and over again not understanding and then I read another forum where it was explained.
LikeLike
Hi Torben, I’ve set my BBS02 (36v 500w) to 100% Limit Speed (=Motor Speed) for each PAS level (1 through 9). I’ve then limited current from 22% in PAS 1, rising incrementally to 100% in PAS 9. I set Limit Current (A) to 16amps. (To protect the controller from going up in smoke. Stock is 25amps) I’ve set start current to 15%. Slow start mode to 4. Start up degree to 4. Work Mode to Undetermined. Time of Stop to 5. Current Decay to 8. Stop Decay to 0. Keep Current to 100%. I’ve done over 2000 miles on these settings. I live in a fairly hilly area and have climbed a few 20% gradients using these settings. I ride in PAS 3-5 most of the time. I removed the throttle. My average speed over the 2000 miles is 17.4 mph. I’ve averaged well over 20mph on several 50+ mile rides on the road (Pavement as they say in the US). The bikes top speed is only limited by the 50kph (31.25mph) upper limit imposed by the display version supplied with my motor. I can reach 50kph in PAS level 6 and above on the flat. This equates to a pedal cadence of 100rpm in top gear (42 Bling Ring x 11t). I’m 62 yrs old and these days I cant hold 100rpm for long!
Using the above settings the motor just keeps spinning as fast as the load permits ie slope and gearing (provided I pedal) with the only restriction being current. You’ll need to change down to climb hills keeping cadence above 80 rpm to reduce load on the controller and maybe go up a couple of PAS levels if you want to show off. I find that the bike behaves more like a cycle than a governed moped using these settings.
I’ve had no issues and I have range of around 3.5 hrs, roughly 70 miles provided I don’t use > PAS 6 or above. 18AH battery pack with the latest Samsung Cells. Bike is a 2004 Gary Fisher Hard Tail 29er. Paid £100 on ebay for it + £700 for the motor and battery. Beats ALL stock electric bikes into a cocked hat here in the UK including those costing over 5 times as much.
LikeLike
Thanks Chris. What you write makes sense but I cant see that matching Carls info. Example:
“Asst3 Limit Current(%): 64/30/64/30/64 – Power cut based on road speed at power level 3 if set to 9 power levels” especially “power cut based on road speed” seems incorrect. It is not based on road speed it is based on on a percentage of max current. Right?
LikeLike
Torben you are confused. Speed refers to the speed of the MOTOR not the road speed. The reason it is confusing is because the Chinese have very poor english.
When you set the current to 50% then only 50% of the total power rating will ever get to the motor in that PAS setting. If you set the speed limit to 50% then the power will roll back as the motor gets up to spinning at 50% of it’s fastest rotational speed.
LikeLike
I get what you are saying in our last reply but it does not match the explanation in the blog post.
Btw your blog is great and I´m not wanting to mark words or bash on your great work. i just want to understand and if something appears wrong it might be better for others if it is corrected. And of course I may be wrong but if I am I want to understand where my misunderstanding is.
Cheers
LikeLiked by 1 person
Hi Karl and thanks for this great article!
For starters some background info about my setup: I have the BBSHD motor and Rohloff IGH and I would like to both of them to last as long as possible.
So I already figured out that I could change the Start Current (%) to 1.
But could you (or someone else) explain a bit more about the parameter Slow-Start Mode (1-8) behavior. What does this do and how should I use it and not to use it? If I set the Start Current (%) to 1 what should the Slow-Start Mode (1-8) be?
It also says in the intro section that “Setting every PAS level to 100% is a terrible idea.” but the purple setting for every Asst Limit Spd(%) (where x is 0 to 9) is 100. Is this still ok? Does this mean that the motor will try to assist at certain power level limited by Asst Limit Current(%) (where x is 0 to 9) and there is no speed limit for the assistance? Is there any risk using it this way?
How can I make the throttle to work at PAS 0?
LikeLike
Start current and slow-start are two seperate variables that have different settings on the motor.
The Purple settings are Kepler’s setting which some people love, other people hate. It allows the motor to spin up to the highest RPM settings regardless of the PAS level (if it can). If you set it to PAS 1 and 100% Asst Limit Speed then even if the Asst current limit setting is much lower than 100 it will still spin at max RPMs if you are going down a steep hill for instance. Kepler limits the current with the Limit Amps setting which I totally do not recommend.
If you want the throttle to work at PAS 0 then use Karl’s special sauce )or any setting that sets 1% on both Limit Current and Limit Speed for Assist level 0 on page 1.
LikeLike
Okay thank you!
I’m still a bit confused about the Slow-Start Mode(1-8).
The description says “Controls how quickly the power ramps and how much it overshoots. If this variable is set too high the PAS start will be jerky, if set too low you risk blowing the controller as with Start Current above. If you are in too low of a gear to start and this variable is set too low it can blow the controller.”
Why is there a risk blowing up the controller if this value is set to low? Does low mean that the power ramp is increasing more rapidly or more slowly? From the description I get the feeling that the ramp is increasing more slowly when the value is lower. Is this true? Is yes, why the controller might blow more easily?
And if the value is high, does it mean that the ramp overshoots, then undershoots, again overshoots and keeps oscillating and this oscillation is the same as jerky feeling?
LikeLike
Has anyone burned up a BBSHD yet? I have a BBSHD with hotrod programming from lunacycle on a Fat Bike. My bike weighs 60lbs I weigh 270lbs. I keep it is PAS 1 all the time and when I go up a hill I mash the throttle when it starts getting difficult. This setup takes me all over the place and I never have to change gears. Am I safe to keep doing this. I noticed the motor was very hot to the touch yesterday when I got done riding for about 45 minutes.
LikeLike
Unless you have a Ludicrous controller it is unlikely that you will be able to fry the drive unit. I have not heard of anyone that has lost a drive unit with the stock controller.
LikeLike